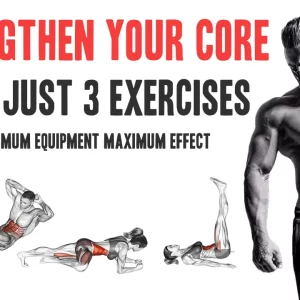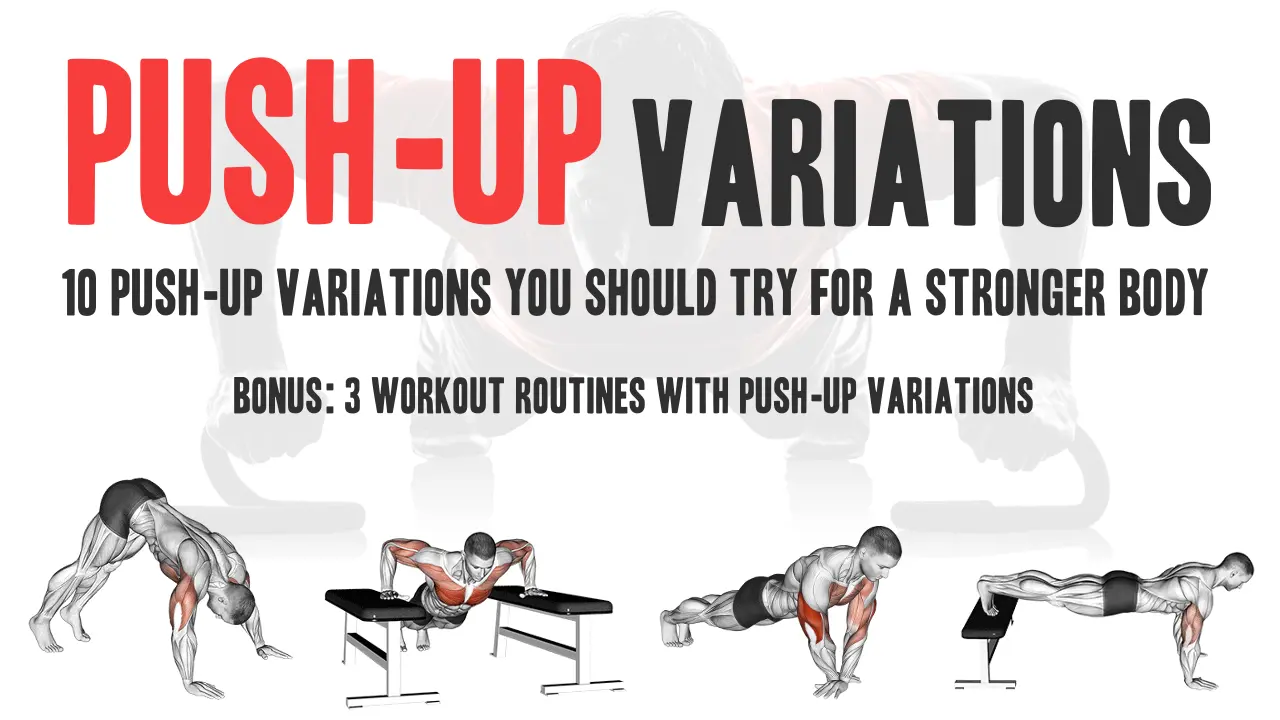
We’ve handpicked 10 push-up variations that comprehensively work your entire body, ensuring a well-rounded and challenging exercise experience. We’ll also show you how to create your own customized push-up workout by strategically combining these push-up variations. Whatever your fitness goals, our guide will give you the power to design a push-up routine tailored to your specific needs.
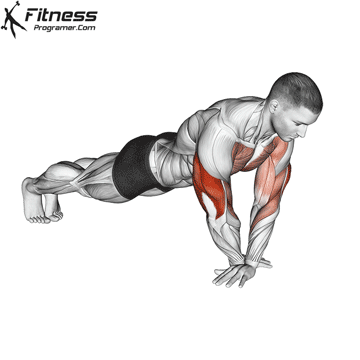
Push-ups are a classic exercise that has been a staple in fitness routines for decades. But we’re not here to discuss the standard push-up that you’ve probably mastered already. Instead, we invite you to embark on a journey into the world of diverse and dynamic push-up variations that will transform your entire body and redefine your fitness experience.
These push-up variations not only engage your chest muscles but also target your shoulders, triceps, explosive power, conditioning, and more. By incorporating these dynamic push-up variations into your fitness regimen, you can unlock your full-body strength, boost your cardiovascular fitness, and take your workout to the next level.
Here are 10 Push-up variations you should try for a stronger body:
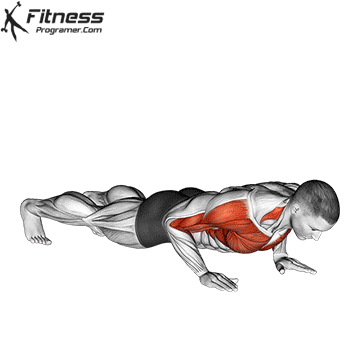
1- Diamond Push-up

Diamond Push-ups are a more difficult variant of standard push-ups and are made by lifting your body weight by joining your hands in a triangle. It provides a high level of performance by working other muscle groups to stabilize your body and gain strength.
It significantly targets the triceps muscles and also engages the inner chest and shoulder muscles. As it is an exercise that requires physical competence, it is not suitable for beginners.
How to do Diamond Push-Ups:
- Starting Position: Begin in a standard push-up position. Place your hands on the ground directly under your shoulders, but instead of having your hands shoulder-width apart, bring your thumbs and index fingers together to form a diamond shape with your hands. Your other fingers should be extended straight.
- Body Alignment: Ensure your body is in a straight line from your head to your heels. Engage your core muscles to maintain this alignment.
- Descent: Lower your chest towards the center of the diamond by bending your elbows. Keep your elbows close to your body as you lower yourself. Aim to get your chest as close to your hands as possible.
- Ascent: Push your body back up to the starting position by straightening your arms. Exhale as you push up.
- Repeat: Perform the desired number of repetitions, maintaining proper form throughout.
Beginners may find diamond push-ups quite challenging due to the increased triceps involvement. Start with a modified version on your knees (knee diamond push-ups) to build strength gradually.
Benefits of Diamond Push-Ups:
- Tricep Emphasis: Diamond push-ups are an excellent exercise for developing triceps strength and definition. The close hand positioning places a significant load on the triceps muscles.
- Inner Chest Focus: The unique hand placement in diamond push-ups activates the inner chest muscles more than standard push-ups. This can help improve the definition and strength of the inner chest area.
- Shoulder Activation: While the primary focus is on the triceps and inner chest, diamond push-ups also engage the anterior deltoid muscles in the shoulders, contributing to shoulder development.
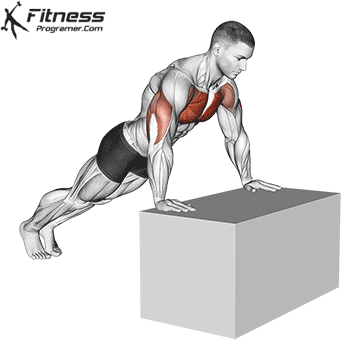
2- Bench Pike Push-Up
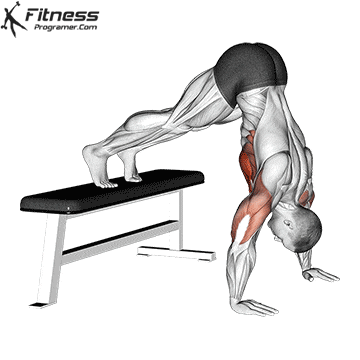
Pike push-up are a difficult variation of the standard push-up that emphasizes your shoulder muscles. The only equipment you’ll need is an bench or chair to elevate your feet.
How to do Bench Pike Push-Ups:
- Starting Position: Place your feet on the bench, raising your hips to create an inverted “L” shape with your body. This specific setup effectively targets the shoulder muscles.
- Maintaining Alignment: Ensure that your body forms a seamless straight line from your head down to your hips, keeping your hips elevated.
- Descending Action: Gradually bend your elbows as you lower your upper body toward the ground. Strive to bring your head as close to the floor as possible without making contact.
- Rising Up: With precision, push your body back up to the initial position by fully extending your arms.
- Repetition and Form: Execute the exercise for the desired number of repetitions while adhering to proper form. Focus on controlled and deliberate movements to optimize the engagement of your shoulder muscles and maintain the stability of your core.
Bench pike push-ups can be adapted to suit your fitness level. Beginners can start with easier push-up variations, such as placing their feet on a low surface or the floor.
Adding an explosive element to bench pike push-ups can significantly increase the challenge and intensity of the exercise, making it a great option for those looking to further advance their upper body strength and power. Start with regular bench pike push-ups to build strength and confidence before attempting the explosive variation.
Benefits of Bench Pike Push-Ups:
Pike push-up is effective on shoulder muscles. It will also emphasize your triceps muscles, upper back muscles and upper chest muscles. During a pike pushup, your core is also engaged to stabilize the torso.
Incorporating this variant of push-up into your exercise routine can help build additional strength, muscle mass and improve weak areas in your shoulders. Additionally, those who want to do handstand push-ups can use pike push-ups as a start.
3- Push-up Toe Touch
The Push-Up Toe Touch is a dynamic and challenging variation of the standard push-up that engages multiple muscle groups, including the pecs, triceps, shoulders, lower back, and core. It not only builds strength but also adds an element of balance and flexibility to the exercise.
How to do Push-Up Toe Touch:
- Starting Position: Begin in a standard push-up position with your hands on the ground, slightly wider than shoulder-width apart, and your toes on the floor. Your body should form a straight line from head to heels.
- Descent: Lower your chest towards the ground by bending your elbows, just like in a standard push-up. Keep your core engaged and your body in a straight line.
- Ascent: As you push your body back up to the starting position, simultaneously lift your right hand off the ground and reach it towards your left toes. Try to touch your left toe with your right hand.
- Return: Lower your right hand back to the ground as you bend your elbows to perform another push-up repetition.
- Repeat: Perform another push-up, and this time, lift your left hand and reach it towards your right toes. Alternate between right and left hand toe touches with each push-up repetition.
- Continue: Repeat the cycle for the desired number of repetitions or as part of your workout routine.
Benefits of Push-Up Toe Touch:
- Full-Body Engagement: Push-Up Toe Touch engages a wide range of muscle groups, including the chest, triceps, shoulders, core, and lower back. This makes it an efficient exercise for full-body strength development.
- Balance and Coordination: The toe touch aspect of the exercise requires balance and coordination, helping to improve these aspects of physical fitness.
- Cardiovascular Component: The combination of push-ups and toe touches can elevate your heart rate, making it suitable for inclusion in cardio workouts or high-intensity interval training (HIIT) routines.
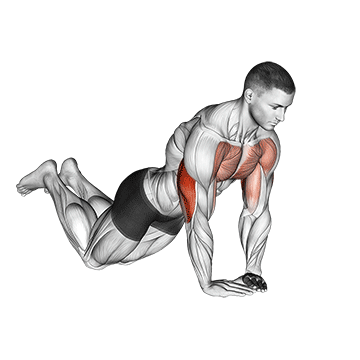
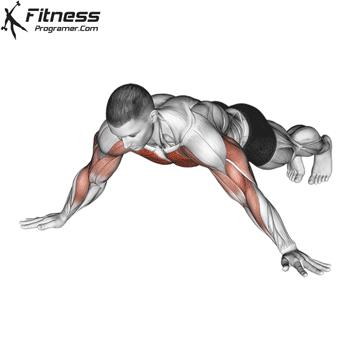
4- Cross Body Push-ups
Cross Body Push-Ups are an advanced push-up variation that not only target the chest and shoulders but also engage the triceps, hips, abdominal muscles, and obliques. This exercise involves a twisting motion and requires stability and core strength. Here’s how to perform Cross Body Push-Ups and some of their benefits:
How to do Cross Body Push-Ups:
- Starting Position: Begin in a standard push-up position with your hands on the ground, slightly wider than shoulder-width apart, and your toes on the floor.
- Descent: Lower your chest towards the ground by bending your elbows, just like in a standard push-up. Lower your body back down to the ground while keeping your leg extended and your torso twisted to the left.
- Twist and Extend: As you push your body back up to the starting position, simultaneously twist your torso to the left and extend your right leg out to the side. Try to touch your left knee with your right elbow.
- Return to Center: Align your body in a straight line as you return to the starting position.
- Repeat: Alternate between left and right leg extensions with each push-up repetition. Repeat the cycle for the desired number of repetitions or as part of your workout routine.
Benefits of Cross Body Push-Ups:
- Full-Body Engagement: Cross Body Push-Ups engage a wide range of muscle groups, including the chest, triceps, shoulders, core, hips, and obliques. This makes them an efficient exercise for full-body strength development.
- Triceps Emphasis: The twisting motion and leg extension force the triceps to work harder than in a standard push-up.
- Core Strengthening: The twisting and leg extension actions heavily engage the abdominal muscles and obliques, enhancing core strength and stability.
- Hip Mobility: Cross Body Push-Ups encourage hip mobility and flexibility due to the leg extension and rotation.
- Calorie Burn: The twisting and leg extension movements add an element of intensity, making Cross Body Push-Ups a suitable option for burning calories during a cardio session or high-intensity workout.
Adding cross body push-ups to a cardio session or crossfit workout can be a good option to burn more calories while strengthening you.
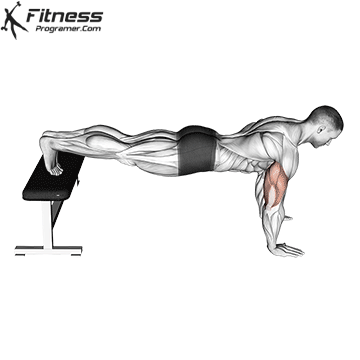
5- Drop Push-up

If you want to improve athletic strength, this exercise is for you.
Drop Push-up is one of the challenging push-up variations that helps build explosive power with body weight strength. These types of dynamic movements are often called plyometric exercises. Plyometrics exercises; They are explosive movements that increase speed, agility and power, and they work your whole body.
This exercise requires explosive power and should be approached with caution, especially if you’re new to plyometric training.
How to Perform Drop Push-up
- Setup: Place two sturdy benches or boxes parallel to each other so you can move at a comfortable distance.
- Starting Position: Get into a push-up position with your feet on the floor and your hands on the bench, positioned at a wide angle. Your hands should be slightly wider than shoulder-width apart. Your body should form a straight line from head to heels.
- Regular Push-Up: Begin with a regular push-up by lowering your chest toward the bench, bending your elbows.
- Landing: During the landing phase, take your hands off the bench and direct them toward the ground for a soft landing. Aim to land with your hands slightly bent to absorb the impact and protect your wrists.
- Return: After completing the push-up on the ground, explosively push yourself up with as much force as possible and place your hands back on the bench in the starting position.
- Repeat: Perform the exercise for the desired number of repetitions, focusing on explosive push-offs and a controlled return to the bench.
If you find this exercise difficult, you can start with Clap Push-Ups and gradually move to Drop Push-Ups as you gain strength and power.
Benefits of Drop Push-Ups:
- Upper Body Power: Drop Push-Ups help you develop explosive upper body power by combining the push-up motion with an explosive push-off from the ground.
- Strength and Speed: This exercise builds both strength and speed, making it valuable for athletes who require rapid upper body movements.
- Plyometric Training: The plyometric aspect of Drop Push-Ups enhances your ability to generate force and power quickly, which can translate into improved performance in various sports and activities.
- Full-Body Engagement: While the focus is on the upper body, Drop Push-Ups engage your core and lower body muscles to help stabilize your body during the explosive movements.
- Cardiovascular Endurance: Due to the explosive nature of the exercise, Drop Push-Ups can also elevate your heart rate and provide cardiovascular benefits when performed in a high-intensity workout.
6- Decline Push-up

Decline Push-Ups are a challenging push-up variation that target the upper chest, shoulders, and upper back muscles more intensely compared to regular push-ups. This exercise involves elevating your feet, which increases the angle of your body and places more emphasis on the upper part of the chest. If you’re new to this exercise, start with a lower elevation and gradually increase the height as you become more comfortable and stronger.
How to do Decline Push-Ups:
- Setup: You’ll need an elevated surface, such as a bench, step, or sturdy box. Assume a push-up position with your hands on the floor slightly wider than shoulder-width apart and your feet on the elevated surface behind you.
- Descent: Bend your elbows and lower your chest towards the ground, similar to a standard push-up. Keep your elbows at a 45-degree angle to your body.
- Ascent: Push your body back up to the starting position by straightening your arms. Your upper chest, shoulders, and triceps should be doing the majority of the work.
- Repeat: Perform the desired number of repetitions while maintaining proper form.
Benefits of Decline Push-Ups:
- Upper Chest Development: Decline Push-Ups place a greater load on the upper chest muscles (pectoralis major clavicular head), helping to build strength and definition in this area.
- Shoulder Engagement: While standard push-ups work the front deltoids, Decline Push-Ups intensify shoulder engagement, helping to develop the shoulders.
- Upper Back Activation: The decline angle also engages the upper back muscles, including the rhomboids and trapezius, which are responsible for shoulder blade stability.
- Triceps Emphasis: Like traditional push-ups, Decline Push-Ups engage the triceps, contributing to overall arm strength.
7- Incline Push-up
Changing the angle of your push-up can shift the emphasis from one muscle group to another, allowing you to target different parts of your chest and upper body. Decline push-ups and incline push-ups are effective push-up variations that alter the angle of the exercise to focus on specific muscle areas.
How to do Incline Push-Ups:
- Starting Position: Find a sturdy surface, such as a bench, box, step, or any elevated platform. Place your hands on the surface, slightly wider than shoulder-width apart. Step back and extend your legs, creating a diagonal line from head to heels.
- Descent: Lower your chest toward the elevated surface by bending your elbows. Keep your core engaged and maintain a straight line from head to heels.
- Ascent: Push your body back up to the starting position by straightening your arms. Exhale as you push up.
- Repeat: Perform the desired number of repetitions with control, focusing on proper form throughout the movement.
Benefits of Incline Push-Ups:
- Muscle Engagement: Incline push-ups target the lower part of the chest more intensely compared to standard push-ups. This is beneficial for achieving a balanced and well-developed chest.
- Beginner-Friendly: These push-ups are less challenging than standard push-ups, making them an excellent starting point for beginners who want to build the strength necessary for more advanced variations.
- Progression: As you become more comfortable with Incline Push-Ups, you can gradually progress to standard push-ups and more challenging variations.
By incorporating both decline and incline push-ups into your workout routine, you can ensure balanced development of your chest muscles. This helps create a well-rounded chest and upper body strength.
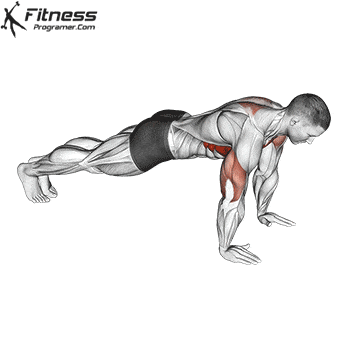
8- Cross Arm Push-up
Cross Arm Push-Ups are a challenging push-up variation that involves crossing your arms during the exercise. This exercise primarily targets the triceps and chest muscles while also engaging the front shoulder muscles (anterior deltoids). Due to its increased difficulty, it’s not recommended for beginners.
How to do Cross Arm Push-Ups:
- Crossover Hand Position: In this variation, your hands will be placed in a crossover position. Take your right hand and place it slightly to the left side of your chest, crossing over the centerline of your body. Your left hand should be placed slightly to the right side of your chest, crossing over the centerline and under your right hand. Your hands will be close together but in a staggered position.
- Descent: Bend your elbows and lower your chest towards the ground, as you would in a standard push-up. Keep your body in a straight line.
- Ascent: Push your body back up to the starting position by straightening your arms. Your chest and triceps should be doing the majority of the work.
- Repeat: Perform the desired number of repetitions with your hands in the crossover position.
Benefits of Cross Arm Push-Ups:
- Triceps Focus: Cross Arm Push-Ups emphasize the triceps, making them an effective exercise for triceps strength and development.
- Chest Engagement: While primarily targeting the triceps, this variation also engages the chest muscles, providing a well-rounded upper body workout.
- Front Shoulder Activation: The front shoulder muscles (anterior deltoids) are also worked during Cross Arm Push-Ups.
- Challenging Variation: Cross Arm Push-Ups add variety and challenge to your push-up routine, helping you progress and build upper body strength.
- Core Stability: Performing this exercise requires core stability to maintain proper form, contributing to improved core strength.
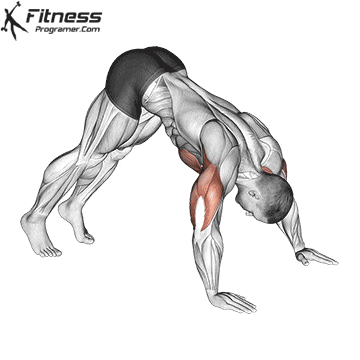
9- Hindu Push-up
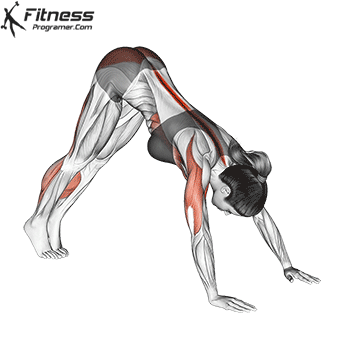
The Hindu Push-Up, also known as the “Dive Bomber Push-Up,” is a bodyweight exercise that combines elements of yoga and traditional push-ups. It is a dynamic and flowing push-up variation that works multiple muscle groups and increases flexibility, strength and mobility.
How to do the Hindu Push-Up:
- Start Position: Begin in a downward dog yoga pose with hands shoulder-width apart and feet hip-width apart.
- Descent (Dive Bomber Phase):
- Shift weight forward, lowering upper body while keeping arms straight.
- Move until chest nearly touches the ground with hips low and back arched.
- Look upward and forward, arching your back deeply.
- Ascent (Reverse Dive Bomber Phase):
- Push hips back and upward, head looking between legs.
- Bend elbows, lowering chest back to the start.
- Continue until back in the downward dog pose.
- Repeat: Do desired reps, smoothly transitioning between phases.
Benefits of Hindu Push-Ups:
- Full-Body Workout: Hindu Push-Ups engage multiple muscle groups in the upper body, including the chest, shoulders, and triceps. The overall dynamic movement pattern of Hindu Push-Ups challenges these muscle groups in a unique way, contributing to increased strength over time.
- Flexibility: The dynamic nature of this exercise enhances flexibility in the shoulders, back, and hips, making it a valuable addition to a stretching or yoga routine.
- Strength and Endurance: Hindu Push-Ups require a continuous and flowing movement, which means you are performing multiple repetitions without resting between them. This continuous effort builds muscular endurance. It helps your muscles adapt to sustained effort, making them less prone to fatigue during activities that require prolonged upper body exertion.
- Improved Posture: The Hindu Push-Up emphasizes maintaining a straight back and good form throughout the movement, which can help improve posture over time.
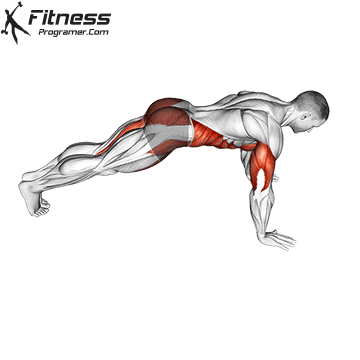
10- Archer Push-Up
The Archer Push-Up is an advanced push-up variation that targets the chest, shoulders, triceps, and core while also improving upper body strength and stability. This exercise involves a wide range of motion and emphasizes one side of the chest and shoulder at a time.
How to do Archer Push-Ups:
- Starting Position: Begin in a standard push-up position with your hands slightly wider than shoulder-width apart and your toes on the ground. Your body should form a straight line from head to heels. This is your initial position.
- Shift Weight to One Side: Choose one side to start with (let’s say the right side for this explanation). As you lower your body towards the ground, shift your weight to your left side. Your right arm should remain straight, and your left arm will bend as you perform the push-up.
- Lower Your Chest: As you lower your chest towards the ground, extend your right arm out to the side, perpendicular to your body. Keep your right hand flat on the ground.
- Push-Up: Push your body back up to the starting position by straightening your left arm while bending your right arm. Your left arm should remain close to your body.
- Repeat on the Other Side: After completing the push-up on the right side, shift your weight to the right side and extend your left arm out to the side as you lower your chest towards the ground. Perform a push-up on the left side by straightening your right arm while bending your left arm.
- Repeat Alternating Sides: Continue to alternate between right and left sides for the desired number of repetitions. Focus on maintaining proper form and control throughout the exercise.
Benefits of Archer Push-Ups:
- Chest and Shoulder Strength: Archer Push-Ups place a greater emphasis on one side of the chest and shoulder at a time, helping to build strength and balance between the two sides.
- Triceps Engagement: This exercise effectively targets the triceps, contributing to overall arm strength.
- Core Stabilization: To execute the Archer Push-Up with proper form, your core must work to maintain stability, leading to improved core strength.
- Functional Upper Body Strength: Archer Push-Ups mimic functional pushing movements and can be beneficial for real-world activities that require unilateral strength and stability.
- Variation: Adding Archer Push-Ups to your routine adds variety and challenge to your push-up workout.
Archer Push-Ups are an advanced exercise and may not be suitable for beginners. Ensure that you have a strong foundation in standard push-ups and good upper body strength before attempting this variation. Focus on proper form and control to maximize the benefits and reduce the risk of injury.
Create a Comprehensive Routine with Push-Up Variations
Creating a comprehensive push-up routine by incorporating various push-up variations can be an effective way to target different muscle groups and progressively challenge yourself. Below are sample routines that includes a variety of push-up variations to work on strength, endurance, and overall upper body development. Please remember to adapt the sets and reps to your personal fitness level and goals.
Beginner’s Push-Up Routine
Objective: This beginner’s push-up routine is designed to help you develop a solid foundation in push-up technique and gradually build upper body strength. It includes four different push-up variations to target various muscle groups.
- 5-10 minutes of light cardio (e.g., jumping jacks, jogging in place) to increase blood flow and prepare your muscles for exercise.
- Dynamic stretches for the upper body, including arm circles and shoulder rolls.
Push-up Workout Routine
Set 1: Standard Push-Ups
- Sets: 1-2
- Repetitions: 10-12
- Rest Interval: 30-60 seconds
Set 2: Pike Push-Ups
- Sets: 1-2
- Repetitions: 10-12
- Rest Interval: 30-60 seconds
Set 3: Incline Push-Ups
- Sets: 1-2
- Repetitions: 10-12
- Rest Interval: 30-60 seconds
Set 4: Decline Push-Ups
- Sets: 1-2
- Repetitions: 10-12
- Rest Interval: 30-60 seconds
- Stretching exercises for the chest, shoulders, triceps, and upper back to improve flexibility and aid in recovery.
Push-Up Routine for Strength and Condition
Objective: This routine combines push-up variations to enhance upper body strength while incorporating exercises that elevate your heart rate for cardiovascular fitness.
Set 1: Push-up Toe Touch
- Sets: 2-3
- Repetitions: 12-15
- Rest Interval: 30-60 seconds
Set 2: Cross Body Push-up
- Sets: 2-3
- Repetitions: 12-15
- Rest Interval: 30-60 seconds
Set 3: Hindu Push-Ups
- Sets: 2-3
- Repetitions: 12-15
- Rest Interval: 30-60 seconds
This routine combines push-up variations with cardiovascular elements to provide a comprehensive workout. Focus on proper form during each exercise, and maintain a steady pace to elevate your heart rate. Adjust the number of sets and repetitions based on your fitness level and how challenging the workout feels for you.
Explosive Power Routine with Push-Up Variations
Objective: This advanced push-up routine is tailored for individuals looking to take their upper body strength and power to the next level. It incorporates high-intensity push-up variations that demand explosive strength.
Note: This push-up variations focus on explosive power and strength development. The exercises are intense, and proper form and control are crucial to prevent injury. Rest adequately between sets to ensure you’re performing each repetition with maximal effort.
Set 1: Drop Push-Ups
- Sets: 3
- Repetitions: 5-6
- Rest Interval: 2-3 minutes
Set 2: Bench Pike Push-Ups (Explosive)
- Sets: 3
- Repetitions: 5-6
- Rest Interval: 2-3 minutes
Bench Pike Push-Ups (Explosive phase): In this version of bench pike push-ups, you’ll perform explosive push-ups to work on upper body power. Instead of pushing up to the starting position in a controlled manner, focus on explosively pushing your body back to the starting position. This variation emphasizes the explosive aspect of the movement and helps build power. To ensure safety during the exercise, it is advisable to position a sturdy object measuring 10-15 cm in height beneath each hand.
Safety Note: Ensure that you have a good foundation in push-up technique and have built sufficient upper body strength before attempting the advanced exercises in this routine. Explosive exercises can put additional strain on joints and muscles, so approach them with caution and consider working with a fitness professional if you’re unsure about your readiness for this level of training.