Contents
- 1. Bodyweight Squats (Legs and Glutes):
- 2. Push-Ups (Chest, Shoulders, and Triceps):
- 3. Plank (Core and Full-Body Stability):
- 4. Reverse Lunges (Legs and Glutes):
- 5. Glute Bridges (Lower Back and Glutes):
- 6. Burpees (Full-Body Cardio):
- 7. Bicycle Crunches (Core):
- 8. Superman (Lower Back and Upper Back):
- 9. Mountain Climbers (Core and Cardio):
- 10. Tricep Dips (Triceps and Shoulders):
- 11. High Knees (Cardio):
- 12. Side Bridge (Core, Obliques):
- 13. Russian Twists (Core, Obliques):
- 14. Inchworms (Full-body):
- 15. Diamond Push-Ups (Chest, Triceps, Shoulder):
Incorporating no-equipment full-body exercises into your fitness routine offers a multitude of benefits, from increased strength and muscle definition to improved balance, coordination, and calorie burn. Getting a full-body exercises doesn’t always require a gym membership or fancy equipment. In fact, you can achieve a comprehensive workout from the comfort of your own home with little to no equipment.
In this article, we’ll introduce you to some of the most effective full-body exercises that require minimal or no special equipment. Get ready to sculpt and strengthen your entire body without ever leaving your living room!
These no-equipment full-body exercises are effective and can be easily incorporated into your home workout routine. Mix and match these exercises to create your own full-body workout or follow a structured routine
1. Bodyweight Squats (Legs and Glutes):
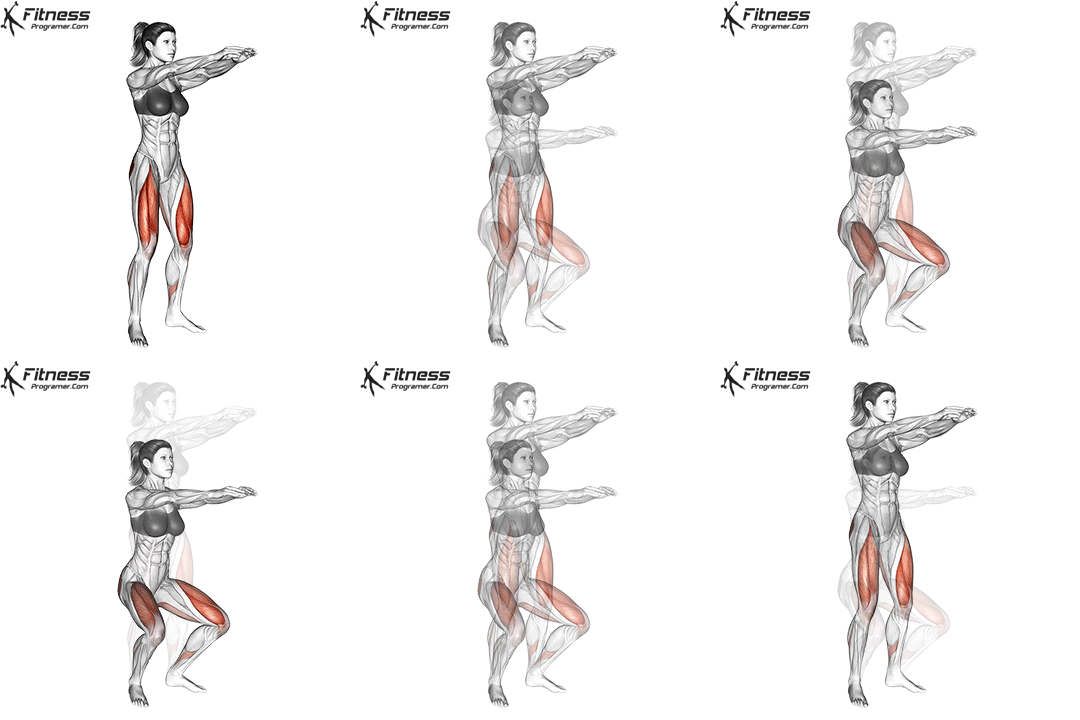
Bodyweight squats are an equipment-free full-body exercise that targets your lower body, specifically the quadriceps, hamstrings, glutes, and calves. They also engage your core and help improve balance and flexibility. Bodyweight squats are not only effective but also incredibly versatile, making them an excellent addition to any home workout routine.
Instructions:
- Starting Position:
- Stand with your feet shoulder-width apart.
- Keep your toes pointing slightly outward.
- Body Alignment:
- Maintain an upright posture with your chest up and shoulders back.
- Keep your core engaged throughout the exercise to support your lower back.
- Squatting Down:
- Initiate the movement by bending at your hips and knees simultaneously.
- Lower your body as if you’re sitting back into an imaginary chair.
- Keep your knees aligned with your toes and ensure they don’t go beyond your toes.
- Aim to go as low as your flexibility allows, ideally until your thighs are parallel to the ground or lower if possible.
- Squat Depth:
- Proper depth is essential. Going too low can stress your knees, and not going low enough may not engage your muscles effectively.
- Maintain Form:
- Throughout the movement, focus on keeping your back straight and chest up.
- Ensure your knees are in line with your toes, pointing in the same direction.
- Ascent:
- Push through your heels to return to the standing position.
- Straighten your hips and knees simultaneously.
- Exhale as you rise.
- Repetitions:
- Aim for 3 sets of 12-15 repetitions, or adjust the number based on your fitness level and goals.
- Difficult variations: Curtsy Squat, Split Jump Squat Jump, Jump Squat, Shrimp Squat
2. Push-Ups (Chest, Shoulders, and Triceps):
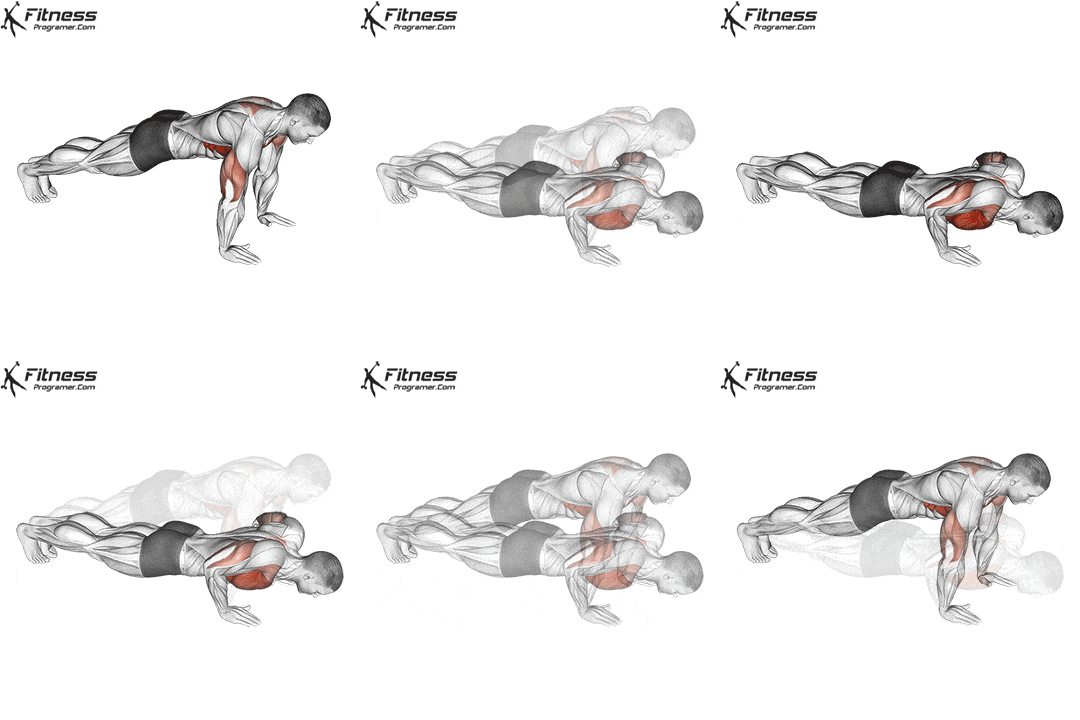
Push-ups are a classic full-body exercise that primarily targets your chest, shoulders, triceps, and core. They are incredibly effective and can be done virtually anywhere without any equipment.
Instructions:
- Starting Position:
- Begin in a plank position with your hands placed slightly wider than shoulder-width apart.
- Your wrists should be aligned with your shoulders.
- Keep your body in a straight line from head to heels, engaging your core muscles.
- Body Alignment:
- Maintain a neutral spine throughout the exercise.
- Avoid letting your hips sag or sticking your butt up in the air.
- Keep your head in line with your spine, looking slightly forward.
- Lowering Phase:
- Lower your body toward the ground by bending your elbows.
- Keep your elbows at an angle of approximately 45 degrees from your body.
- Lower your chest until it’s just above the ground, or as far as your strength allows.
- Keep your body in a straight line, and ensure your core remains engaged.
- Full Range of Motion:
- Aim to get your chest as close to the ground as possible without touching it.
- This full range of motion ensures you engage the target muscles effectively.
- Ascent:
- Push through your palms to straighten your arms, lifting your body back up to the starting position.
- Fully extend your elbows, but avoid locking them.
- Breathing:
- Inhale as you lower your body.
- Exhale as you push back up.
- Repetitions:
- Aim for 3 sets of 10-15 repetitions, or adjust the number based on your fitness level and goals.
- Difficult variations: Clap Push-up, Archer Push-up, Shoulder Tab Push-up
3. Plank (Core and Full-Body Stability):
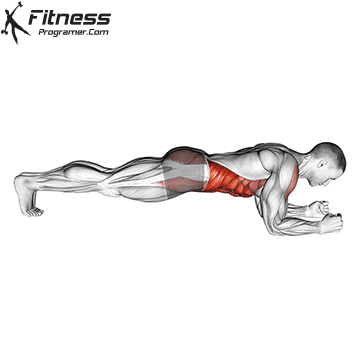
Planks are a highly effective full-body exercise that primarily targets your core muscles while also engaging your shoulders, back, and glutes. This static exercise helps improve core stability and endurance.
Instructions:
- Starting Position:
- Begin in a push-up position with your hands placed directly under your shoulders.
- Your wrists should be aligned with your elbows.
- Extend your legs straight, with your toes on the ground.
- Keep your body in a straight line from head to heels, engaging your core muscles.
- Body Alignment:
- Maintain a neutral spine throughout the exercise.
- Avoid letting your hips sag or sticking your butt up in the air.
- Keep your head in line with your spine, looking slightly forward.
- Holding the Plank:
- Hold this position, maintaining a strong and stable core.
- Focus on contracting your abdominal muscles, and keep your breathing steady.
- Start with a goal of holding the plank for 20-30 seconds.
- Progression:
- As you become more comfortable, aim to increase the duration gradually.
- Work toward holding a plank for 60 seconds or more, challenging your core muscles with time.
- Difficult variations: Plank Knee To Elbow, Front Plank With Arm And Leg Lift
4. Reverse Lunges (Legs and Glutes):
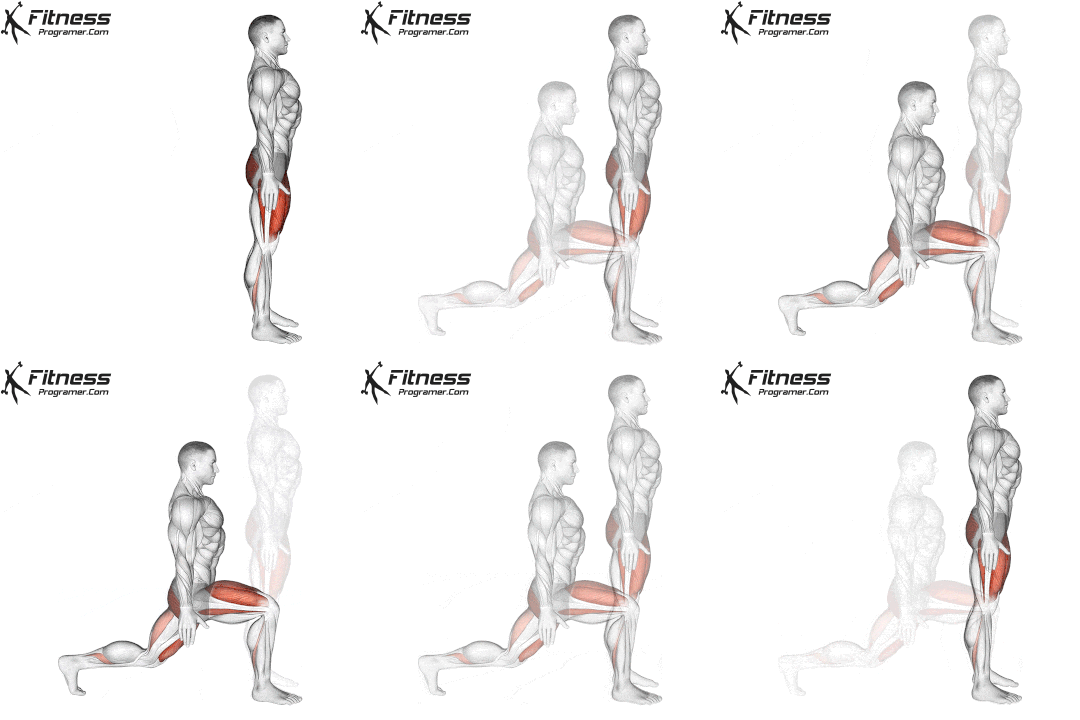
Reverse lunges are an equipment-free full-body exercise that primarily targets your lower body, including your quadriceps, hamstrings, glutes, and calves. They also engage your core and help improve balance and coordination. What’s great about reverse lunges is that they are gentle on the knees, making them an excellent choice for people of all fitness levels.
Instructions:
- Starting Position:
- Begin by standing up straight with your feet together.
- Keep your chest up and shoulders back for good posture.
- Step Backward:
- Take a controlled step backward with one leg.
- As you step back, simultaneously lower your body toward the ground.
- Lower Your Body:
- Bend both knees to lower your body.
- Your front knee should be directly above your ankle, and your back knee should hover just above the floor.
- Ensure your back remains straight, and your core is engaged.
- Maintain Posture:
- Keep your upper body upright throughout the movement.
- Avoid leaning too far forward or backward.
- Push Forward:
- Push through the heel of your front foot to return to the starting position.
- As you rise, engage your glutes and quadriceps to straighten your front leg.
- Alternate Legs:
- Complete the desired number of reps for one leg and then switch to the other leg.
- Aim for 3 sets of 12-15 reverse lunges on each leg.
5. Glute Bridges (Lower Back and Glutes):
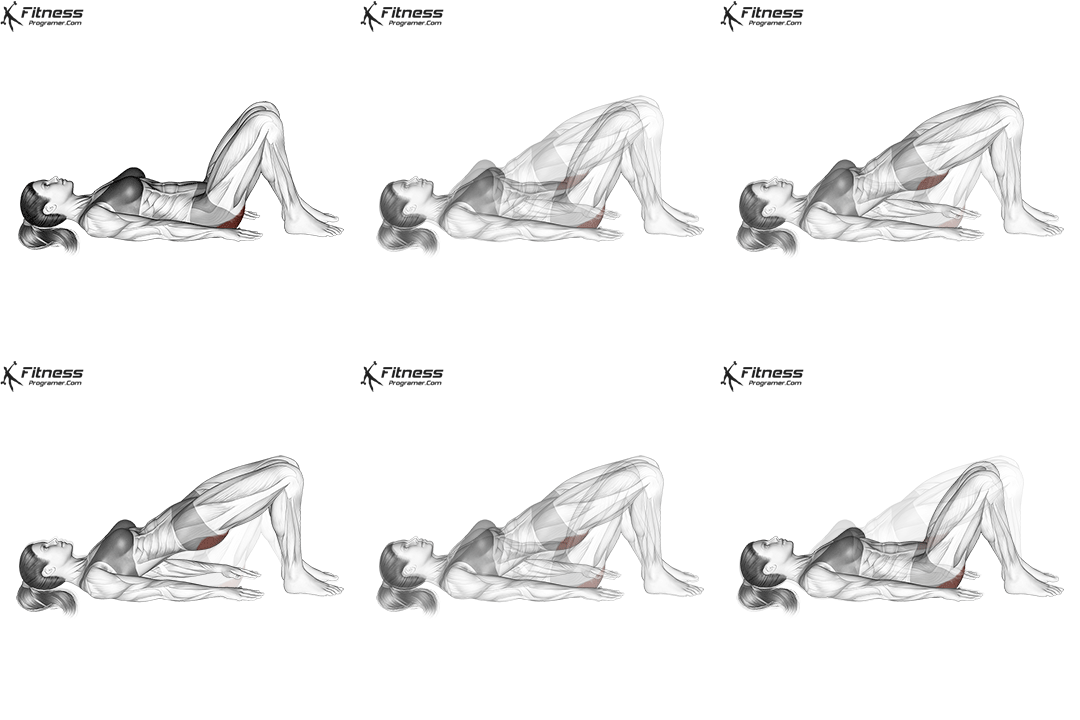
Glute bridges are an excellent full-body exercise that primarily targets the glutes, hamstrings, lower back, and core muscles. They are effective for building strength in the posterior chain while also helping improve hip stability and overall body posture.
Instructions:
- Starting Position:
- Begin by lying on your back on a comfortable exercise mat or the floor.
- Bend your knees and place your feet flat on the ground, hip-width apart.
- Keep your arms relaxed at your sides with your palms facing down.
- Body Alignment:
- Ensure your feet are positioned close enough to your buttocks that you can touch your heels with your fingertips when your arms are extended.
- Keep your feet, knees, and hips aligned in a straight line.
- Lift Your Hips:
- Press through your heels and engage your glutes and core muscles.
- Lift your hips off the ground, creating a straight line from your shoulders to your knees at the top of the movement.
- Squeeze your glutes at the peak of the bridge.
- Hold the Bridge:
- Hold the elevated position for a moment, maintaining tension in your glutes and core.
- Ensure your knees don’t splay outward; keep them aligned with your feet.
- Lower Your Hips:
- Lower your hips back down to the starting position in a controlled manner.
- Avoid letting your hips touch the ground between repetitions to keep the muscles engaged.
- Repetitions:
- Aim for 3 sets of 12-15 repetitions.
6. Burpees (Full-Body Cardio):
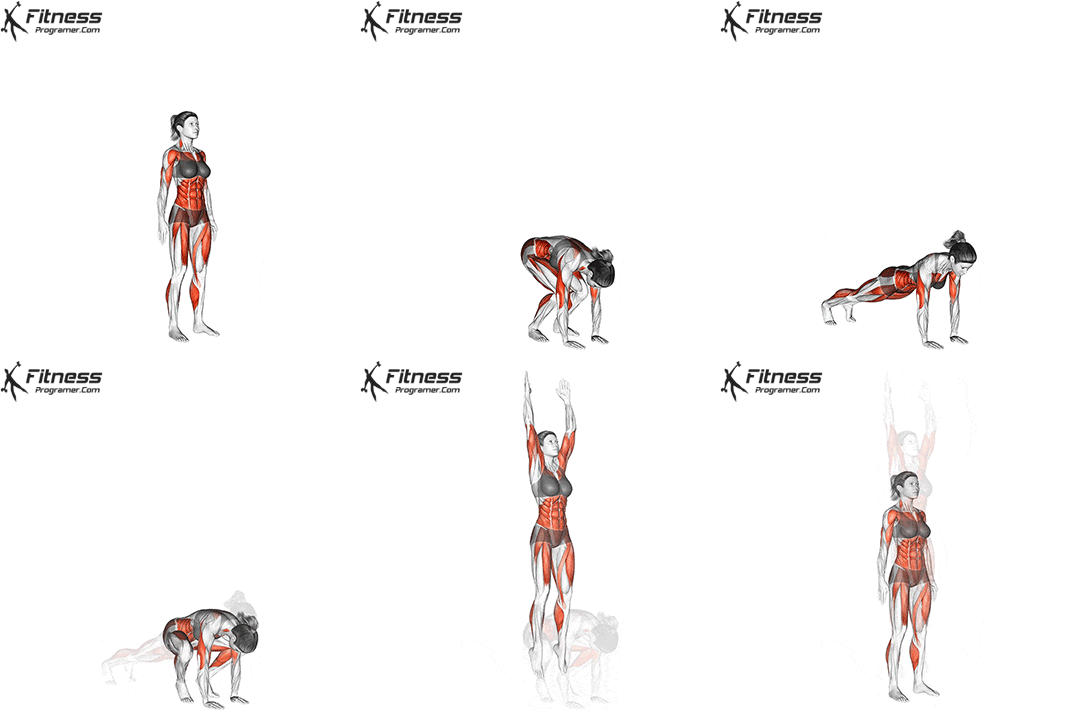
Burpees are a high-intensity, full-body exercise that combines elements of strength training and cardiovascular conditioning. They work multiple muscle groups and are excellent for burning calories, building strength, and improving overall fitness.
Instructions:
- Starting Position:
- Begin in a standing position with your feet hip-width apart.
- Keep your arms at your sides.
- Squat Down:
- Lower your body into a squat position by bending your knees and pushing your hips back.
- Place your hands on the floor in front of you, just outside your feet.
- Kick Your Feet Back:
- Kick both feet back behind you so that you are in a plank position.
- Your body should be in a straight line from head to heels, with your hands shoulder-width apart.
- Perform a Push-Up (Optional):
- If you want to intensify the exercise, you can include a push-up in the plank position.
- Lower your chest toward the floor, keeping your body in a straight line.
- Push back up to the plank position.
- Jump Your Feet Forward:
- Jump your feet back to the squat position, landing with your feet outside your hands.
- Explode Upward:
- Explode upward from the squat position, jumping as high as you can.
- Reach your arms overhead as you jump.
- Land and Repeat:
- Land softly with your knees slightly bent to absorb the impact.
- Immediately go back into the squat position to initiate the next repetition.
- Repetitions:
- Aim for 3 sets of 10-15 burpees, or adjust the number based on your fitness level and goals.
7. Bicycle Crunches (Core):
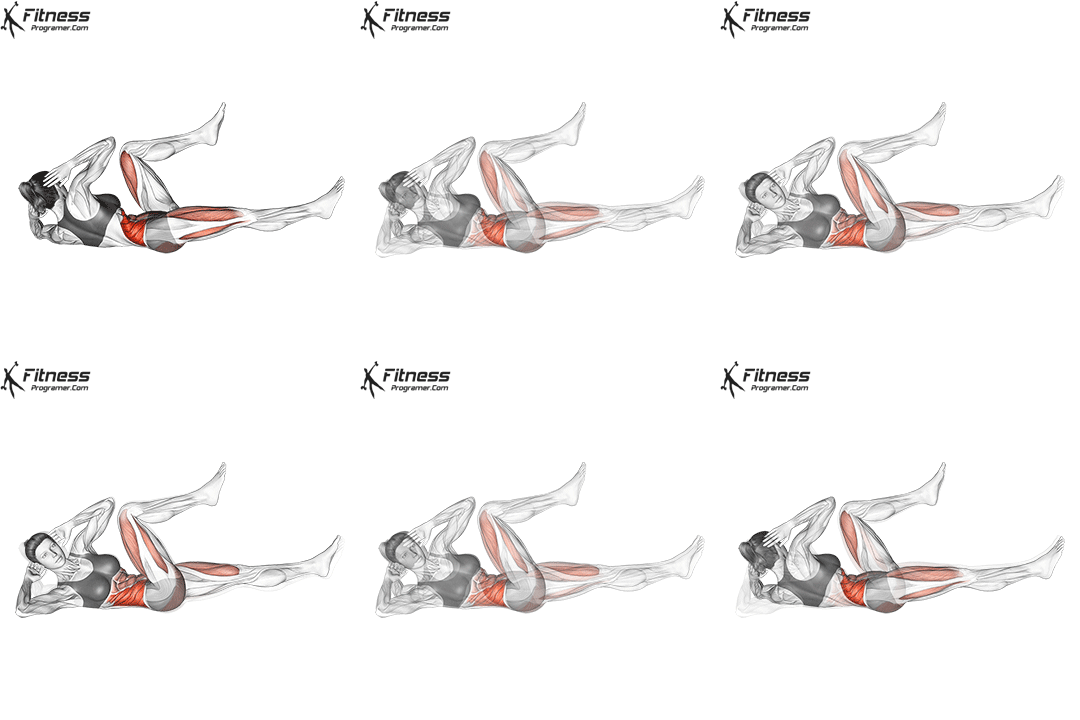
Bicycle crunches are an excellent abdominal exercise that targets the rectus abdominis (the “six-pack” muscles) while also engaging the obliques (the muscles on the sides of your core). They are a dynamic exercise that helps improve core strength and definition.
Instructions:
- Starting Position:
- Begin by lying flat on your back on an exercise mat or the floor.
- Place your hands behind your head, lightly supporting your neck with your fingertips.
- Bend your knees and lift your feet off the ground, so your thighs are perpendicular to the floor.
- Keep your lower back pressed into the mat or floor.
- Bicycle Motion:
- Lift your head, neck, and shoulders slightly off the ground, but avoid pulling on your neck with your hands.
- Start by bringing your right knee toward your chest while simultaneously twisting your torso to bring your left elbow toward your right knee.
- At the same time, extend your left leg straight, hovering it just above the ground.
- Alternate Sides:
- Reverse the motion by straightening your right leg while bringing your left knee toward your chest.
- Simultaneously, twist your torso to bring your right elbow toward your left knee.
- Continue to alternate sides in a pedaling motion, as if you were riding a bicycle.
- Breathing:
- Exhale as you twist and bring your elbow toward your knee.
- Inhale as you switch to the other side.
- Full Range of Motion:
- Focus on bringing your shoulder blades off the ground with each twist to fully engage your abdominal muscles.
- Try to touch your elbow to your opposite knee for maximum contraction.
- Repetitions:
- Aim for 3 sets of 15-20 bicycle crunches on each side.
8. Superman (Lower Back and Upper Back):
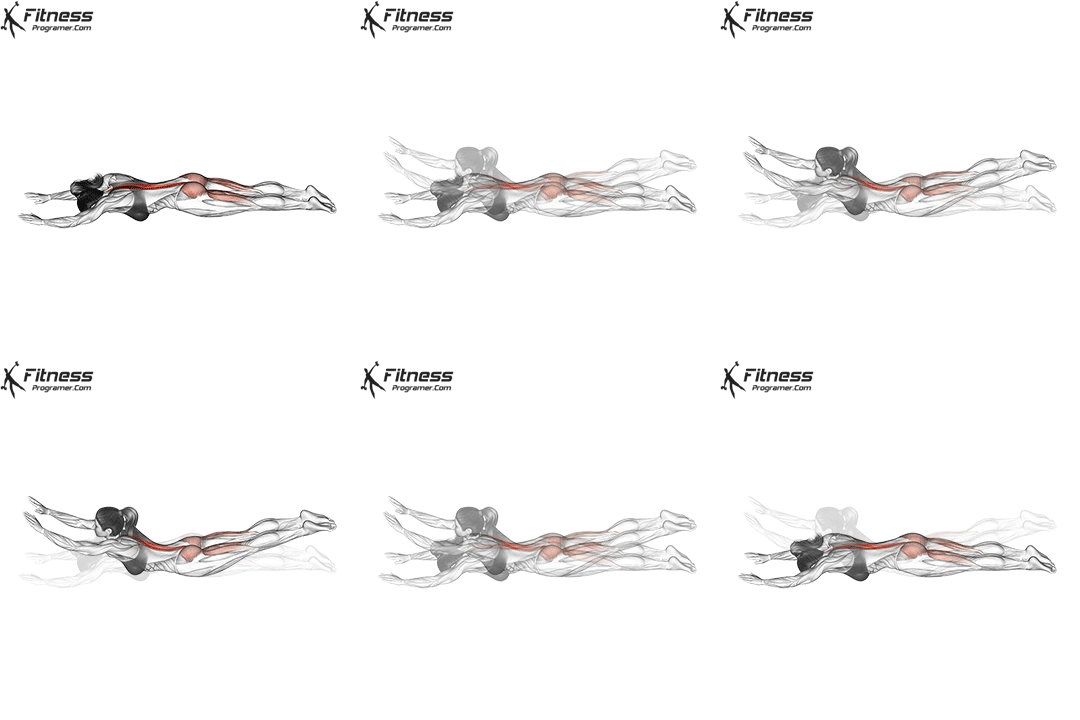
Supermans are a simple yet effective exercise that targets the muscles in your lower back, upper back, glutes, and shoulders. They help improve your posture and strengthen the muscles that support your spine.
Instructions:
- Starting Position:
- Begin by lying face down on an exercise mat or the floor.
- Extend your arms straight out in front of you, shoulder-width apart.
- Keep your legs straight and together, with your toes pointed downward.
- Body Alignment:
- Ensure your head is in a neutral position, looking down at the floor.
- Engage your core muscles to support your lower back.
- Lift Your Upper Body and Legs:
- Inhale as you simultaneously lift your chest, arms, and legs off the ground.
- Imagine you’re trying to create a “U” shape with your body.
- Keep your neck in a neutral position, and avoid straining your neck by looking forward.
- Hold the Superman:
- Hold the elevated position for a few seconds, squeezing your lower back muscles and glutes.
- Focus on contracting the muscles of your lower back and upper back.
- Lower Back Down:
- Exhale as you gently lower your chest, arms, and legs back down to the starting position.
- Maintain control and avoid slamming your body back onto the ground.
- Repetitions:
- Aim for 3 sets of 12-15 repetitions.
9. Mountain Climbers (Core and Cardio):
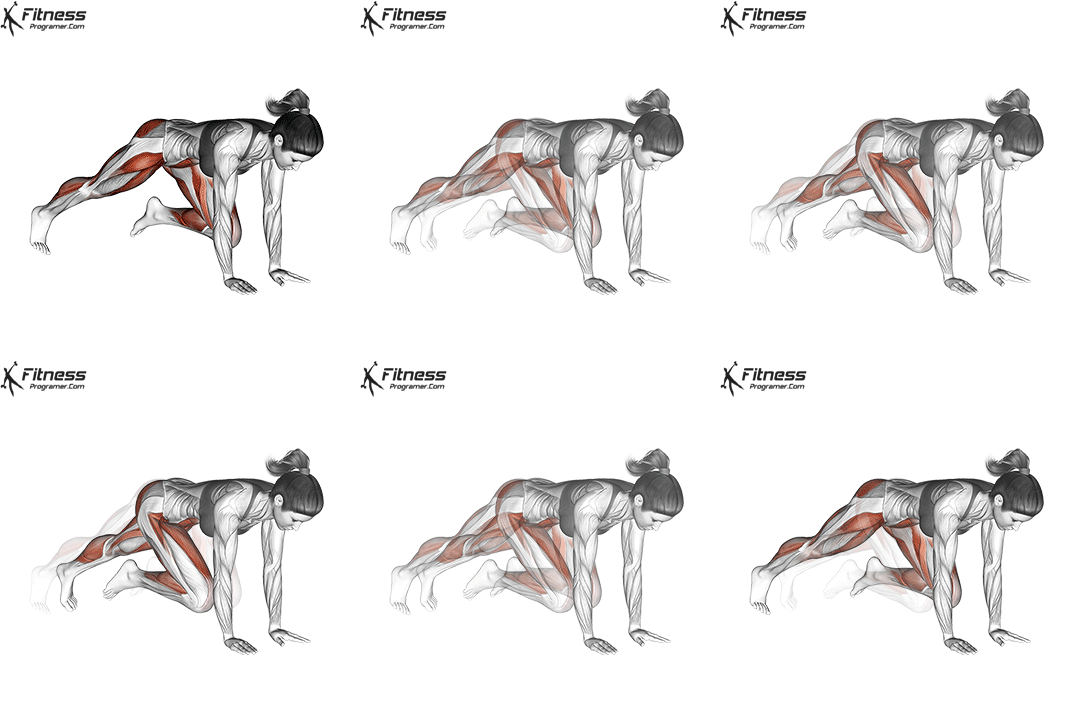
Mountain climbers are a dynamic full-body exercise that engages multiple muscle groups, including the core, shoulders, chest, arms, and legs. They also provide a cardiovascular workout, making them an effective addition to your fitness routine.
Instructions:
- Starting Position:
- Begin in a high plank position with your hands placed directly under your shoulders.
- Keep your wrists aligned with your elbows and your body in a straight line from head to heels.
- Engage your core muscles to maintain a stable plank position.
- Alternate Knee Drive:
- Start by bringing your right knee toward your chest while keeping your left leg extended.
- Use your core and hip flexor muscles to draw your knee in.
- Maintain a controlled and steady pace.
- Switch Legs:
- As you return your right foot to the plank position, immediately switch and bring your left knee toward your chest.
- Your legs should mimic a running motion while maintaining the high plank position.
- Continuous Motion:
- Continue to alternate between your right and left knees, moving as quickly as you comfortably can while maintaining proper form.
- Breathing:
- Breathe naturally as you perform the exercise, coordinating your breath with the knee drive.
- Repetitions:
- Aim for 3 sets of 30 seconds to 1 minute of mountain climbers.
10. Tricep Dips (Triceps and Shoulders):
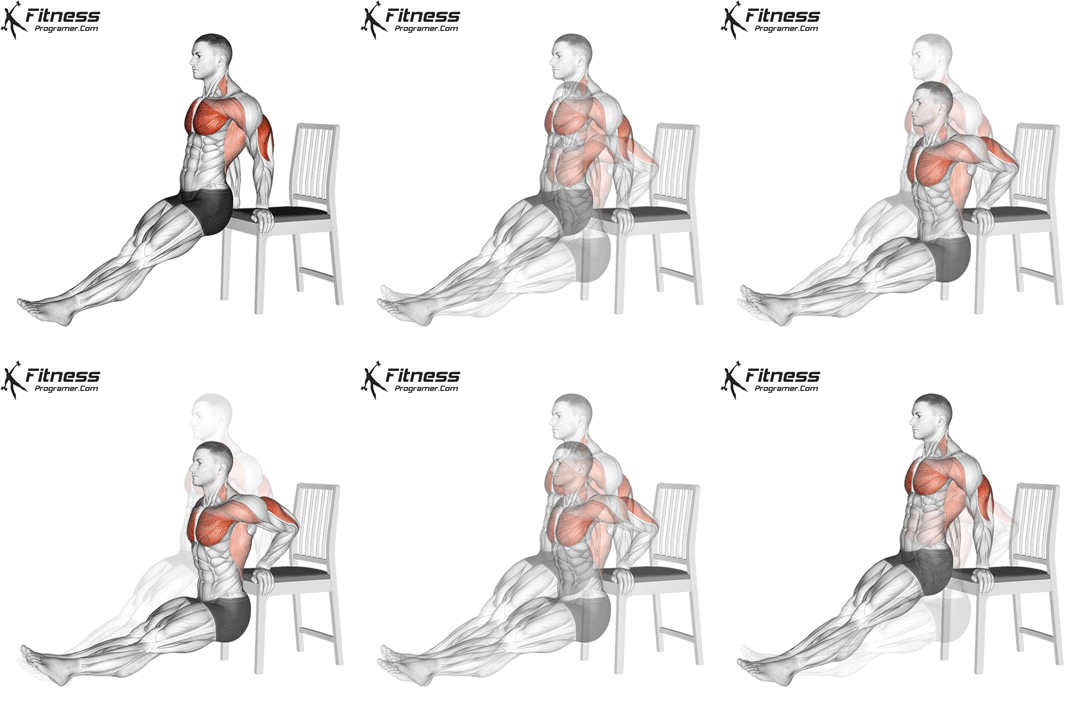
Chair dips are an effective no-equipment full-body exercise that targets your triceps and shoulders while also engaging your chest and core muscles. They are a fantastic way to build upper body strength and can be performed using a sturdy chair or any elevated surface, making them perfect for home workouts.
How to Perform Chair Dips:
- Find a Sturdy Surface:
- Locate a sturdy chair, bench, or any elevated surface that can support your weight without wobbling.
- Starting Position:
- Sit on the edge of the chair with your palms gripping the front edge.
- Keep your hands shoulder-width apart, fingers pointing forward.
- Extend your legs straight in front of you, heels on the ground, and feet hip-width apart.
- Slide your buttocks off the edge of the chair.
- Lower Your Body:
- Lower your body by bending your elbows, aiming to create a 90-degree angle at your elbows.
- Keep your back close to the chair and your chest lifted.
- Push Back Up:
- Push through your palms to straighten your arms and return to the starting position.
- Repetitions:
- Aim for 3 sets of 10-12 chair dips, or adjust the number based on your fitness level and goals.
11. High Knees (Cardio):
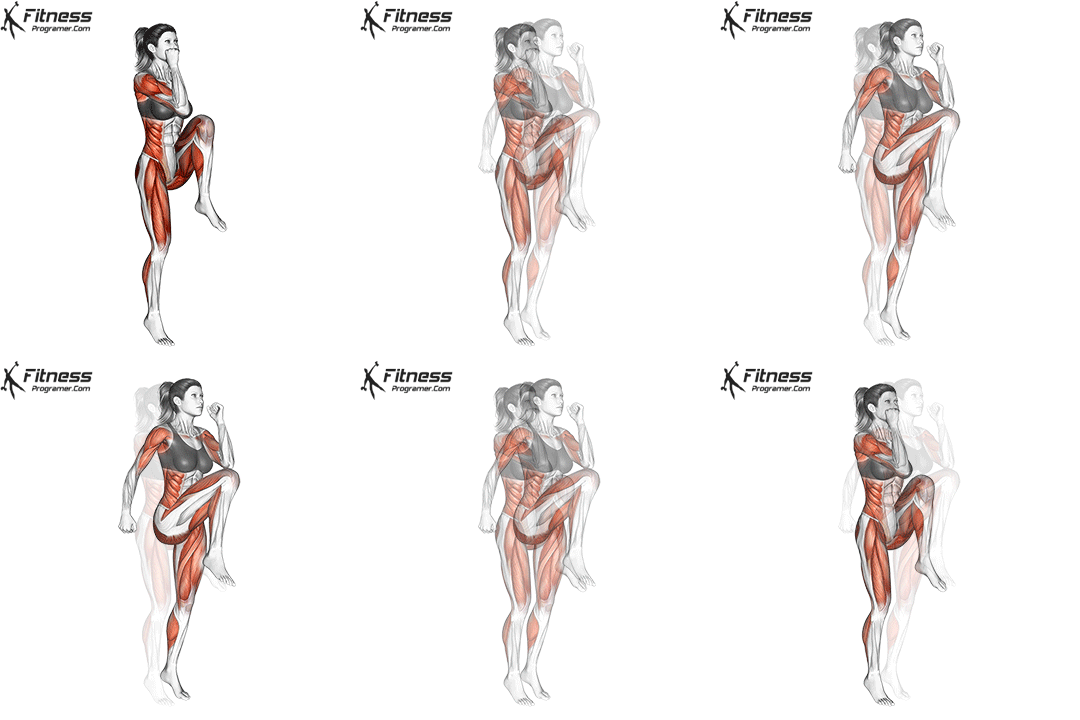
High knees are a dynamic no-equipment full-body exercise that serves as a great cardio workout while engaging your core, legs, and hip flexors. This exercise helps elevate your heart rate, improve endurance, and burn calories, making it an excellent addition to your home workout routine.
How to Perform High Knees:
- Starting Position:
- Begin by standing up straight with your feet hip-width apart.
- Keep your arms at your sides.
- Lift One Knee:
- Lift your right knee as high as possible while simultaneously raising your left arm, bent at the elbow, to waist level.
- Keep your core engaged to stabilize your upper body.
- Alternate Sides:
- Quickly lower your right leg and lift your left knee as high as possible while raising your right arm.
- Continue alternating knees and arms in a running motion.
- Pace and Breathing:
- Perform high knees at a brisk pace, aiming to lift your knees as high as possible with each repetition.
- Breathe naturally as you perform the exercise.
- Repetitions:
- Aim for 3 sets of 30 seconds to 1 minute of high knees, or adjust the duration based on your fitness level and goals.
12. Side Bridge (Core, Obliques):
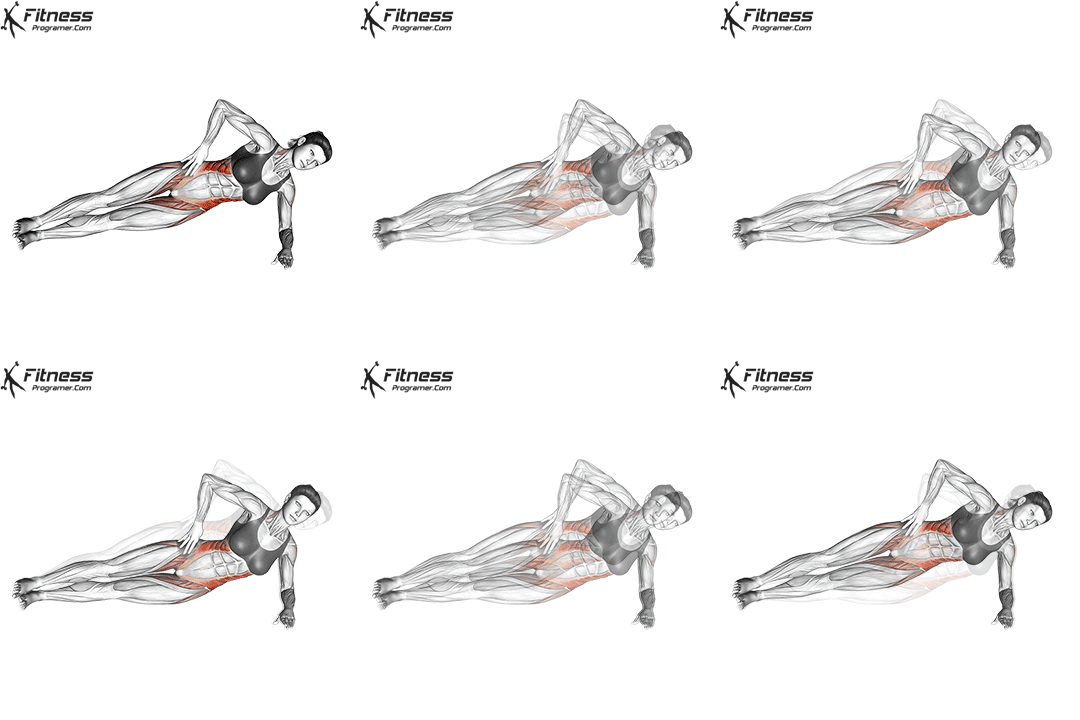
The side bridge, also known as the side plank, is a fantastic exercise that targets the muscles of the core, including the obliques (the muscles on the sides of your abdomen) and the muscles along your spine. It’s an effective exercise for building core strength, stability, and balance.
Instructions:
- Starting Position:
- Begin by lying on your side on an exercise mat or the floor.
- Position your elbow directly beneath your shoulder, so your forearm is flat on the ground.
- Stack your legs on top of each other, with your feet flexed and your hips and knees in alignment.
- Keep your body in a straight line from head to heels.
- Lift Your Hips:
- Engage your core muscles and lift your hips off the ground, creating a straight line from your head to your heels.
- Use your bottom arm for support by pressing your forearm into the ground.
- Keep your body in a straight line without letting your hips sag or rise too high.
- Hold the Side Bridge:
- Maintain this elevated position, balancing on your forearm and the side of your bottom foot.
- Keep your core engaged and breathe regularly.
- Aim to hold the side bridge for 20-30 seconds initially.
- Lower Your Hips:
- Gently lower your hips back down to the ground to complete one repetition.
- Rest briefly and then repeat the exercise for the desired number of repetitions.
- Switch Sides:
- After completing the set on one side, flip over and perform the side bridge on the other side.
- Repetitions:
- Aim for 3 sets of 20-30 seconds on each side.
- Difficult variations: Side Plank Oblique Crunch, Side Bridge Hip Abduction, Side Plank Leg Raise
13. Russian Twists (Core, Obliques):
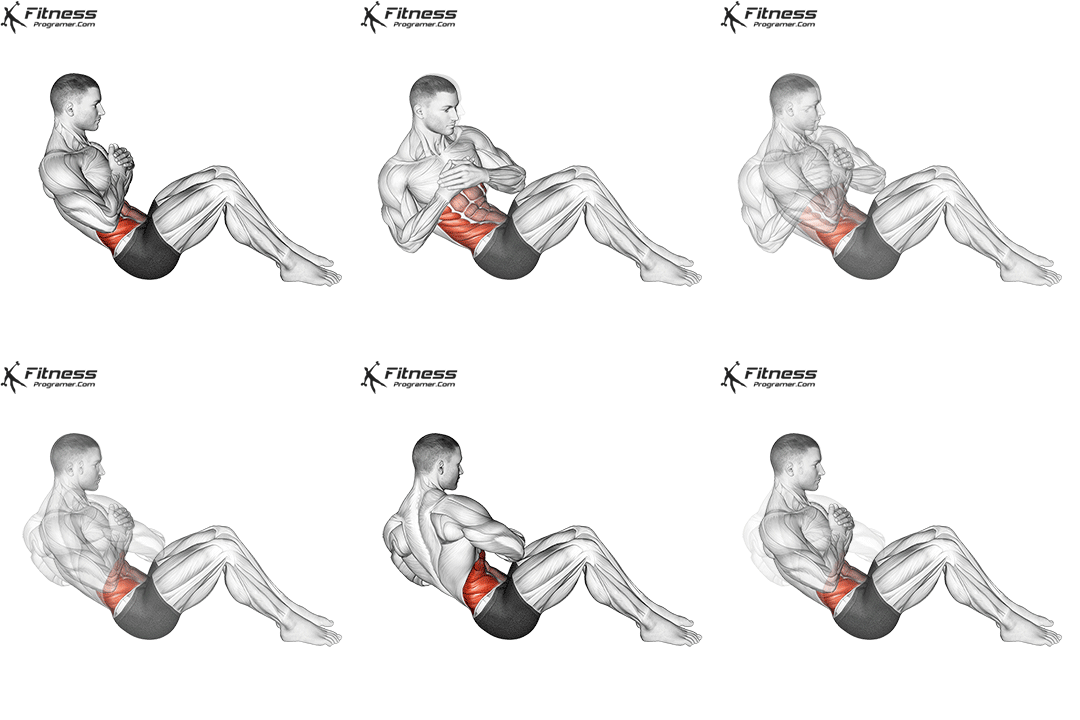
Russian twists are an effective core-strengthening exercise that targets the obliques (the muscles on the sides of your abdomen) and also engages the rectus abdominis (front of the abdomen) and lower back muscles. They are a great way to improve rotational stability and work on your overall core strength.
Instructions:
- Starting Position:
- Begin by sitting on the floor or an exercise mat with your knees bent and your feet flat on the ground.
- Keep your back straight and your chest lifted.
- Sit at a 45-degree angle to the floor, leaning slightly back but not rounding your lower back.
- Hand Placement:
- Extend your arms straight out in front of you and clasp your hands together.
- Twist to One Side:
- Engage your core muscles and twist your torso to one side (e.g., to the right).
- Try to touch your clasped hands to the floor beside your hip.
- Return to Center:
- Slowly return to the starting position with your hands in front of you.
- Twist to the Other Side:
- Twist your torso to the other side (e.g., to the left) and touch your hands to the floor beside your other hip.
- Continuous Motion:
- Continue alternating sides in a controlled manner, creating a twisting motion.
- Focus on your core muscles and engage your obliques to perform the rotation.
- Breathing:
- Exhale as you twist to each side.
- Inhale as you return to the center position.
- Repetitions:
- Aim for 3 sets of 15-20 Russian twists on each side, or adjust the number based on your fitness level and goals.
14. Inchworms (Full-body):
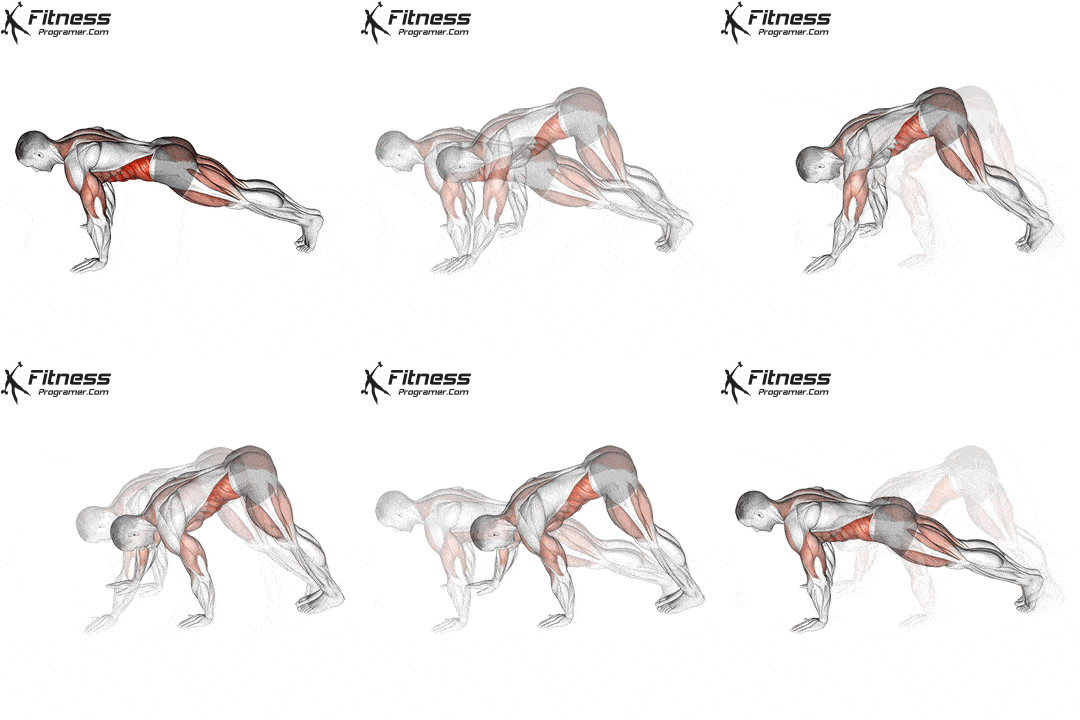
Inchworms are a full-body exercise that primarily targets your core, hamstrings, and upper body while also improving flexibility and mobility. They are a dynamic movement that can be incorporated into your warm-up routine or used as a standalone exercise to engage multiple muscle groups.
Instructions:
- Starting Position:
- Begin by standing up straight with your feet hip-width apart.
- Keep your arms at your sides.
- Bend at the Hips:
- Bend forward at your hips, keeping your legs straight, as you reach your hands toward the floor.
- Lower your hands as far as your flexibility allows while keeping your knees straight. You may need to bend your knees slightly if you have tight hamstrings.
- Walk Out:
- Once your hands are as close to the floor as you can comfortably reach, walk your hands forward on the ground.
- Continue walking your hands away from your feet until you’re in a high plank or push-up position.
- Hold the Plank:
- Once you reach the high plank position, maintain a strong and stable core.
- Keep your body in a straight line from head to heels.
- Walk Back In:
- From the high plank position, walk your hands back toward your feet.
- As you walk your hands in, keep your legs as straight as possible.
- Stand Up:
- Once your hands are back near your feet, stand up straight by extending your hips and returning to the starting position.
- Repetitions:
- Aim for 3 sets of 8-10 inchworms, or adjust the number based on your fitness level and goals.
15. Diamond Push-Ups (Chest, Triceps, Shoulder):
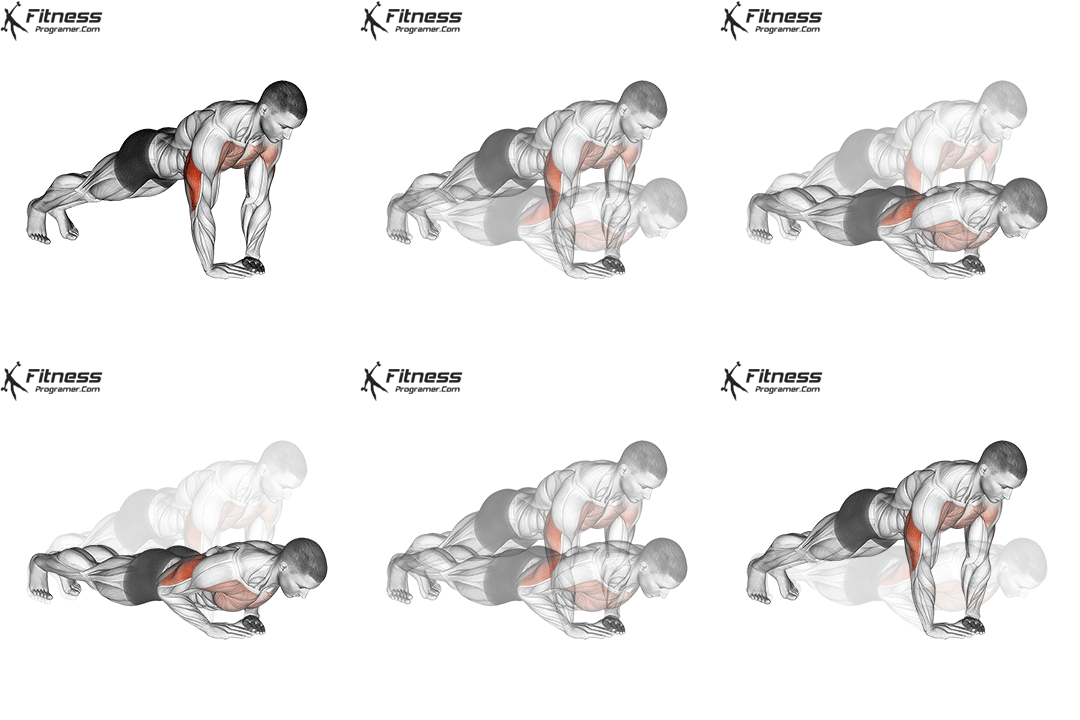
Diamond push-ups, also known as close-grip push-ups, are a challenging no-equipment exercise that primarily targets your triceps and chest muscles while engaging your shoulders and core. This variation of the classic push-up adds an extra level of intensity, making it an effective upper body strength-building exercise.
Instructions:
- Starting Position:
- Begin in a high plank position with your hands directly under your shoulders.
- Your arms should be close together, with your thumbs and index fingers forming a diamond shape on the floor.
- Keep your legs extended, toes on the ground, and your body in a straight line from head to heels.
- Engage your core and maintain a neutral spine.
- Lower Your Body:
- Lower your chest toward the diamond shape you’ve created by bending your elbows.
- Keep your elbows close to your body as you lower yourself.
- Aim to bring your chest as close to the diamond as possible without touching it.
- Full Range of Motion:
- Ensure you go through a full range of motion by lowering your chest until it’s just above the diamond shape on the floor.
- Push Back Up:
- Push through your palms to extend your arms and return to the starting position.
- Fully extend your elbows without locking them.
- Breathing:
- Inhale as you lower your body.
- Exhale as you push back up to the starting position.
- Repetitions:
- Aim for 3 sets of 10-12 repetitions, or adjust the number based on your fitness level and goals.
Notes:
- Adjust the number of repetitions and sets based on your fitness level and goals. Beginners can start with fewer reps and sets and gradually increase them over time.
- Maintain proper form throughout each exercise to prevent injury and maximize results.
- Ensure you have proper rest between sets to recover and maintain good form.
- Stay hydrated throughout your workout, and listen to your body. If you experience pain or discomfort beyond normal muscle fatigue, stop the exercise and consult a fitness professional.
Conclusion:
You don’t need a gym or expensive equipment to work your entire body effectively. These full-body exercises can be done at home, allowing you to maintain your fitness routine conveniently. Combine these exercises into a workout routine that suits your fitness level and goals, and you’ll be on your way to a stronger, healthier you in no time.

