
Overview
The Burpee Long Jump is an advanced, full-body plyometric conditioning exercise that combines the explosive power of a burpee with the athleticism of a broad jump. It challenges the entire body—building muscular endurance, cardiovascular stamina, and explosive power simultaneously. This movement is often used in high-intensity interval training (HIIT), CrossFit workouts, athletic conditioning, and military-style workouts.
How to Perform the Burpee Long Jump
Starting Position:
Stand tall with feet shoulder-width apart.
Keep your core braced and arms relaxed at your sides.
Burpee Phase:
Drop into a squat position and place your hands on the floor in front of you.
Jump or step your feet back into a high plank position.
Perform a push-up (optional but common in this variation).
Return to Squat:
Jump or step your feet forward so they land just outside your hands.
Keep your chest lifted as you prepare to jump.
Long Jump Phase:
Swing your arms backward, then explosively jump forward as far as possible.
Land softly with knees bent and weight distributed evenly.
Reset:
Turn around or walk backward to your starting point.
Repeat for the desired number of reps or distance.
Tips for Proper Form
Land quietly with bent knees to protect your joints.
Keep your core tight during the push-up and jump phases.
Use your arms for momentum in the long jump.
Focus on quality jumps, not just distance.
Common Mistakes to Avoid
Collapsing the lower back during the plank/push-up.
Landing stiff-legged, which increases injury risk.
Rushing through the burpee phase without control.
Letting the knees cave inward on the long jump landing.
Benefits of Burpee Long Jump
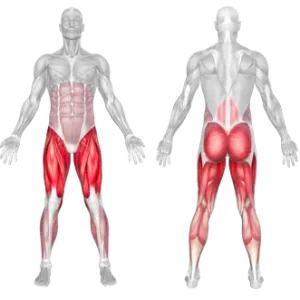
- Explosive Lower-Body Power: The long jump component activates fast-twitch muscle fibers in the glutes, quads, and hamstrings, improving sprinting, leaping, and athletic performance.
- Full-Body Strength Development: Combining a burpee with a push-up and jump engages the chest, shoulders, triceps, core, and lower body, creating a total-body strengthening effect.
- Cardiovascular Endurance: The constant transition between plank, squat, and jump elevates the heart rate, improving conditioning and VO₂ max.
- Functional Athleticism: Mimics real-life movement patterns involving squatting, pushing, and jumping, making it a staple for athletes who need agility and explosiveness.
- High Calorie Expenditure: Because it recruits multiple large muscle groups simultaneously, it’s highly effective for fat loss and metabolic conditioning.
- Improved Coordination and Mobility: The multi-step sequence challenges timing, balance, and joint mobility in the hips, knees, and ankles.
How to Incorporate Into Your Routine
Beginners: Perform standard burpees first; once proficient, add the long jump.
Power Training: 3–4 sets of 6–8 controlled reps (focus on explosive jumps).
Functional Training: Include in obstacle-course prep or athletic drills.
Circuit Training: Combine with push-ups, lunges, and sprints for conditioning.
General Fitness: 2–3 sets of 30–45 seconds for endurance.
Mobility: Use as a dynamic warm-up drill (fewer reps, focus on control).
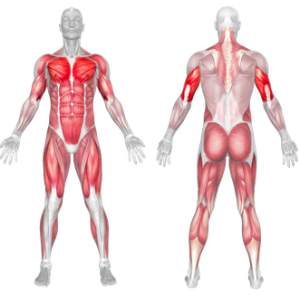
Burpee Long Jump: Muscles Worked
Frequently Asked Questions
Is the push-up mandatory in a Burpee Long Jump?
No, the push-up is optional. Including it makes the exercise more challenging and upper-body focused, while skipping it emphasizes conditioning and lower-body power.
How far should I jump in the long jump portion?
Focus on safe, controlled landings rather than maximum distance. Over time, your explosive strength will naturally increase your jump length.
Can beginners perform this exercise?
It’s best suited for intermediate to advanced trainees. Beginners should first master squats, push-ups, and standard burpees before progressing.
How many calories does a Burpee Long Jump burn?
Depending on body weight and intensity, it can burn 10–15 calories per minute, making it an effective fat-burning tool when done in intervals.
Is the Burpee Long Jump safe for the knees?
Yes, if performed with proper landing mechanics—knees bent, hips back, and feet shoulder-width apart. Those with existing knee issues should opt for standard burpees or reduce jump distance.
Can I replace regular cardio with this exercise?
Burpee Long Jumps provide intense conditioning but should supplement, not fully replace, steady-state cardio for well-rounded fitness.
Overview
The burpee with push-up is a high-intensity, full-body exercise that combines a traditional burpee with a push-up at the bottom of the movement. This variation not only challenges cardiovascular endurance but also develops upper-body and core strength. It is a staple in conditioning workouts, HIIT sessions, and military-inspired training programs.
How to Perform the Burpee with Push-Up
Starting Position: Stand tall with feet shoulder-width apart, arms at your sides.
Squat Down: Lower into a squat and place your hands flat on the ground in front of you.
Kick Back: Jump your feet backward into a high plank position, keeping your body in a straight line.
Push-Up: Perform a controlled push-up, lowering your chest toward the ground and pressing back up.
Return: Jump your feet forward back into the squat position.
Explosive Jump: Drive upward into a vertical jump, reaching overhead.
Repeat for the desired number of reps or time.
Tips for Proper Form
Keep your core engaged during the plank and push-up to prevent lower back sagging.
Land softly on the jump to reduce joint stress.
Perform the push-up with controlled movement; avoid letting your chest collapse.
Breathe rhythmically: inhale during the push-up, exhale as you jump.
Common Mistakes to Avoid
Dropping hips during the plank or push-up, which can strain the lower back.
Skipping the jump and rushing through reps without maintaining intensity.
Shallow push-ups that reduce upper-body engagement.
Poor landing mechanics, such as stiff knees or excessive heel striking.
Benefits of the Burpee with Push-Up
Builds explosive power through the squat-to-jump transition.
Enhances cardiovascular endurance by engaging large muscle groups continuously.
Strengthens upper body and core with the added push-up.
Burns a high number of calories, making it ideal for fat loss programs.
Improves athletic conditioning, agility, and resilience under fatigue.
How to Incorporate Into Your Routine
Beginners: 3–4 sets of 5–8 reps, focusing on controlled movement.
Hypertrophy: Using a weighted vest or dumbbells, do 3-5 sets of 8-12 controlled repetitions.
Explosive Power: Add a weighted vest or combine with other plyometric exercises.
Functional Training: Use in circuit workouts with other bodyweight moves.
HIIT / Conditioning: Perform 20–40 seconds of max-effort burpees, rest 20–30 seconds, repeat for 6–8 rounds.
General Fitness: Add at the end of workouts as a finisher for conditioning and calorie burn.
Mobility/Active Recovery: Perform modified versions without the jump to reduce joint stress.
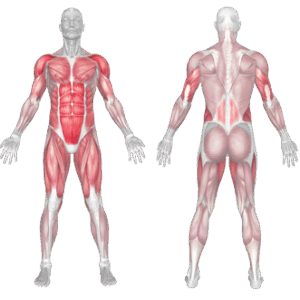
Burpee With Push-up: Muscles Worked
Frequently Asked Questions
Is the burpee with push-up good for fat loss?
Yes. It is a calorie-intensive, full-body movement that elevates heart rate and burns fat effectively.
Can beginners do burpees with push-ups?
Beginners should first master the basic burpee and push-up separately before combining them.
How many burpees with push-ups should I do?
Start with 3–4 sets of 5–10 reps and progress to timed intervals (20–40 seconds) for conditioning.
How many calories does a burpee with push-up burn?
Depending on intensity and fitness level, it can burn approximately 10–15 calories per minute.
Do burpees build muscle?
While burpees primarily improve conditioning, the push-up component provides upper-body muscle endurance. For hypertrophy, pair them with strength training.
Is it safe for people with joint issues?
Those with knee, shoulder, or lower back pain should modify the movement (e.g., no jump, incline push-up) or avoid until cleared by a professional.
Overview
The bear crawl is a functional bodyweight exercise that improves core stability, coordination, and total-body strength. It’s a quadrupedal locomotion model where you move forward (or backward) on your hands and feet while keeping your knees off the ground.
This low-impact movement challenges muscles from shoulders to hips while promoting better movement control. It mimics the natural contralateral movement pattern seen in crawling and is often used in athletic warm-ups, military-style training, mobility drills, functional fitness, and conditioning workouts.
How to perform Bear Crawl
Begin on all fours, with hands under shoulders and knees under hips.
Lift your knees slightly off the ground, keeping them bent about 2–3 inches above the floor.
Brace your core and maintain a flat back throughout the movement.
Move forward by stepping your right hand and left foot forward simultaneously, then your left hand and right foot.
Continue for the desired distance, keeping hips low and body aligned.
Tips for Proper Form
Keep knees close to the ground for optimal core engagement.
Move slowly and deliberately to control your body position.
Maintain a neutral spine, avoiding any sagging or arching.
Minimize torso rotation for better core activation.
Breathe steadily to maintain tension without fatigue.
Common Mistakes
Hips rising too high, which reduces core involvement.
Losing alignment, causing the spine to sag or twist.
Moving too quickly, sacrificing control and stability.
Letting knees drift too far forward or out from under the hips.
Not bracing the core, leading to poor control and compensation.
Benefits of the Bear Crawl
Improves Core Stability: Engages deep abdominal muscles and spinal stabilizers through dynamic movement.
Enhances Coordination: Contralateral movement patterns sharpen brain-body connection and neuromuscular control.
Strengthens Shoulders and Hips: Builds joint stability and endurance in both the upper and lower body.
Promotes Functional Mobility: Improves movement mechanics useful in sports, crawling, or obstacle training.
Increases Conditioning and Endurance: When performed for distance or time, it challenges muscular and cardiovascular systems.
Requires No Equipment: Can be done anywhere as part of a warm-up, workout, or rehab program.
Great for All Fitness Levels: Easy to regress or progress based on speed, distance, or elevation.
How to Incorporate Into Your Routine
- For Beginners: Start with 2–3 sets of 10–15 meters at a controlled pace, focusing on form.
- For Strength and Core Control: Use 3–4 sets of 20 meters, prioritizing posture and tension.
- For Functional Training: Use in athletic drills, animal flow sessions, or agility-based warm-ups.
- For Endurance: Do longer distance bear crawls with weight bags.
- For Circuit Training: Include as a transitional movement between upper and lower body sets.
- For Fitness programs: Add into your warm-up for joint prep and neural activation.
- For Mobility and Rehab: Use slower, shortened movements to improve hip, shoulder, and spinal coordination.
Bear Crawl Muscles Worked
Frequently Asked Questions
Is the bear crawl a core or full-body movement?
Both. It primarily targets the core but also works shoulders, hips, and stabilizers.
Can I crawl backwards or sideways?
Yes. Backward and lateral crawls add variety and challenge different motor patterns.
How long should I bear crawl?
Start with 10–15 meters or 15–30 seconds. Increase as strength and endurance improve.
Is it safe for people with wrist issues?
Modify by using fists or handles to reduce wrist strain, or limit duration.
Can I use the bear crawl as a cardio exercise?
Yes. Longer crawls at a faster pace provide a metabolic challenge while reinforcing form.
Overview
The Navy SEAL Burpee is a high-intensity exercise that combines elements of a standard burpee with push-ups and mountain climbers. It is frequently used in military physical training programs and HIIT protocols to improve muscle strength, cardiovascular endurance, and overall physical conditioning.
How to perform Navy Seal Burpee
Start from a standing position with feet shoulder-width apart.
Drop into a squat, place your hands on the ground, and kick your feet back into a push-up position.
Perform a push-up, then drive your right knee toward your right elbow.
Perform a second push-up, then drive your left knee toward your left elbow.
Perform a third push-up, then jump your feet forward to return to the squat position.
Explode upward into a jump, reaching overhead.
Land softly and repeat.
Tips for Proper Form
Keep your core braced during each push-up and knee drive.
Control your breathing, exhaling during exertion and inhaling on the way down.
Keep your elbows at a 45-degree angle during push-ups to protect your shoulders.
Maintain a neutral spine during push-ups and jumps.
Land softly to reduce joint impact.
Common Mistakes
Rushing through the reps, which compromises form and increases injury risk.
Letting the hips sag during push-ups, placing strain on the lower back.
Skipping knee drives, which reduces core activation.
Inconsistent depth on push-ups or squats.
Neglecting the jump, which reduces the metabolic intensity.
Benefits of the Navy Seal Burpee
- Builds Total-Body Strength: Works the chest, arms, core, glutes, and legs in a single, high-effort movement.
- Boosts Cardiovascular Fitness: Elevates heart rate quickly, making it ideal for conditioning and fat loss.
- Increases Core Stability: The knee drives and push-up transitions challenge the abdominals and obliques.
- Enhances Muscular Endurance: Repeating complex patterns under fatigue builds stamina and mental resilience.
- Improves Explosive Power: The jump and transitions train fast-twitch muscle fibers for better athleticism.
- Enhanced Agility and Coordination: The rapid transitions between the squat, push-up, and jump phases of Navy SEAL Burpees help improve your agility and coordination.
- Efficient Fat Burning: High-intensity nature boosts calorie burn and triggers EPOC (afterburn effect).
- No Equipment Needed: Perfect for travel, home workouts, or outdoor training with zero gear.
How to Incorporate Into Your Routine
- For Beginners: Start with standard burpees or reduce to 1–2 push-ups per rep. Aim for 2–3 sets of 4–6 reps.
- For Strength: Pair with weighted calisthenics or explosive power training.
- For Functional Training: Add to agility drills or obstacle course workouts to improve coordination and resilience.
- For Circuit Training: Use as a finisher in HIIT circuits (30 seconds work, 30 seconds rest for 3–4 rounds).
- For General Fitness: Include in full-body sessions 2–3 times per week to boost conditioning.
- For Fat Loss: Perform 4–5 sets of 8–10 reps or time-based rounds (30–45 seconds) to maximize metabolic output.
Muscles Worked
Frequently Asked Questions
Is the Navy Seal Burpee suitable for beginners?
It is a high-skill, high-intensity move best suited for intermediate to advanced trainees. Beginners should scale down to basic burpees.
How many Navy Seal Burpees should I do?
Start with small sets (4–6 reps) and increase as your endurance improves. Quality is more important than quantity.
Can I build muscle with Navy Seal Burpees?
Yes, they enhance muscular endurance and strength, especially when combined with resistance training.
How often should I include this in my workouts?
2–3 times per week is sufficient for most goals, depending on your recovery and overall program.
Navy Seal Burpee Variations
Power Lunge
Power lunges are a dynamic high-intensity exercise that can help increase leg strength, explosive power and agility. They are often included in workouts aimed at enhancing athletic performance, such as in sports like basketball, soccer, and track and field. Additionally, power lunges can be incorporated into various fitness routines, including HIIT (High-Intensity Interval Training) workouts, to increase cardiovascular fitness and lower-body strength.
How to do
Starting Position:
- Stand with your feet hip-width apart.
- Keep your hands on your hips or at your sides for balance.
Lunge Position:
- Bend both knees to create a lunge position.
- Take a long step back with your right foot.
- Your left knee should be at a 90-degree angle, with your thigh parallel to the ground.
- Keep your core engaged, chest up, and back straight.
Jumping Phase:
- From the lowered lunge position, explode into the air using the strength of your left leg.
- As you jump, lift your right knee as high as possible toward your chest.
- Use your arms for balance and momentum if needed.
Landing:
- Land softly on the ground with your left foot, returning to the begin position.
- Ensure that you land with a slight bend in your left knee to absorb the impact and reduce stress on your joints.
Repeat on the Other Leg:
- Immediately after landing, switch your legs, so your right foot is forward and your left foot is behind you.
- Repeat the same sequence: lunge down, jump up, and bring your left knee towards your chest.
Repetitions and Sets:
- You can perform a specific number of repetitions on each leg (e.g., 10 on each leg) or time yourself (e.g., 15 seconds on each leg) based on your fitness level and goals.
Benefits of Power Lunges
Increased Leg Strength: Power lunges target the major leg muscles, including the quadriceps, hamstrings, glutes, and calf muscles. This helps to build strength in these muscle groups, which can enhance overall lower body strength and stability.
Explosive Power: The explosive jump element of power lunges focuses on developing power in the legs. This can be particularly beneficial for athletes in sports like basketball, volleyball, and track and field, where explosive leg power is crucial.
Cardiovascular Conditioning: The fast-paced nature of power lunges and the inclusion of jumping make this exercise an effective cardiovascular workout. It raises your heart rate, improves endurance, and burns calories.
Agility and Coordination: The quick and controlled nature of the movements in power lunges can help improve agility and coordination, which can be advantageous in various sports and activities.This can improve your ability to change direction quickly, an important skill in many sports and activities.
Functional Fitness: The movements in power lunges mimic real-life actions like stepping and jumping, making them valuable for functional fitness and improving daily activities.
Fast fat loss: Because power lunges engage multiple muscle groups and involve explosive movements, they can contribute to calorie burning, making them useful for those looking to manage their weight.
Power Lunge Muscles Worked
Power lunges primarily target the muscles of the lower body, including the quadriceps, glutes, hamstrings, and calves. Here’s a breakdown of the muscles worked during power lunges:
- Quadriceps: The quadriceps are the muscles located at the front of your thigh. They are heavily engaged when you lower your body into a lunge position and push explosively off the ground during the jump.
- Hamstrings: The hamstrings are the muscles at the back of your thigh. They are involved in both the lowering phase and the explosive jump phase of the power lunge.
- Gluteus Maximus: The glutes, particularly the gluteus maximus (the largest glute muscle), are worked when you push yourself upward during the jump and maintain an upright position during the lunge.
- Calf Muscles: The calf muscles, including the gastrocnemius and soleus, are activated when you push off the ground during the jump and when you land softly.
- Hip Flexors: The hip flexor muscles, including the iliopsoas, are engaged when you lift your knee towards your chest during the jump phase.
- Core Muscles: Your core muscles, including the rectus abdominis (front), obliques (sides), and transverse abdominis (deep core), play a role in maintaining balance and stability throughout the movement.
- Adductors: The inner thigh muscles, known as the adductors, are involved in maintaining proper leg alignment during the lunge.
- Erector Spinae: The erector spinae muscles in the lower back provide support to maintain an upright posture during power lunges.
By incorporating power lunges into your workout routine, you can effectively target and strengthen these muscle groups, enhancing your lower body strength, explosive power, and overall athletic performance. Remember to use proper form and technique to maximize the benefits of the exercise while minimizing the risk of injury.
Power Lunge Variations
You can customize them in numerous ways to tailor your workouts to your specific needs. These variations encompass reverse lunges, lateral lunges, curtsy lunges, jumping lunges, and an array of others. By integrating these diverse forms, you not only target various muscle groups but also infuse your workouts with engaging diversity.


Riding Outdoor Bicycle
Walking
Benefits of Walking
- Walking is one of the simplest physical activities. This simple activity allows you to work many large and small muscle groups in your lower body.
In addition, walking consumes some energy, and if your goal is to burn calories, you can create more calorie deficit by walking alongside your nutritional diet.
What Muscles Does the Walking Work

Briskly Walking
How To Start Running
Walking is a great tool to prepare your body for running. Your walking in start should consist of a mixture of running and walking depending on how much pressure your body can take. As time passes your muscles get trained and you are good to go for running.
While running you should always increase distance gradually you are never going to lose more weight by running more you can get injured by over-pressuring your body. If you cannot increase your running distance so add a little walk before and after running. The 10% rule is always a good rule which is a sensible running increase. You can increase your running distance by 10% a week to others.
Running Benefits
Running is one of the most dominant forms of exercise for weight loss. If you’re a professional athlete looking to get shredded or a rookie who’s looking to lose some weight, running is the best option for you.
An intense running phase might be better if you are looking to gain some stamina. It increases your cardiovascular abilities but makes your muscles do more work.
On the other hand, low-intensity running is the best to break down your fat cells as it requires less work from muscle. You can easily jog a few miles to get more fuel from fat around your body.
The best running workout is to have progressive running in intervals which starts from slow exercise and getting faster in the period. It will also be great to induce the recovery phase which will help your muscle to relax.
- Depression & Anxiety: Running also plays an important role in reducing depression and anxiety. Running increases bonding, focus and motivation among depressed individuals.
- Knee Damage: It is a very common myth among people of all ages that running will cause knee damage and make your knees weak. This is completely untrue. Running makes your knees string and make your knee muscles more responsive. It makes your knees healthier.
- Cataracts: A study found that people who run more have a lower chance of developing cataracts. A small run will reduce the chances of cataracts. Perfect health will be ensured. (https://ncbi.nlm.nih.gov/pmc/articles/PMC3757559/)
Running Helps In Fat Burning: The process of “Fat Burning” is carried out in our body. In this process, the fat is converted into fuel which aids us to get more power to do the work. Running helps in weight loss by burning fat and converting it into useful carbs. The more fat is burned, the more stamina and power to your body.
Types of Running
There are many types of running that help the human body move. Some of the popular types are as follows:
- Base Running: It is normally run to get muscle use to of compound movement. They are short runs extending from 8 to 10 km.
- Long Running: Adding some more distance to base run are long runs. A person can run up to 20 km to increase his endurance and stamina.
- Interval Running: Intense running in different sets to increase stamina and cardiovascular abilities are called interval running. A person can do 5 sets of running 400 meters, starting from jogging and getting better with each interval.
- Mountain Running: It is the same as interval running, you just to run upward on the hilly area to increase your strength and stamina equally. Try to do it in intervals as well to get the best results.
- Recovery Running: These runs are slow after hectic running to recover your muscle and take the all heat out from them very easily. Run at least 4 to 5 minutes to ease your muscle after a hard training day.
- Progression Running: These runs are started at a slow pace and get to the top speed at the end. It is just like a marathon in which you have to runs miles and get better in speed every mile you cover. It builds your strength, muscles, and stamina on a daily bases.
Sprint