
Overview
The Burpee Long Jump is an advanced, full-body plyometric conditioning exercise that combines the explosive power of a burpee with the athleticism of a broad jump. It challenges the entire body—building muscular endurance, cardiovascular stamina, and explosive power simultaneously. This movement is often used in high-intensity interval training (HIIT), CrossFit workouts, athletic conditioning, and military-style workouts.
How to Perform the Burpee Long Jump
Starting Position:
Stand tall with feet shoulder-width apart.
Keep your core braced and arms relaxed at your sides.
Burpee Phase:
Drop into a squat position and place your hands on the floor in front of you.
Jump or step your feet back into a high plank position.
Perform a push-up (optional but common in this variation).
Return to Squat:
Jump or step your feet forward so they land just outside your hands.
Keep your chest lifted as you prepare to jump.
Long Jump Phase:
Swing your arms backward, then explosively jump forward as far as possible.
Land softly with knees bent and weight distributed evenly.
Reset:
Turn around or walk backward to your starting point.
Repeat for the desired number of reps or distance.
Tips for Proper Form
Land quietly with bent knees to protect your joints.
Keep your core tight during the push-up and jump phases.
Use your arms for momentum in the long jump.
Focus on quality jumps, not just distance.
Common Mistakes to Avoid
Collapsing the lower back during the plank/push-up.
Landing stiff-legged, which increases injury risk.
Rushing through the burpee phase without control.
Letting the knees cave inward on the long jump landing.
Benefits of Burpee Long Jump
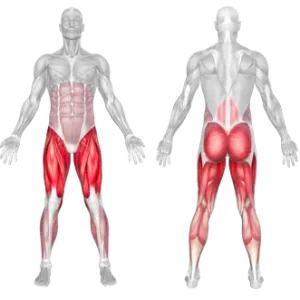
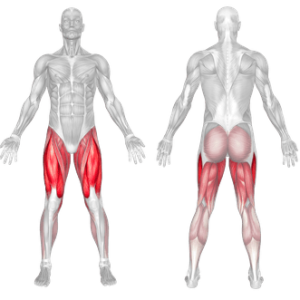
- Explosive Lower-Body Power: The long jump component activates fast-twitch muscle fibers in the glutes, quads, and hamstrings, improving sprinting, leaping, and athletic performance.
- Full-Body Strength Development: Combining a burpee with a push-up and jump engages the chest, shoulders, triceps, core, and lower body, creating a total-body strengthening effect.
- Cardiovascular Endurance: The constant transition between plank, squat, and jump elevates the heart rate, improving conditioning and VO₂ max.
- Functional Athleticism: Mimics real-life movement patterns involving squatting, pushing, and jumping, making it a staple for athletes who need agility and explosiveness.
- High Calorie Expenditure: Because it recruits multiple large muscle groups simultaneously, it’s highly effective for fat loss and metabolic conditioning.
- Improved Coordination and Mobility: The multi-step sequence challenges timing, balance, and joint mobility in the hips, knees, and ankles.
How to Incorporate Into Your Routine
Beginners: Perform standard burpees first; once proficient, add the long jump.
Power Training: 3–4 sets of 6–8 controlled reps (focus on explosive jumps).
Functional Training: Include in obstacle-course prep or athletic drills.
Circuit Training: Combine with push-ups, lunges, and sprints for conditioning.
General Fitness: 2–3 sets of 30–45 seconds for endurance.
Mobility: Use as a dynamic warm-up drill (fewer reps, focus on control).
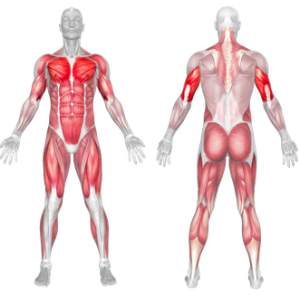
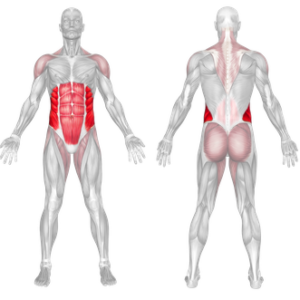
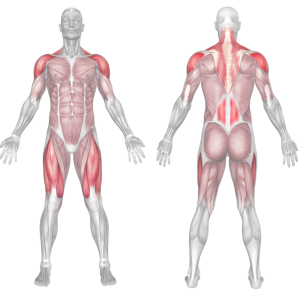
Burpee Long Jump: Muscles Worked
Frequently Asked Questions
Is the push-up mandatory in a Burpee Long Jump?
No, the push-up is optional. Including it makes the exercise more challenging and upper-body focused, while skipping it emphasizes conditioning and lower-body power.
How far should I jump in the long jump portion?
Focus on safe, controlled landings rather than maximum distance. Over time, your explosive strength will naturally increase your jump length.
Can beginners perform this exercise?
It’s best suited for intermediate to advanced trainees. Beginners should first master squats, push-ups, and standard burpees before progressing.
How many calories does a Burpee Long Jump burn?
Depending on body weight and intensity, it can burn 10–15 calories per minute, making it an effective fat-burning tool when done in intervals.
Is the Burpee Long Jump safe for the knees?
Yes, if performed with proper landing mechanics—knees bent, hips back, and feet shoulder-width apart. Those with existing knee issues should opt for standard burpees or reduce jump distance.
Can I replace regular cardio with this exercise?
Burpee Long Jumps provide intense conditioning but should supplement, not fully replace, steady-state cardio for well-rounded fitness.
Overview
The burpee with push-up is a high-intensity, full-body exercise that combines a traditional burpee with a push-up at the bottom of the movement. This variation not only challenges cardiovascular endurance but also develops upper-body and core strength. It is a staple in conditioning workouts, HIIT sessions, and military-inspired training programs.
How to Perform the Burpee with Push-Up
Starting Position: Stand tall with feet shoulder-width apart, arms at your sides.
Squat Down: Lower into a squat and place your hands flat on the ground in front of you.
Kick Back: Jump your feet backward into a high plank position, keeping your body in a straight line.
Push-Up: Perform a controlled push-up, lowering your chest toward the ground and pressing back up.
Return: Jump your feet forward back into the squat position.
Explosive Jump: Drive upward into a vertical jump, reaching overhead.
Repeat for the desired number of reps or time.
Tips for Proper Form
Keep your core engaged during the plank and push-up to prevent lower back sagging.
Land softly on the jump to reduce joint stress.
Perform the push-up with controlled movement; avoid letting your chest collapse.
Breathe rhythmically: inhale during the push-up, exhale as you jump.
Common Mistakes to Avoid
Dropping hips during the plank or push-up, which can strain the lower back.
Skipping the jump and rushing through reps without maintaining intensity.
Shallow push-ups that reduce upper-body engagement.
Poor landing mechanics, such as stiff knees or excessive heel striking.
Benefits of the Burpee with Push-Up
Builds explosive power through the squat-to-jump transition.
Enhances cardiovascular endurance by engaging large muscle groups continuously.
Strengthens upper body and core with the added push-up.
Burns a high number of calories, making it ideal for fat loss programs.
Improves athletic conditioning, agility, and resilience under fatigue.
How to Incorporate Into Your Routine
Beginners: 3–4 sets of 5–8 reps, focusing on controlled movement.
Hypertrophy: Using a weighted vest or dumbbells, do 3-5 sets of 8-12 controlled repetitions.
Explosive Power: Add a weighted vest or combine with other plyometric exercises.
Functional Training: Use in circuit workouts with other bodyweight moves.
HIIT / Conditioning: Perform 20–40 seconds of max-effort burpees, rest 20–30 seconds, repeat for 6–8 rounds.
General Fitness: Add at the end of workouts as a finisher for conditioning and calorie burn.
Mobility/Active Recovery: Perform modified versions without the jump to reduce joint stress.
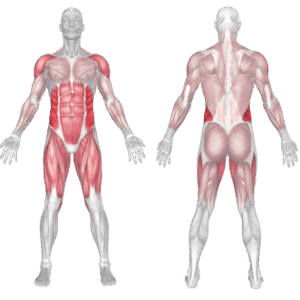
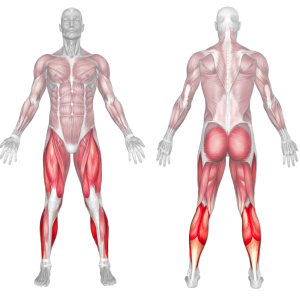
Burpee With Push-up: Muscles Worked
Frequently Asked Questions
Is the burpee with push-up good for fat loss?
Yes. It is a calorie-intensive, full-body movement that elevates heart rate and burns fat effectively.
Can beginners do burpees with push-ups?
Beginners should first master the basic burpee and push-up separately before combining them.
How many burpees with push-ups should I do?
Start with 3–4 sets of 5–10 reps and progress to timed intervals (20–40 seconds) for conditioning.
How many calories does a burpee with push-up burn?
Depending on intensity and fitness level, it can burn approximately 10–15 calories per minute.
Do burpees build muscle?
While burpees primarily improve conditioning, the push-up component provides upper-body muscle endurance. For hypertrophy, pair them with strength training.
Is it safe for people with joint issues?
Those with knee, shoulder, or lower back pain should modify the movement (e.g., no jump, incline push-up) or avoid until cleared by a professional.
Overview
The Step-Behind Rotational Med Ball Throw is an advanced power development drill used in rotational sports like baseball, golf, MMA, and tennis. This is a dynamic, high-velocity rotational throw where the athlete steps behind with one foot and rapidly rotates to toss a medicine ball against a wall or into open space. The movement mimics sport-specific actions like a swing, punch, or shot. It develops explosive rotational strength, hip-to-core transfer, and neuromuscular coordination.
How to Perform
Start Side-On to a solid wall or open space, holding a light medicine ball (2–6 kg).
Stand tall with feet shoulder-width apart and the ball held at waist height.
Step your rear foot behind and across your front foot (like a crossover step).
As your rear foot lands, rotate your hips toward the wall and transfer your weight forward.
Explosively rotate your torso and shoulders, releasing the ball in a side-throw motion.
Allow full hip and shoulder rotation, finishing tall and balanced.
Reset between reps and repeat on the opposite side.
Tips for Proper Form
Start light (2–4 kg ball) to prioritize speed and mechanics.
Step behind with control, but rotate explosively on the throw.
Keep the ball close to the torso before release to avoid arming the throw.
Finish tall—do not fall forward or collapse after the throw.
Exhale forcefully as you release the ball for added core engagement.
Use a non-bouncy wall or open field for safety and fluidity.
Common Mistakes
Arming the throw without using the hips and legs.
Skipping the step-behind, making it more of a stationary throw.
Throwing too heavy, which slows down rotation and reduces transfer.
Over-rotating or falling off balance after release.
Not switching sides, creating strength asymmetries.
Benefits of Step-Behind Rotational Med Ball Throw
Develops Explosive Rotational Power: Trains speed and force transfer from the ground through the hips to the hands.
Improves Athletic Transfer: Mimics movements used in sports like baseball, golf, tennis, hockey, and martial arts.
Enhances Kinetic Chain Sequencing: Builds intermuscular coordination between lower and upper body for efficient rotation.
Improves Core Speed and Strength: Targets the obliques, transverse abdominis, hip rotators, and spinal stabilizers.
Teaches Directional Control: Helps athletes learn how to direct power accurately and repeatably.
Increases Agility with Power: The step-behind improves coordination, balance, and direction change ability under speed.
How to Incorporate Into Your Routine
- For Athletic Power: 3–4 sets of 3–5 throws per side before weight training or as part of a power warm-up.
- For Rotational Sport Training: Perform 2–3x/week in-season or off-season, paired with sport-specific drills.
- For Functional Fitness: Include in circuits or core finishers for movement skill and rotational capacity.
- For Rehabilitation: Begin with slower, lighter versions under supervision to restore patterning.
- For General Fitness: Use as a dynamic warm-up or cardio-power drill to keep core training athletic.
Muscles Worked
Frequently Asked Questions
Is this safe for beginners?
Yes, if performed with light balls, proper coaching, and gradually progressed. Emphasize mechanics before intensity.
How heavy should the medicine ball be?
Start with 2–4 kg (4–9 lbs). Prioritize speed and form. Avoid heavy throws that slow rotation.
Which athletes benefit the most?
Athletes in golf, baseball, tennis, boxing, hockey, and field sports. Also valuable for CrossFitters and MMA fighters.
Can this replace traditional core work?
It complements it. Traditional planks and crunches build endurance, while this builds explosive function.
What surfaces are best for throwing?
Use a concrete or rubberized wall, or throw into an open field. Avoid highly elastic surfaces.
Overview Of Medicine Ball Rotational Throw
The medicine ball rotational throw is a dynamic exercise that involves explosively rotating your torso while throwing a medicine ball. It targets the core, obliques, hips and upper back. It is commonly used in strength and conditioning programs for athletes in sports that require rotational power, such as baseball, golf, and tennis.
By incorporating the medicine ball rotational throw into your workout routine, you can improve core strength, rotational power, and stability, which are beneficial for various sports and daily activities.
How to do:
Here’s a comprehensive guide to help you improve your skills and efficiency in performing this exercise.
- Starting Position: Stand about two to four feet away from the wall, facing it, with a medicine ball held in both hands. Medicine ball (choose an appropriate weight based on your fitness level and goals).
- Movement Preparation: Take the medicine ball to your back hip. This initial movement involves a rotation of the torso as you load the ball onto your back hip, preparing for the explosive throw.
- Weight Transfer: Transfer your weight from the back hip to the front hip. This dynamic weight shift is a crucial component of generating power in the throw.
- Hip Rotation: Rotate your hips explosively as you throw the ball against the wall. The explosive hip rotation is a key element for generating power in this exercise. Emphasize the power generated from the hips, not just the arms.
- Catch and Repeat: After the ball rebounds off the wall, catch it with both hands. Take a moment to rest and then repeat the movement.
Master the Medicine Ball Rotational Throw
Mastering the medicine ball rotational throw requires a combination of proper technique, strength, power, and coordination. Understand the mechanics of the exercise, including the starting position, rotational movement, and throwing technique. Practice without the ball initially to focus on proper body mechanics and movement patterns. Gradually increase the weight of the medicine ball as you become more proficient with the exercise.
Tips:
- Engage your core throughout the movement to stabilize your spine.
- Emphasize the transfer of weight from the back hip to the front hip during the movement.
- Engage your core and focus on generating power through hip rotation.
- Keep a slight bend in your knees and maintain good posture.
- The arms serve as an extension of the hip rotation, so avoid relying solely on arm strength.
- Maintain a controlled and fluid motion, avoiding excessive tension in the neck and shoulders.
- Perform the exercise in a controlled manner, emphasizing both the throw and the catch.
By following these guidelines and focusing on consistent practice and improvement, you can master the medicine ball rotational throw and reap its benefits for core strength, power, and athletic performance.
Benefits of Med-Ball Rotational Throw
1- Core Strength: Engages the muscles of the core, including the rectus abdominis, obliques, and transverse abdominis. Improves core stability and strength, essential for overall functional fitness.
2- Hip Power Development: Emphasizes explosive hip rotation, helping to develop power in the hip muscles. Strengthens the glutes and hip abductors, contributing to improved athletic performance.
3- Enhanced Coordination: Requires coordinated movement between the upper and lower body. Improves overall coordination, which is beneficial for various physical activities and sports.
4- Sports-Specific Training: Mimics the rotational movements seen in sports such as golf, tennis, baseball, and others. Provides sport-specific training for athletes involved in activities requiring rotational power.
5- Full-Body Workout: Involves multiple muscle groups, including the core, hips, upper back, and shoulders. Offers a comprehensive and efficient full-body workout in a single exercise.
6- Explosive Power: Focuses on explosive movements, aiding in the development of power and speed. Suitable for athletes looking to enhance their ability to generate force quickly.
7- Caloric Expenditure and Conditioning: Can be incorporated into high-intensity interval training (HIIT) for cardiovascular benefits. Supports fat loss and conditioning when performed with higher repetitions and intensity.
8- Improved Posture: Encourages proper body mechanics and posture during rotational movements. Reinforces good spinal alignment and body awareness.
9- Versatility: Adaptable to different fitness levels by adjusting the weight of the medicine ball and the intensity of the throws. Can be performed with various rep ranges to target different fitness goals.
10- Functional Movement: Enhances the ability to perform everyday activities involving rotational movements. Improves overall functional fitness, translating into better performance in daily life.
Muscles Worked
The medicine ball rotational throw primarily targets the muscles involved in rotational movements, as well as those responsible for stabilizing the core and generating power. Here are the main muscles worked during the medicine ball rotational throw:
- Rectus Abdominis: This is the muscle responsible for flexing the spine and is engaged during the rotation and throwing phases of the exercise.
- Obliques: Both the internal and external obliques are heavily engaged during the rotational movement, as they are responsible for rotating the torso and providing stability.
- Transverse Abdominis: This deep abdominal muscle helps stabilize the core and pelvis, providing support during rotational movements.
- Anterior Deltoid: The front shoulder muscles are activated during the throwing phase to help propel the medicine ball forward.
- Trapezius: The trapezius muscles in the upper back are engaged to stabilize the shoulder girdle and assist in transferring force from the core to the arms.
- Gluteus Medius: This muscle on the side of the hip helps stabilize the pelvis during the rotational movement.
- Erector Spinae: The muscles along the spine are engaged to maintain proper spinal alignment and support during the rotational movement.
- Tensor Fasciae Latae: This muscle located on the side of the hip assists in hip abduction and stabilization during the rotation.
- Multifidus: These small muscles along the spine help stabilize and support the vertebrae during movement.
- Triceps: The triceps muscles are engaged during the throwing phase to extend the arms and propel the medicine ball forward.
While these are the primary muscles worked during the medicine ball rotational throw, other stabilizing muscles throughout the body may also be engaged to a lesser extent to support proper form and execution of the exercise.
Overview
The 5 Dot Drill is an agility workout that involves creating an X-shaped pattern using five markers positioned on the ground. The objective is to perform dynamic jumps and movements between these markers to enhance agility and coordination. Incorporating 5 Dot drills into your training regimen can be a valuable addition for individuals seeking to enhance their athletic performance, agility, and overall fitness.
How to Perform 5 Dot Drill:
1. Setup:
- Arrange five markers on the ground in the sequence A-B-C-D-E to form the layout.
- Stand on the initial markers, A and B.
2. Initial Position (A-B):
- Commence with your feet together on markers A and B.
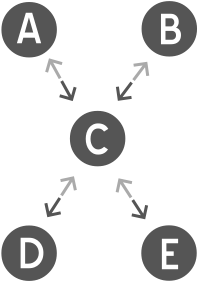
3. Leap to Point C:
- Swiftly jump forward to marker C, ensuring that your left foot lands precisely on the marker.
4. Leap to D and E (Split Feet):
- Following marker C, perform another explosive jump, but this time separate your feet. Land with one foot on marker D and the other on marker E.
5. Backward Jump:
- Execute a rapid backward jump using both feet, landing on marker C with your left foot.
- Immediately perform another backward jump to return to the starting position, markers A and B, with both feet together.
- Maintain control and balance throughout the entire movement.
6. Repeat:
- Duplicate the sequence, this time leading with your right leg. Strive to execute the drill with maximum speed while adhering to proper form.
8 Benefits of 5 Dot Drill
1- Improved Agility: Agility is the ability to move the body quickly and easily while maintaining control and balance, especially in changing or challenging situations. The 5 Dot Drill is a specialized exercise designed to target and enhance agility through a series of dynamic and multidirectional movements. The dynamic and multidirectional movements required in the drill enhance agility by training the body to change direction quickly and efficiently.
2- Enhanced Coordination: The specific foot placements and dynamic movements required during the drill stimulate the connection between the brain and muscles, fostering improved coordination and neuromuscular control. The intentional and controlled nature of each step fosters a heightened connection between the brain and the muscles involved in the intricate footwork. This process not only sharpens the mind-muscle connection but also refines the intricate coordination skills necessary for diverse physical activities.
3- Increased Speed: The drill encourages participants to execute movements at an accelerated pace, fostering the development of speed and quickness. The incorporation of explosive jumps challenges the muscles to generate force rapidly.
4- Balance Development: Landing on and jumping between markers challenges the body’s balance and stability, activating core muscles and smaller stabilizing muscles in the legs, ankles, and feet. As participants land on one foot and transition between markers, they experience unilateral loading. This uneven distribution of weight challenges the body to stabilize and adapt to changes in load, promoting strength and balance on each leg independently.
5- Sports Performance: Sports are dynamic, and athletes must react quickly to changing situations. Athletes in sports such as basketball, soccer, tennis, and others that require quick lateral movements and changes in direction can benefit significantly from the sport-specific agility and speed developed through the 5 Dot Drill.
6- Cardiovascular Endurance: As a continuous and dynamic exercise, the 5 Dot Drill elevates heart rate and maintains it throughout the session, leading to improved cardiovascular endurance. Cardiovascular endurance is essential for activities that require sustained effort over time, such as prolonged workouts, sports matches, or even everyday tasks that demand continuous physical exertion. The 5 Dot Drill helps individuals build the stamina needed to perform these activities with greater ease and efficiency.
7- Caloric Expenditure: The continuous and rhythmic movements of the 5 Dot Drill result in increased caloric expenditure. This can be beneficial for those looking to manage weight or improve body composition, as it contributes to the overall energy balance by burning calories during the workout.
8- Plyometric Training: Plyometric exercises involve rapid contraction and extension of muscles, utilizing the stretch-shortening cycle. This cycle involves a rapid lengthening (eccentric phase) followed by an immediate shortening (concentric phase) of the muscle. Incorporating plyometric elements such as jumps and explosive movements in 5 Dot Drills contributes to lower-body power and explosiveness.
5 Dot Drill: Muscles Worked
Here are the main muscles worked during the 5 Dot Drill:
- Quadriceps: Located at the front of the thigh, the quadriceps are engaged during the explosive jumps and directional changes of the drill.
- Gluteus Maximus: The largest muscle in the buttocks, the gluteus maximus is involved in generating power during the jumps and providing stability during landings.
- Hip Flexors: These muscles, including the iliopsoas, assist in lifting the legs and driving them upward during the drill’s movements.
- Hamstrings: Situated at the back of the thigh, the hamstrings are engaged during both the explosive jumps and the controlled landings, helping to stabilize the knee joint.
- Soleus: A calf muscle that assists in ankle plantar flexion, the soleus is engaged during the rapid foot movements and jumps of the 5 Dot Drill.
- Gastrocnemius: Another calf muscle, the gastrocnemius works with the soleus to provide strength and stability to the ankle joint during the drill’s movements.
By targeting these muscles, the 5 Dot Drill helps improve lower body strength, power, agility, and coordination, making it a valuable exercise for athletes and individuals looking to enhance their athletic performance.
Depth Jump to Hurdle Hop
The depth jump to hurdle hop is an advanced plyometric exercise frequently used in sports that require explosive power and agility. This exercise combines two plyometric movements: the depth jump and the hurdle hop. By incorporating this exercise into your training regimen, you can expect improvements in explosive power, agility, and lower body strength, making it a valuable tool for athletes aiming to excel in their respective sports.
how to do:
- Set up the Hurdles: Arrange a series of hurdles at different heights in a straight line, leaving enough space between them for you to land and hop between each one.
- Depth Jump:
- Stand on top of the plyometric box or platform with your feet hip-width apart.
- Start by stepping off the box and quickly dropping down to the ground, allowing your knees to slightly bend to absorb the impact.
- As soon as your feet make contact with the ground, immediately spring up explosively, using your arms for momentum.
- The depth jump is intended to be a quick and powerful jump, so make sure you’re not spending much time on the ground.
- Hurdle Hop:
- After the depth jump, immediately transition into the hurdle hop.
- As you ascend from the depth jump, aim to clear the first hurdle with a high knee lift.
- Land on the other side of the hurdle and quickly prepare for the next hop.
- Repeat: Continue performing the depth jump to hurdle hop sequence for the desired number of repetitions or for a set time period.
Tips:
- Focus on explosiveness and speed during both the depth jump and hurdle hop phases.
- Land softly on the balls of your feet to reduce impact and minimize the risk of injury.
- Maintain proper body posture and alignment throughout the exercise.
- Start with a low hurdle height and gradually increase it as you become more proficient.
- Ensure that you have adequate strength and conditioning before attempting this exercise, as it can be physically demanding.
Key Components of Depth Jump to Hurdle Hop:
Depth Jump: This exercise begins with a “depth jump” off an elevated platform or box. This initial drop stimulates the stretch-shortening cycle of your muscles, allowing for a more forceful contraction during the subsequent jump.
Stretch-Shortening Cycle (SSC): During the depth jump, the muscles undergo a rapid eccentric (lengthening) phase as you land, followed by an immediate concentric (shortening) phase as you jump vertically. This SSC recruits a large number of muscle fibers, enhancing force production.
Hurdle Hop: Following the drop, you transition seamlessly into a hurdle hop. In this phase, you explode upward and forward, propelling yourself over a hurdle or obstacle. This part of the exercise requires precise timing, explosive power, and excellent coordination.
Benefits:
- Explosive Power: The depth jump component of this exercise forces you to generate significant force quickly when pushing off the ground. This translates into improved vertical jump performance and sprint acceleration.
- Agility: Agility is the ability to change direction rapidly while maintaining balance and speed. The hurdle hops challenge your agility and coordination, helping you become more nimble and responsive in sports that require rapid direction changes and quick footwork.
- Lower Body Strength: As you repeatedly jump over hurdles, your leg muscles, particularly the quads, hamstrings, and calves, are engaged extensively, leading to increased lower body strength.
- Increased Power Output: The combination of depth jumps and hurdle hops focuses on maximizing power output. This can translate into improved sprinting speed, jumping ability, and overall athletic performance.
Muscles Worked:
Here are the primary muscles worked during this exercise:
- Quadriceps (Front Thigh Muscles): The quadriceps play a significant role in extending your knees and propelling you upward during the jump phase of the exercise. They are responsible for straightening your legs as you leap off the ground.
- Hamstrings (Back of Thigh Muscles): The hamstrings are activated during both the drop (eccentric phase) and jump (concentric phase) portions of the exercise. They help control the descent during the drop and contribute to the explosive upward thrust during the jump.
- Glutes (Buttocks Muscles): The gluteal muscles, particularly the gluteus maximus, are heavily engaged in generating power during the upward jump. They work alongside the quadriceps and hamstrings to provide the force necessary to propel you over the hurdle.
- Calves (Gastrocnemius and Soleus): The calf muscles play a crucial role in extending your ankles during the takeoff phase of the jump, contributing to your ability to spring off the ground and clear the hurdle.
- Hip Flexors: The hip flexor muscles, including the iliopsoas, are involved in lifting your legs and hips during the jump. They help bring your knees toward your chest and allow for hip flexion, which is vital for clearing the hurdle.
- Core Muscles: Your core muscles, including the rectus abdominis and obliques, provide stability and support during the exercise. A strong core is essential for maintaining proper posture and controlling your movements.
- Lower Back (Erector Spinae): The erector spinae muscles in your lower back help maintain an upright posture during the exercise. They provide stability and assist in controlling the descent and takeoff phases.
- Hip Adductors and Abductors: These muscles, located on the inside and outside of your thighs, respectively, help control the alignment of your legs and assist in maintaining proper form as you jump over the hurdle.
- Ankle Stabilizers: The muscles surrounding the ankle joint, such as the tibialis anterior and posterior, are essential for stabilizing your ankles and ensuring a safe takeoff and landing.
- Shoulder and Arm Muscles (to a lesser extent): While the primary focus of the Depth Jump to Hurdle Hop is on the lower body, your shoulder and arm muscles may also be engaged to help with balance and coordination.
Power Lunge
Power lunges are a dynamic high-intensity exercise that can help increase leg strength, explosive power and agility. They are often included in workouts aimed at enhancing athletic performance, such as in sports like basketball, soccer, and track and field. Additionally, power lunges can be incorporated into various fitness routines, including HIIT (High-Intensity Interval Training) workouts, to increase cardiovascular fitness and lower-body strength.
How to do
Starting Position:
- Stand with your feet hip-width apart.
- Keep your hands on your hips or at your sides for balance.
Lunge Position:
- Bend both knees to create a lunge position.
- Take a long step back with your right foot.
- Your left knee should be at a 90-degree angle, with your thigh parallel to the ground.
- Keep your core engaged, chest up, and back straight.
Jumping Phase:
- From the lowered lunge position, explode into the air using the strength of your left leg.
- As you jump, lift your right knee as high as possible toward your chest.
- Use your arms for balance and momentum if needed.
Landing:
- Land softly on the ground with your left foot, returning to the begin position.
- Ensure that you land with a slight bend in your left knee to absorb the impact and reduce stress on your joints.
Repeat on the Other Leg:
- Immediately after landing, switch your legs, so your right foot is forward and your left foot is behind you.
- Repeat the same sequence: lunge down, jump up, and bring your left knee towards your chest.
Repetitions and Sets:
- You can perform a specific number of repetitions on each leg (e.g., 10 on each leg) or time yourself (e.g., 15 seconds on each leg) based on your fitness level and goals.
Benefits of Power Lunges
Increased Leg Strength: Power lunges target the major leg muscles, including the quadriceps, hamstrings, glutes, and calf muscles. This helps to build strength in these muscle groups, which can enhance overall lower body strength and stability.
Explosive Power: The explosive jump element of power lunges focuses on developing power in the legs. This can be particularly beneficial for athletes in sports like basketball, volleyball, and track and field, where explosive leg power is crucial.
Cardiovascular Conditioning: The fast-paced nature of power lunges and the inclusion of jumping make this exercise an effective cardiovascular workout. It raises your heart rate, improves endurance, and burns calories.
Agility and Coordination: The quick and controlled nature of the movements in power lunges can help improve agility and coordination, which can be advantageous in various sports and activities.This can improve your ability to change direction quickly, an important skill in many sports and activities.
Functional Fitness: The movements in power lunges mimic real-life actions like stepping and jumping, making them valuable for functional fitness and improving daily activities.
Fast fat loss: Because power lunges engage multiple muscle groups and involve explosive movements, they can contribute to calorie burning, making them useful for those looking to manage their weight.
Power Lunge Muscles Worked
Power lunges primarily target the muscles of the lower body, including the quadriceps, glutes, hamstrings, and calves. Here’s a breakdown of the muscles worked during power lunges:
- Quadriceps: The quadriceps are the muscles located at the front of your thigh. They are heavily engaged when you lower your body into a lunge position and push explosively off the ground during the jump.
- Hamstrings: The hamstrings are the muscles at the back of your thigh. They are involved in both the lowering phase and the explosive jump phase of the power lunge.
- Gluteus Maximus: The glutes, particularly the gluteus maximus (the largest glute muscle), are worked when you push yourself upward during the jump and maintain an upright position during the lunge.
- Calf Muscles: The calf muscles, including the gastrocnemius and soleus, are activated when you push off the ground during the jump and when you land softly.
- Hip Flexors: The hip flexor muscles, including the iliopsoas, are engaged when you lift your knee towards your chest during the jump phase.
- Core Muscles: Your core muscles, including the rectus abdominis (front), obliques (sides), and transverse abdominis (deep core), play a role in maintaining balance and stability throughout the movement.
- Adductors: The inner thigh muscles, known as the adductors, are involved in maintaining proper leg alignment during the lunge.
- Erector Spinae: The erector spinae muscles in the lower back provide support to maintain an upright posture during power lunges.
By incorporating power lunges into your workout routine, you can effectively target and strengthen these muscle groups, enhancing your lower body strength, explosive power, and overall athletic performance. Remember to use proper form and technique to maximize the benefits of the exercise while minimizing the risk of injury.
Power Lunge Variations
You can customize them in numerous ways to tailor your workouts to your specific needs. These variations encompass reverse lunges, lateral lunges, curtsy lunges, jumping lunges, and an array of others. By integrating these diverse forms, you not only target various muscle groups but also infuse your workouts with engaging diversity.


Backward Medicine Ball Throw
The backward medicine ball throw is a plyometric exercise that involves explosively throwing a medicine ball backward over your head. This exercise primarily targets the muscles of the upper body, including the back, shoulders, and arms, while also engaging the core muscles for stability and coordination. Here’s how you can perform the exercise commonly used in strength and conditioning training:
How to do:
- Begin by standing with your feet shoulder-width apart, knees slightly bent, and core engaged.
- Maintain a firm grip on the ball and ensure that your wrists are straight.
- Extend your arms upward, fully raising the medicine ball above your head.
- From this overhead position, forcefully and explosively throw the medicine ball backward.
- As you throw the ball backward, allow your arms to follow through with the movement, extending them fully.
- Maintain a straight posture and engage your core muscles to provide stability during the throw.
- Retrieve the medicine ball and repeat the exercise for the desired number of repetitions.
Tips:
- Start with a lighter medicine ball and gradually increase the weight as you become more comfortable and stronger.
- To ensure proper engagement of the lower back muscles during the backward medicine ball throw, focus on maintaining good posture, engaging your core, and avoiding excessive arching or rounding of the spine. Keep your gaze forward and maintain a neutral neck position throughout the exercise.
- Ensure that you have enough space and a safe environment to perform the exercise.
- It’s advisable to work with a qualified trainer or coach if you’re new to this exercise, as they can guide you in maintaining proper form and technique.
- As always, consult with a healthcare professional or fitness expert before starting any new exercise program, particularly if you have any underlying medical conditions or injuries.
Backward Medicine Ball Throw – Benefits
Upper Body Strength: The backward medicine ball throw primarily targets the muscles of the upper body, including the shoulders, back, and arms. By consistently performing this exercise, you can develop and strengthen these muscle groups, leading to improved upper body strength.
Power and Explosiveness: The explosive nature of the backward medicine ball throw requires you to generate power quickly and forcefully. This exercise engages your fast-twitch muscle fibers, which are responsible for producing powerful and explosive movements. Over time, this can enhance your overall power and explosiveness in various athletic activities.
Core Stability: To execute the backward throw effectively, you need to engage your core muscles for stability and control. Your abdominal muscles, obliques, and lower back muscles work together to maintain proper posture and transfer power from the lower body to the upper body. This exercise helps strengthen your core and improve stability, which is essential for functional movements and sports performance.
Sports-Specific Application: The backward medicine ball throw mimics the throwing motion required in many sports, such as baseball, softball, football, and basketball. By incorporating this exercise into your training routine, you can enhance your ability to generate power and explosiveness in sport-specific movements, resulting in improved athletic performance.
Full-Body Coordination: Performing the backward medicine ball throw involves coordinating the movement of your lower body, core, and upper body. It requires proper sequencing and timing to generate maximum power and release the ball at the right moment. Regular practice of this exercise can improve your overall coordination and kinesthetic awareness.
Calorie Burn and Metabolic Boost: The backward medicine ball throw is a high-intensity exercise that engages multiple muscle groups. When performed as part of a well-rounded workout routine, it can help increase calorie expenditure, contributing to weight management goals. Additionally, high-intensity exercises like this can stimulate your metabolism, leading to a post-workout calorie burn effect.
Backward Medicine Ball Throw – Muscle Activation
While the backward medicine ball throw primarily targets the upper body muscles, it also involves the lower body, particularly the hips and legs, to generate power and provide a strong base for the throw.
- Deltoids: The deltoid muscles, specifically the anterior (front), middle, and posterior (rear) heads, are highly activated during the backward medicine ball throw. These muscles contribute to shoulder abduction and extension, generating force to propel the ball backward.
- Latissimus Dorsi: The large muscles of the back, known as the latissimus dorsi or “lats,” play a significant role in the backward throw. They assist in shoulder extension, adduction, and internal rotation, providing power and stability during the throwing motion.
- Trapezius: The trapezius muscles, particularly the middle and lower fibers, are activated to stabilize and control scapular movement. They help maintain proper shoulder positioning throughout the backward throw.
- Rotator Cuff Muscles: The rotator cuff muscles, including the supraspinatus, infraspinatus, teres minor, and subscapularis, work synergistically to stabilize the shoulder joint during the backward throw. They provide stability and control, preventing excessive stress and potential injuries.
- Core Muscles: The backward medicine ball throw engages various core muscles to maintain stability and transfer power from the lower body to the upper body. The rectus abdominis, obliques, and erector spinae muscles work together to provide a solid foundation for the throwing motion.
- Erector Spinae: The erector spinae muscles are a group of muscles that run along the length of the spine and are responsible for extending and stabilizing the back. During the backward medicine ball throw, these muscles work isometrically to maintain proper posture and provide stability throughout the movement.
- Chest Muscles: While the chest muscles are not the main drivers of the backward medicine ball throw, they do provide stability and support to the shoulder joint and upper body during the exercise. They assist in maintaining proper alignment and control, especially during the initial phases of the movement.
Biomechanics:
- Hip and Knee Extension: The backward throw initiates with a powerful extension of the hips and knees, generating force from the lower body. This action creates a strong foundation for the subsequent upper body movement.
- Triple Extension: The backward medicine ball throw involves a triple extension, which refers to the simultaneous extension of the ankles, knees, and hips. This coordinated extension optimizes power production and contributes to the explosive nature of the exercise.
- Shoulder Abduction and Extension: As the medicine ball is propelled backward, the shoulder joint undergoes abduction (moving the arm away from the body) and extension (moving the arm backward). This movement pattern maximizes the range of motion and power output of the shoulder muscles.
- Transverse Plane Rotation: The backward throw incorporates transverse plane rotation, where the trunk rotates to generate additional power and facilitate the throwing motion. This rotation is driven by the activation of the core muscles, especially the obliques.
Bulgarian Split Squat jump
Bulgarian Split Squat Jumps are an advanced version of the Bulgarian Split Squat that combine strength training with plyometric movements, making them an excellent addition to any fitness routine.
Bulgarian Split Squat Jumps, as a unilateral exercise, offer several benefits that can help improve your overall fitness and athletic performance. Here is a step-by-step guide for beginners:
How to do:
- Stand in front of the bench or step with your feet shoulder-width apart.
- Place your left foot behind you on the bench or step, keeping your right foot flat on the ground.
- Lower your body by bending your right knee and hip, keeping your left foot elevated behind you.
- Jump explosively off your right foot, crouching until your leg is at a 90-degree angle.
- Lower your body back to a 90-degree position, then repeat the jump for the desired number of reps.
Switch legs and repeat the exercise on the other side.
Bulgarian Split Squat Jump: Benefits
Increased muscle activation: Bulgarian Split Squat Jumps require greater muscle activation than traditional squats, especially in the quadriceps, hamstrings, and glutes. This is because they require a rapid stretch-shortening cycle, which causes the muscle fibers to contract more forcefully.
Plyometric effect: Like other plyometric exercises, Bulgarian Split Squat Jumps require a rapid stretching and contracting of the muscles. This increases the tension on the muscles, causing them to work harder and leading to greater muscle activation.
Greater range of motion: Bulgarian Split Squat Jumps require a greater range of motion than traditional squats, which means your muscles have to work harder to control the movement and stabilize your body.
Improved cardiovascular fitness: Plyometric exercises like Bulgarian Split Squat Jumps involve explosive movements that require maximum effort in a short amount of time. Bulgarian Jump Squats can help improve cardiovascular fitness by increasing your heart rate and oxygen consumption during exercise.
Increased calorie burn: The explosive nature of Bulgarian Split Squat Jumps makes them a high-intensity exercise, which can lead to a greater calorie burn than traditional strength training exercises.
Increased power and explosiveness: The explosive jump at the top of the movement requires a high amount of power and explosiveness, which can help improve your overall athletic performance.
Greater muscular endurance: Bulgarian Split Squat Jumps are a high-intensity exercise, which can help improve your muscular endurance over time.
Improved muscular balance: Since Bulgarian Split Squat Jumps work one leg at a time, they can help identify and correct any strength or mobility discrepancies between your left and right sides, which can help improve your overall muscular balance.
Increased unilateral strength: Bulgarian Split Squat Jumps can help increase your unilateral leg strength, making it easier to perform activities that require a single leg, such as running or jumping.
Improved stability and balance: Bulgarian Split Squat Jumps require greater balance and stability than traditional bilateral exercises, making them an effective way to improve your overall stability and balance.
In summary, Bulgarian Split Squat Jumps are the ultimate plyometric exercise because they provide a full-body workout, are high-intensity, can increase power, improve balance and stability, are versatile, can increase bone density, and reduce the risk of injury. When done correctly and with proper form, they can be a valuable addition to your fitness routine.
Bulgarian Jump Squat: Muscles Worked
Overview
Jump rope, also known as skipping, is a classic cardio workout that engages multiple muscle groups and improves cardiovascular endurance, coordination, and agility. Portable and inexpensive, it’s a favorite among athletes, boxers, and general fitness enthusiasts alike.
How to do perform Jump Rope
Choose a rope length that reaches your armpits when stood on with both feet.
Hold the handles at hip height with elbows bent and wrists slightly forward.
Stand tall with your feet together, core tight, and knees slightly bent.
Begin turning the rope with your wrists while keeping your shoulders relaxed.
Jump just high enough to clear the rope, landing softly on the balls of your feet.
Maintain a steady rhythm, keeping your jumps small and controlled.
Tips for Proper Form
Use your wrists to spin the rope, not your arms.
Keep your core engaged for balance and posture.
Jump low to conserve energy and reduce impact.
Land softly with slightly bent knees.
Breathe rhythmically to sustain endurance.
Common Mistakes
Jumping too high, which wastes energy and increases joint stress.
Using arms instead of wrists, causing inefficient movement.
Slouching or looking down, which affects form and rhythm.
Poor rope length, which causes tripping or tangling.
Holding your breath, leading to early fatigue.
Benefits of the Jump Rope
Boosts Cardiovascular Health: Jumping rope rapidly elevates heart rate, improving heart and lung endurance.
Burns Calories Efficiently: High-intensity rope skipping can burn over 10–15 calories per minute.
Improves Coordination and Agility: Timing and rhythm sharpen motor skills and body awareness.
Strengthens Lower Legs and Ankles: Repetitive jumping targets calves, ankles, and foot muscles.
Enhances Balance and Footwork: Requires dynamic stability and helps athletes improve agility.
Full-Body Engagement: Activates shoulders, core, glutes, and legs for total-body conditioning.
Portable and Versatile: Jump rope can be done anywhere, anytime, with minimal equipment.
How to Incorporate Into Your Routine
- For Beginners: Start with 2–3 sets of 30–60 seconds of jumping, resting between sets.
- For Functional Training: Add 30–60 seconds between compound exercises to enhance agility and coordination.
- For Circuit Training: Use as a cardio station in a high-intensity circuit for 3–4 rounds.
- For General Fitness: Jump for 10–15 minutes at moderate intensity 3–5 days a week.
- For Conditioning and Fat Loss: Perform interval-style jump rope training (e.g., 40 sec on, 20 sec off) for 15–20 minutes.
Muscles Worked
Frequently Asked Questions
Is jump rope good for beginners?
Yes, it’s scalable for all fitness levels. Start slowly and focus on form before increasing speed.
Can jump rope replace running?
It can be a great alternative to running for cardiovascular health and fat loss, especially if space or impact is a concern.
How often should I do jump rope workouts?
You can include it 3–5 times per week depending on your fitness goals and intensity level.
What kind of rope should I use?
Use a speed rope for fast-paced workouts or a weighted rope for strength and conditioning.