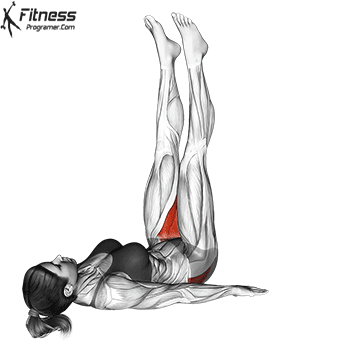
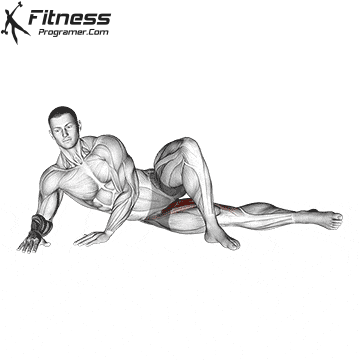
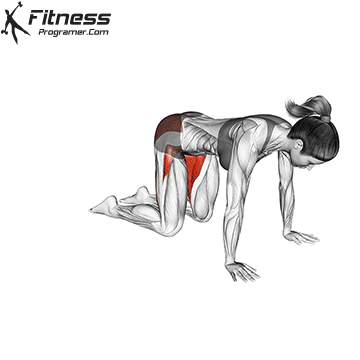
Thigh Fly Overview
The Thigh Fly, also known as the Adductor Magnus Stretch or Inner Thigh Stretch, is a versatile exercise that enhances flexibility, mobility, and strength in the inner thigh area. This exercise involves lying on your back, lifting your legs towards the ceiling, and then opening and closing them in a controlled manner to engage the inner thigh muscles.
The Thigh Fly can be performed as either a static stretch, where you hold the position for a certain period, or as a dynamic movement, where you continuously open and close your legs. Both variations offer unique benefits. By incorporating the Thigh Fly into your fitness routine, you can improve flexibility, strength, and mobility while supporting overall lower body function and stability.
How to Perform the Thigh Fly
The Thigh Fly as a static stretch:
- Starting Position: Lie on your back with your legs together, lifted towards the ceiling. Ensure your hips are firmly anchored to the floor.
- Stretching Movement: Slowly open your legs to the sides as far as comfortable, feeling a stretch along your inner thighs. Hold this position for 10-15 seconds while breathing steadily.
- Return to Starting Position: Gently close your legs back together, returning to the starting position.
- Repetitions: Repeat the stretch for 2-4 repetitions, taking brief rest periods in between if needed.
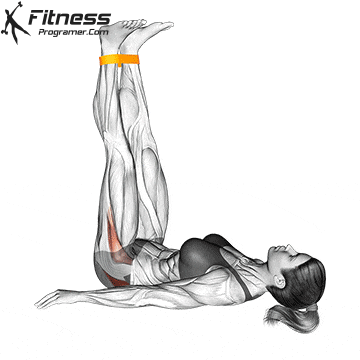
The Thigh Fly as a dynamic movement:
- Starting Position: Begin in the same starting position as the static stretch.
- Continuous Movement: Open your legs to the sides and then close them back together in a fluid motion without pausing at the stretched position.
- Repetitions: Perform the dynamic Thigh Fly for the specified number of repetitions without resting between each repetition.
- Breathing: Inhale as you open your legs and exhale as you close them.
As always, listen to your body and adjust the intensity and duration of the exercise based on your fitness level and comfort.
Tips for Proper Form
- Keep your hips anchored to the floor throughout the movement.
- Move slowly and with control to maximize the stretch and engage the muscles effectively.
- Breathe deeply and steadily throughout the exercise.
- If you feel discomfort or strain, reduce the range of motion or stop the exercise.
Common Mistakes to Avoid
- Arching the Lower Back: Ensure your back stays flat on the ground to prevent strain.
- Using Momentum: Perform the movement with control rather than relying on momentum.
- Overextending: Avoid pushing your legs too far apart, as this may cause muscle strain.
- Holding Your Breath: Maintain steady breathing to enhance relaxation and effectiveness.
Benefits of the Thigh Fly
1. Enhanced Flexibility
The Thigh Fly helps stretch and lengthen the inner thigh muscles, increasing range of motion and reducing muscle tightness. Improved flexibility can also contribute to better posture and movement efficiency.
2. Improved Mobility
By increasing flexibility and strengthening the inner thighs, the Thigh Fly makes movements like walking, running, and squatting easier and more comfortable. Enhanced mobility can also help reduce the risk of injury by promoting better joint function.
3. Increased Strength
This exercise engages and strengthens the inner thigh muscles, which provide stability and support to the hips and pelvis. Stronger inner thighs contribute to better balance and coordination, which are essential for both daily activities and athletic performance.
4. Core Activation
The Thigh Fly requires core stability to maintain proper form, which helps strengthen the abdominal muscles, lower back, and pelvis. A strong core supports better posture and overall body alignment.
5. Enhanced Lower Body Function
Stronger and more flexible inner thighs improve overall lower body function, which can enhance athletic performance, increase agility, and reduce the risk of falls, particularly in older adults.
6. Rehabilitation & Injury Prevention
The controlled stretching and strengthening involved in the Thigh Fly can be beneficial for individuals recovering from hip, thigh, or groin injuries. This exercise can help promote healing, restore range of motion, and improve overall lower-body stability.
How to Incorporate the Thigh Fly Into Your Routine
- Warm-Up or Cool-Down: Use the static stretch variation before or after workouts to improve flexibility.
- Leg Day Workouts: Include the dynamic Thigh Fly to enhance inner thigh strength and stability.
- Core Workouts: Engage the core while performing the movement to improve balance and abdominal strength.
- Rehabilitation Programs: Utilize this exercise for recovering from groin, hip, or thigh injuries with a physical therapist’s guidance.
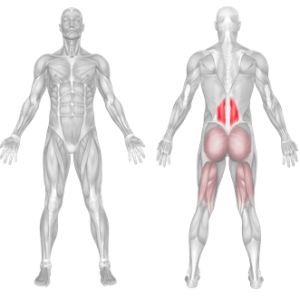
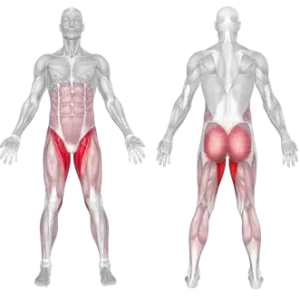
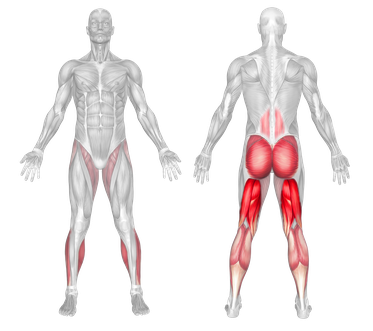
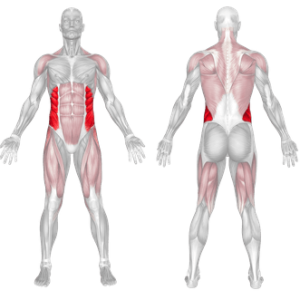
Thigh Fly Muscles Worked
Thigh fly Variations

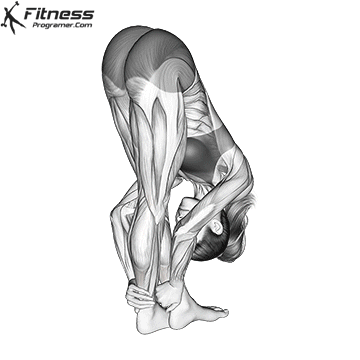
Overview
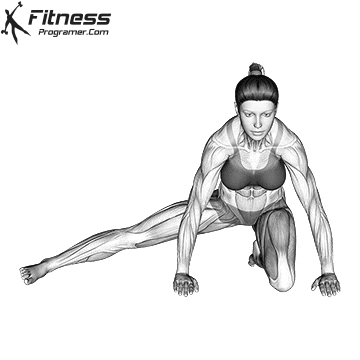
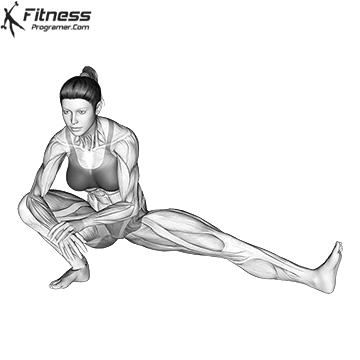
The Standing Cross-Leg Hamstring Stretch is a static flexibility exercise that targets the hamstrings, calves, glutes, and lower back. It is a posterior chain-focused stretch and is commonly used in warm-ups, cool-downs, and flexibility routines. This stretch helps release muscle tension, especially for those with sedentary lifestyles or lower body tightness due to training.
How to Perform the Standing Cross-Leg Hamstring Stretch
Starting Position: Stand tall with both feet together and arms at your sides.
Cross Your Legs: Step your right foot over your left so your legs are crossed. Keep both feet flat on the ground and knees slightly bent or straight depending on flexibility.
Bend Forward: Slowly hinge at the hips and bend forward, reaching toward your toes or the floor. Let your head hang down and keep your spine relaxed.
Hold the Stretch: Grab your ankles, shins, or the floor—wherever your flexibility allows. Hold this position for 20–30 seconds while breathing deeply.
Switch Sides: Slowly return to the starting position, then switch your leg cross and repeat the stretch on the other side.
Tips for Proper Form
Keep your back relaxed and allow your spine to lengthen naturally.
Don’t lock your knees; a soft bend prevents unnecessary strain.
Avoid bouncing or jerking movements; the stretch should be slow and controlled.
Exhale deeply as you fold forward to help relax your muscles.
Focus on the hip hinge, not the back bend, to target hamstrings properly.
Common Mistakes
Rounding the back too much: This reduces the effectiveness of the hamstring stretch and may strain your spine.
Bouncing to go deeper: Static stretches should be held, not bounced.
Locking the knees: This can strain the joints and reduce muscle engagement.
Overreaching: Trying to touch the floor before developing flexibility may cause injury.
Incorrect breathing: Holding your breath can increase tension and reduce the stretch’s effectiveness.
Benefits of the Standing Cross-Leg Hamstring Stretch
Improves hamstring flexibility: Helps elongate tight hamstrings, reducing the risk of strains and tears.
Reduces lower back tension: The forward fold decompresses the spine and stretches the lower back, alleviating stiffness.
Enhances posture: Regular practice can correct posterior pelvic tilt caused by tight posterior chain muscles.
Increases blood flow to muscles: Stretching stimulates circulation, helping with recovery and reducing muscle soreness.
Boosts hip and glute mobility: Crossing the legs targets additional fibers in the glutes and hips, enhancing lower body movement quality.
Improves balance and coordination: Standing while folding forward with legs crossed requires and develops body awareness.
No equipment required: A convenient stretch that can be performed anywhere—gym, home, or office.
How to Incorporate Into Your Routine
- For Flexibility Training: Include this stretch at the end of your workout when muscles are warm. Perform 2–3 rounds per leg, holding for 30–60 seconds.
- For General Fitness: Use it during cool-downs after leg-heavy workouts or as a daily stretch to counteract sitting.
- For Recovery: Add it to your post-rehabilitation or mobility routine to restore hamstring length and reduce tension.
- For Athletic Performance: Incorporate before sprinting, deadlifting, or jumping workouts to ensure optimal hamstring range of motion.
- For Yoga or Mobility Circuits: Use this movement in place of seated forward folds for a standing variation that still builds deep hamstring flexibility.
Muscles Worked
Frequently Asked Questions
Is the standing cross-leg hamstring stretch safe for beginners?
Yes, but beginners should maintain a slight bend in the knees and avoid overstretching to prevent strain.
Can this stretch help with lower back pain?
It can relieve mild lower back tightness caused by hamstring stiffness, but those with chronic back pain should consult a professional first.
How often should I perform this stretch?
2–4 times per week is sufficient for maintaining flexibility. Daily use is fine if done gently.
What should I do if I can’t reach the floor?
Place your hands on your thighs, shins, or use yoga blocks to support yourself without straining.
Can I perform this stretch cold, without warming up?
It’s best to stretch after some light activity or a workout. Stretching cold muscles can lead to injury.
How to Bodyweight Windmill
Bodyweight Windmill Benefits
- A dynamic flexibility exercise that you can do before starting workouts. It can help you increase flexibility and range of motion, including back, shoulder, arm, legs and abdominal muscles
Muscles Worked in The Bodyweight Windmill
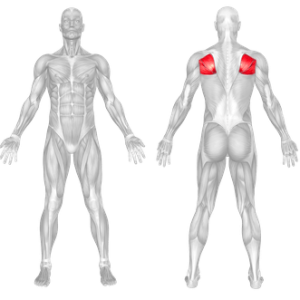
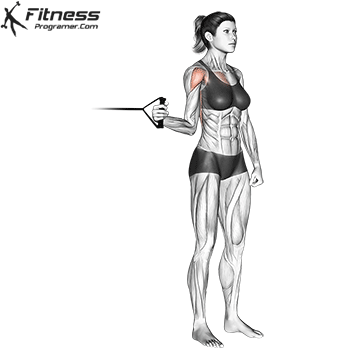
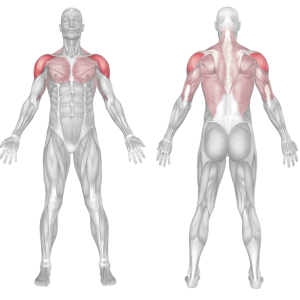
Cable External Shoulder Rotation
Cable External Shoulder Rotation Benefits
The shoulder muscle consists of 3 parts. These; anterior deltoid, lateral deltoid and posterior deltoid muscles. Besides these large muscles, there are 4 more muscles to consider. These muscles are called rotator cuff muscles. These muscles are like columns under the building! The stronger the columns, the more earthquake resistant the building. The shoulder muscles are just like that, the stronger the muscles that support it, the stronger the shoulder muscles. One of the causes of shoulder pain and shoulder injuries in sports is to overload the shoulder muscles without strengthening these muscles.
- Rotation exercises are exercises designed to strengthen the rotator cuff muscles connected to the shoulder muscles. Strengthening your rotator cuff muscles with these exercises before shoulder training is beneficial for your shoulder health.
- To makeover the entire muscle for better muscle balance and joint stability, you have to work it through a full range of motion. Performing shoulder exercises designed to strengthen the muscles as well as to improve the shoulder range of motion will reduce the stress on the joint making it less susceptible to joint inflammations like tendinitis and bursitis.
Muscles Worked in the Cable External Shoulder Rotation
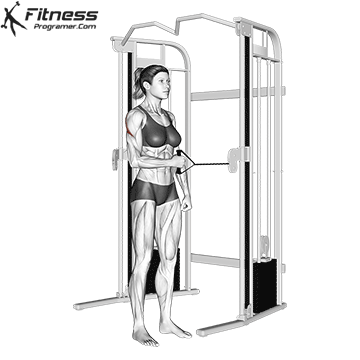
How To Cable Internal Shoulder Rotation
Starting Position: Begin by adjusting a cable machine so that the handle is a little higher than your waist.
Hold the handle and bend your elbow to 90 degrees. Step away from the machine so that there is a little tension in the starting position.
Form: Exhale and rotate your shoulder in towards the center of your body. Hold for a brief second and then slowly lower to the starting position.
Tips: Do your best to keep your shoulder next to your body– don’t let your elbow move too far out to the side.
Move in a slow and controlled manner so that momentum doesn’t take over. Especially focus on slowly returning to the starting position.
Cable Internal Shoulder Rotation Benefits
The shoulder muscle consists of 3 parts. These; anterior deltoid, lateral deltoid and posterior deltoid muscles. Besides these large muscles, there are 4 more muscles to consider. These muscles are called rotator cuff muscles. These muscles are like columns under the building! The stronger the columns, the more earthquake resistant the building. The shoulder muscles are just like that, the stronger the muscles that support it, the stronger the shoulder muscles. One of the causes of shoulder pain and shoulder injuries in sports is to overload the shoulder muscles without strengthening these muscles.
- Rotation exercises are exercises designed to strengthen the rotator cuff muscles connected to the shoulder muscles. Strengthening your rotator cuff muscles with these exercises before shoulder training is beneficial for your shoulder health.
- To makeover the entire muscle for better muscle balance and joint stability, you have to work it through a full range of motion. Performing shoulder exercises designed to strengthen the muscles as well as to improve the shoulder range of motion will reduce the stress on the joint making it less susceptible to joint inflammations like tendinitis and bursitis.
Muscles Worked in the Cable Internal Shoulder Rotation
How to Across Chest Shoulder Stretch
Dynamic stretching consists of active movements. It is usually done before a workout to help warm up your muscles and increase your heart rate. Move slowly, stop and repeat, dig a little deeper each time and improve your range of motion. Pre-workout dynamic stretching improves circulation, prepares your muscles for movement, and temporarily increases your range of motion.
Static stretching, more commonly done at the end of a workout when your muscles are warm, is when stretches are held in place for a certain period of time, not moving. Static stretching is the most effective form of stretching for loosening up your muscles, joints, ligaments, and tendons, while also improving flexibility and range of motion. Static stretching requires you to move a muscle to the end of its range of motion and maintain this position for 20 to 45 seconds. Repeat this 2 to 3 times each.
Across Chest Shoulder Stretch Benefits
- Shoulder stretches can help relieve muscle tension, pain, and tightness in the neck and shoulders. Including shoulder-specific exercises and stretches in your overall workout program may help increase your shoulder mobility and flexibility. These movements may also build strength in your shoulders, improve your shoulder function, and prevent injury.
- In addition, this stretching movement benefits the triceps, and back muscles.
Muscles Worked in the Across Chest Shoulder Stretch

How to: Standing Reach Up Back rotation Stretch
Dynamic stretching consists of active movements. It is usually done before a workout to help warm up your muscles and increase your heart rate. Move slowly, stop and repeat, dig a little deeper each time and improve your range of motion. Pre-workout dynamic stretching improves circulation, prepares your muscles for movement, and temporarily increases your range of motion.
Static stretching, more commonly done at the end of a workout when your muscles are warm, is when stretches are held in place for a certain period of time, not moving. Static stretching is the most effective form of stretching for loosening up your muscles, joints, ligaments, and tendons, while also improving flexibility and range of motion. Static stretching requires you to move a muscle to the end of its range of motion and maintain this position for 20 to 45 seconds. Repeat this 2 to 3 times each.
Standing Reach Up Back rotation Stretch / Benefits
- You can use this exercise to stretch more than one muscle group. Especially while stretching the back muscles, your chest, shoulder and triceps muscles will also gain flexibility. Adding stretches to your overall workout will help increase your muscle mobility and flexibility.
Muscles Worked
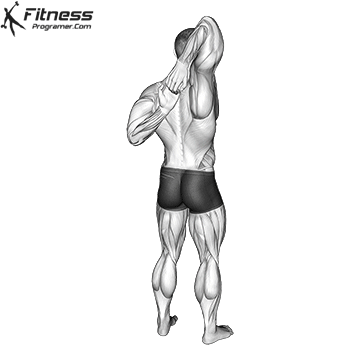
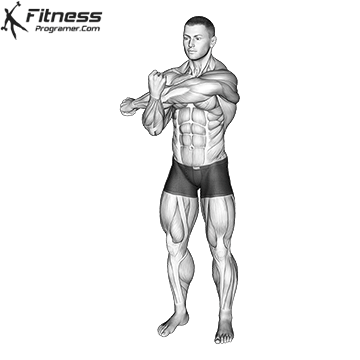
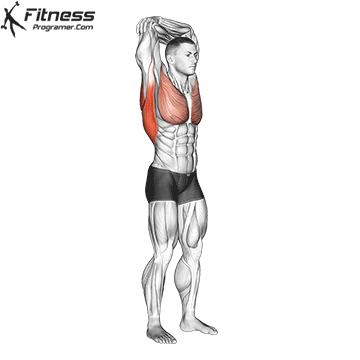
Shoulder Stretch Behind The Back Overview
The Shoulder Stretch Behind the Back is a static stretch designed to improve shoulder flexibility, mobility, and posture. It primarily targets the muscles and joints in the shoulders, while also engaging the chest, upper back, and arms. This stretch is particularly beneficial for releasing tension in the shoulders caused by poor posture, prolonged sitting, or repetitive upper-body movements.
Who Should Perform This Stretch?
- Office Workers: Helps alleviate tension from prolonged sitting and poor posture.
- Athletes and Lifters: Improves shoulder mobility, aiding performance in sports and weightlifting.
- Older Adults: Maintains shoulder health and prevents stiffness associated with aging.
- Individuals in Rehab: Gentle enough for recovery programs, with modifications as needed.
How to perform the Shoulder Stretch Behind the Back
Standing Variation:
- Stand in a neutral posture with your feet shoulder-width apart.
- Raise one arm overhead and bend the elbow to reach behind your back.
- Simultaneously, bring the other arm behind your back from below, aiming to touch or overlap your fingers.
- Do they touch, or are they close to touching? Are they overlapping?Does one side feel tighter than the other?
- Switch sides and note your results.
- Hold a towel or resistance band in both hands behind your back.
- Use the towel to assist in pulling your arms into the stretch if clasping your hands is challenging.
- Follow the same technique as above, ensuring a controlled stretch.
Shoulder Flexibility Test
The Shoulder flexibility test is a simple flexibility test to determine whether the hands can be brought together from behind and to detect shoulder range of motion.
Measure distance from finger tip to finger tip. If fingers overlap, score as a plus. If fingers fail to meet, score as a minus.
- Fingers overlap / Excellent
- Fingers are touching / Good
- Fingertips are not touching but are less than two inches (5cm) apart. / Fair
- Fingertips are greater than two inches (5cm) apart. / Poor
Tips for Maximum Effectiveness
- Start Gradually: Begin with a smaller range of motion and increase as your flexibility improves.
- Pair with Other Shoulder Stretches: Combine this stretch with movements like reverse shoulder stretches or assisted stretches for a comprehensive routine.
- Incorporate into Work Breaks: Use this stretch during long periods of sitting to reduce tension and improve posture.
- Breathe Deeply: Take slow, deep breaths during the stretch to help relax the muscles and enhance flexibility.
Common Mistakes to Avoid
- Overarching the Back: Keep your core engaged to avoid excessive arching in the lumbar spine.
- Hunching the Shoulders: Ensure your shoulders are pulled back and down, rather than shrugged upward.
- Using Momentum: Perform the stretch slowly and with control to avoid jerking motions that can strain the muscles.
- Forcing the Range of Motion: Stretch only to a comfortable point; avoid overextending the shoulders.
Benefits of the Shoulder Stretch Behind the Back
- Improved Shoulder Flexibility
- Enhances the range of motion in the shoulders, making it easier to perform overhead or reaching movements.
- Better Posture
- Opens up the chest and pulls the shoulders back, counteracting the effects of hunching or slouching.
- Relieves Muscle Tension
- Reduces tightness in the shoulders, chest, and upper back, particularly for those with desk jobs or frequent overhead lifting.
- Prevents Injuries
- Increases flexibility and mobility, which can reduce the risk of strains, particularly in sports or resistance training.
- Improves Athletic Performance
- Prepares the shoulders for dynamic movements, benefiting activities like throwing, swimming, or weightlifting.
- Versatility and Accessibility
- Can be performed anywhere, with or without equipment, and is suitable for all fitness levels.
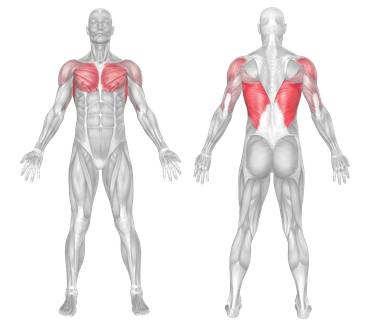
Muscles Worked
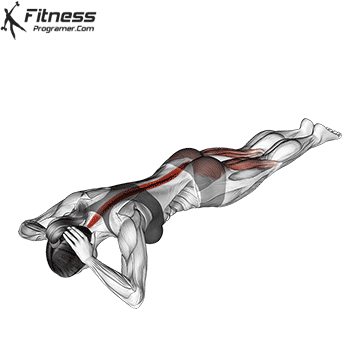
How to Floor Hyperextension
1- Lie face down with your legs together. Place your hands by the side of your head, keeping your shoulders relaxed and your core active. Breathe in.
2- Exhale as you lift your upper body off the floor. Perform the movement slowly, controlling it with your core. Be careful not to jerk your head or strain the muscles of your lower back or neck.
3- Breathe in, hold briefly at the top of the movement, maintaining an active core, then slowly and gently lower yourself back to the start position.
Floor Hyperextension Benefits
- This move strengthens the erector spinae muscles that provide support to the spine. Strong back muscles can prevent postural deviations that lead to poor posture and discomfort, such as kyphosis (“hunchback”). Floor hyperextension movement improves your posture by extending your back muscles and reducing the tension between your lower back and core areas. It also enhances your lower back’s strength, making it easier to stay upright throughout the day.
Muscles Worked in the Floor Hyperextension
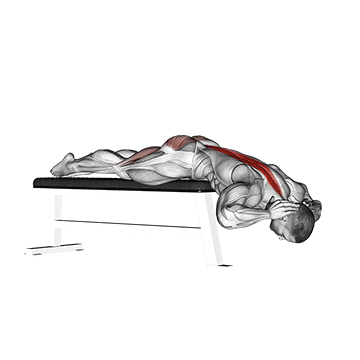
How to Flat Bench Hyperextension
Flat Bench Hyperextension Benefits
- Hyperextension exercises are an excellent workout that strengthens your core, lower back, glutes, and hamstrings.
- Hyperextension movement improves your posture by extending your back muscles and reducing the tension between your lower back and core areas. It also enhances your lower back’s strength, making it easier to stay upright throughout the day.
- It’s also beneficial for lower back health as some lower back pain can stem from weak glutes and tight hamstrings.
Muscles Worked in the Flat Bench Hyperextension