
Walk Wave Machine
Overview
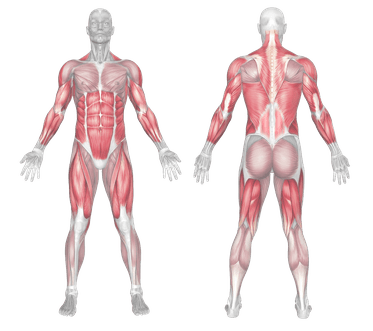
Jump rope, also known as skipping, is a classic cardio workout that engages multiple muscle groups and improves cardiovascular endurance, coordination, and agility. Portable and inexpensive, it’s a favorite among athletes, boxers, and general fitness enthusiasts alike.
How to do perform Jump Rope
Choose a rope length that reaches your armpits when stood on with both feet.
Hold the handles at hip height with elbows bent and wrists slightly forward.
Stand tall with your feet together, core tight, and knees slightly bent.
Begin turning the rope with your wrists while keeping your shoulders relaxed.
Jump just high enough to clear the rope, landing softly on the balls of your feet.
Maintain a steady rhythm, keeping your jumps small and controlled.
Tips for Proper Form
Use your wrists to spin the rope, not your arms.
Keep your core engaged for balance and posture.
Jump low to conserve energy and reduce impact.
Land softly with slightly bent knees.
Breathe rhythmically to sustain endurance.
Common Mistakes
Jumping too high, which wastes energy and increases joint stress.
Using arms instead of wrists, causing inefficient movement.
Slouching or looking down, which affects form and rhythm.
Poor rope length, which causes tripping or tangling.
Holding your breath, leading to early fatigue.
Benefits of the Jump Rope
Boosts Cardiovascular Health: Jumping rope rapidly elevates heart rate, improving heart and lung endurance.
Burns Calories Efficiently: High-intensity rope skipping can burn over 10–15 calories per minute.
Improves Coordination and Agility: Timing and rhythm sharpen motor skills and body awareness.
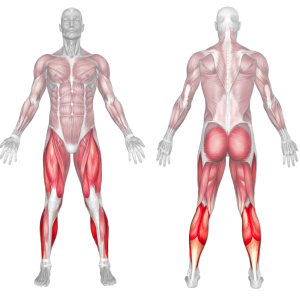
Strengthens Lower Legs and Ankles: Repetitive jumping targets calves, ankles, and foot muscles.
Enhances Balance and Footwork: Requires dynamic stability and helps athletes improve agility.
Full-Body Engagement: Activates shoulders, core, glutes, and legs for total-body conditioning.
Portable and Versatile: Jump rope can be done anywhere, anytime, with minimal equipment.
How to Incorporate Into Your Routine
- For Beginners: Start with 2–3 sets of 30–60 seconds of jumping, resting between sets.
- For Functional Training: Add 30–60 seconds between compound exercises to enhance agility and coordination.
- For Circuit Training: Use as a cardio station in a high-intensity circuit for 3–4 rounds.
- For General Fitness: Jump for 10–15 minutes at moderate intensity 3–5 days a week.
- For Conditioning and Fat Loss: Perform interval-style jump rope training (e.g., 40 sec on, 20 sec off) for 15–20 minutes.
Muscles Worked
Frequently Asked Questions
Is jump rope good for beginners?
Yes, it’s scalable for all fitness levels. Start slowly and focus on form before increasing speed.
Can jump rope replace running?
It can be a great alternative to running for cardiovascular health and fat loss, especially if space or impact is a concern.
How often should I do jump rope workouts?
You can include it 3–5 times per week depending on your fitness goals and intensity level.
What kind of rope should I use?
Use a speed rope for fast-paced workouts or a weighted rope for strength and conditioning.
Overview
The stationary bike is a versatile indoor cardio machine that offers a low-impact, heart-healthy workout suitable for all fitness levels. It helps improve cardiovascular endurance, burn calories, strengthen the legs, and support fat loss goals—all while minimizing stress on the joints. There are upright, recumbent, and spin-style bikes to suit various needs.
How to use a stationary bike
Adjust the seat height so your knee has a slight bend at the bottom of the pedal stroke.
Sit upright with a firm grip on the handlebars and feet securely in the pedals.
Start pedaling slowly to warm up your muscles and joints.
Increase resistance or speed as needed, depending on your workout type.
Maintain steady breathing and posture as you ride.
Cool down by lowering resistance and pedaling gently for 3–5 minutes.
Tips for Proper Form
Keep your back straight and core engaged throughout the ride.
Adjust the seat properly to avoid knee strain.
Push through the heels, not just the toes.
Avoid rocking your hips or leaning excessively on the handlebars.
Maintain consistent cadence and resistance.
Common Mistakes
Poor seat height, which can strain knees or hips.
Slouching or hunching over, reducing core and lung capacity.
Overusing the handlebars, reducing lower-body effort.
Pedaling too fast without resistance, minimizing benefits.
Skipping the warm-up or cooldown, increasing risk of cramps or injury.
Benefits of the Stationary Bike
Joint-Friendly Cardio: Low-impact pedaling motion reduces strain on the knees, hips, and ankles.
Effective Calorie Burn: Can burn hundreds of calories per session depending on effort and duration.
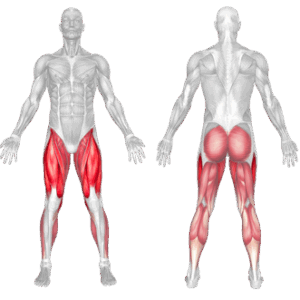
Strengthens Lower Body Muscles: Targets quads, hamstrings, glutes, and calves with each pedal stroke.
Supports Heart and Lung Health: Enhances aerobic capacity and circulation through consistent cardiovascular training.
Adaptable for All Levels: Easily adjustable resistance and pace make it beginner-friendly and athlete-approved.
Ideal for HIIT or Steady-State Workouts: Can be used for both fat-burning intervals and longer endurance sessions.
Safe Indoor Training Option: Allows for consistent training regardless of weather or outdoor safety concerns.
How to Incorporate Into Your Routine
- For Beginners: Ride for 10–15 minutes at low resistance to build stamina and form.
- For Fat Loss: Perform 30–45 minutes of moderate resistance cycling 3–5 times per week.
- For Endurance: Use longer rides (45–60 minutes) at steady pace or perform tempo rides.
- For Strength and Power: Use short bursts of high resistance for 20–30 seconds followed by recovery.
- For Circuit Training: Use the bike for 5–10 minute intervals between strength training sets.
- For General Fitness: Include in weekly rotation as a low-impact cardio day option.
- For Injury Rehab or Recovery: Use light pedaling to stimulate blood flow and improve joint mobility.
Muscles Worked
Frequently Asked Questions
Is cycling better than walking for cardio?
Both are excellent. Cycling offers greater leg strengthening, while walking is more weight-bearing.
Can the stationary bike help with fat loss?
Yes. When combined with a calorie deficit and consistent training, it supports body fat reduction.
How often should I use the bike?
3–5 times per week is ideal for cardiovascular and metabolic benefits.
Can I build leg muscles with the bike?
Yes, especially with higher resistance settings and hill-climb simulations.
Which is better: recumbent or upright bike?
Recumbent bikes offer more back support and comfort. Upright bikes provide a more athletic riding posture and core activation.
Overview
The treadmill is a stationary cardio machine that simulates walking, jogging, or running. It allows users to walk, jog, or run at variable speeds and inclines. Ideal for everyone, treadmills offer benefits such as improved cardiovascular endurance, calorie burning, and support for overall heart and lung function.
How to Use a Treadmill
Step onto the treadmill with the belt stationary. Clip on the safety key.
Start with a warm-up by walking at a slow pace for 3 to 5 minutes.
Increase the speed to your desired pace for walking, jogging, or running.
Adjust the incline as needed to simulate hills and increase intensity.
Maintain an upright posture and swing your arms naturally.
Cool down by gradually reducing speed over the last 3 to 5 minutes.
Tips for Proper Form
Keep your head up and shoulders relaxed to maintain good posture.
Avoid holding onto the rails, especially during jogging or running.
Strike the belt midfoot and avoid overstriding.
Swing your arms naturally to assist with rhythm and balance.
Use proper footwear with cushioning and support for your gait.
Common Mistakes
Looking down at your feet, which can affect posture and balance.
Gripping the handrails tightly, reducing core and leg activation.
Overstriding, which increases joint impact and reduces efficiency.
Skipping the warm-up or cooldown, which can increase injury risk.
Ignoring incline options, which limits potential training adaptations.
Benefits of the Treadmill
Improves Cardiovascular Health: Treadmill workouts elevate heart rate, improving heart and lung efficiency.
Burns Calories for Fat Loss: Walking or running at moderate to high intensities helps reduce body fat.
Convenient and Weatherproof: Treadmills offer indoor cardio training regardless of climate conditions.
Customizable for All Fitness Levels: You can adjust the pace and incline to match your personal goals and ability.
Low-Impact Options Available: Walking on a treadmill is gentler on joints than running outdoors on pavement.
Builds Lower Body Endurance: Regular treadmill use strengthens the calves, hamstrings, glutes, and quads.
Tracks Progress Easily: Most machines include metrics like speed, time, distance, heart rate, and calories burned.
How to Incorporate Into Your Routine
- For Beginners: Start with 2 to 3 sessions per week of 20 to 30 minutes of walking or light jogging.
- For Fat Loss: Use interval walking or incline walking for 30 to 45 minutes, 3 to 5 times weekly.
- For Endurance Training: Run at a steady pace for 45 to 60 minutes, focusing on maintaining heart rate in Zone 2 or 3.
- For Strength and Conditioning: Perform hill sprints or incline intervals 2 to 3 times weekly for lower body endurance.
- For Functional Fitness: Combine short treadmill intervals with bodyweight exercises in a circuit format.
- For General Fitness: Walk briskly for 30 minutes daily or after strength training sessions as a cooldown.
- For Mobility and Recovery: Use walking sessions at a slow pace and low incline to promote blood flow on rest days.
Treadmill Muscles Worked

Frequently Asked Questions
Is treadmill running as effective as outdoor running?
Yes, especially for consistency and reduced joint impact. You can simulate outdoor resistance using incline settings.
How often should I use the treadmill?
Three to five times per week is ideal, depending on your goals, schedule, and overall training routine.
What is a good speed for fat burning?
Moderate walking at 3 to 4 mph on an incline or light jogging at 5 to 6 mph promotes fat oxidation.
Can I use the treadmill for HIIT workouts?
Yes. Alternate between short, fast sprints and walking recovery periods for an effective HIIT session.
Overview
By elevating the treadmill deck, it simulates uphill walking or running. Most treadmills have adjustable incline settings, typically ranging from 0 to 15 percent. Using an incline activates more muscle groups, increases caloric expenditure, and helps improve cardiovascular fitness.
How to do Perform:
Start by warming up with 3 to 5 minutes of flat walking.
Gradually increase the incline between 5 and 12 percent, depending on your fitness level.
Maintain a steady walking pace or light jog while keeping your posture upright.
Avoid leaning forward, and let your glutes and hamstrings do the work.
Use the incline for 15 to 30 minutes, then lower it and cool down for 3 to 5 minutes.
Tips for Proper Form
Keep your chest up and shoulders relaxed to avoid strain.
Look straight ahead, not down at your feet.
Shorten your stride slightly as the incline increases.
Swing your arms naturally to maintain rhythm and balance.
Avoid holding onto the handrails, which reduces muscle activation.
Common Mistakes
Leaning forward excessively, which can strain your lower back.
Gripping the rails too tightly, reducing lower body engagement.
Using a high incline for too long, especially when fatigued.
Skipping the warm-up or cooldown, which increases injury risk.
Setting incline too steep, compromising walking or running form.
Benefits of the Incline Treadmill
Burns More Calories: Walking on an incline increases intensity and calorie burn without speeding up.
Targets More Muscle Groups: The glutes, hamstrings, and calves are more active during incline walking.
Low-Impact Option for Cardio: Incline walking is gentler on joints compared to jogging or sprinting.
Boosts Cardiovascular Endurance: Uphill walking raises heart rate, improving aerobic capacity and stamina.
Improves Posture and Core Strength: Proper incline posture activates core muscles and enhances spinal alignment.
Enhances Fat Loss Potential: Greater muscle engagement means higher energy expenditure, supporting fat loss.
Functional Carryover to Outdoor Terrain: Strengthens muscles used in hiking and walking uphill in real-life scenarios.
How to Incorporate Into Your Routine
- For Beginners: Walk at 3 to 4 mph with a 5 percent incline for 15 to 20 minutes.
- For Fat Loss: Use incline intervals (5 to 12 percent) for 30 to 45 minutes, 3 to 5 times weekly. (For example: 12-3-30 workout)
- For Endurance: Maintain a steady incline walk or jog for 30 to 60 minutes at moderate intensity.
- For Strength and Conditioning: Perform hill intervals or long incline walks with added ankle weights.
- For Functional Fitness: Add incline treadmill walking into circuits for lower body and core endurance.
- For General Fitness: Include incline walking 2 to 3 times weekly after resistance training or as active recovery.
- For Mobility and Recovery: Walk at 2 to 3 mph with a mild incline (3 to 5 percent) to support circulation and mobility.
Incline Treadmill Muscles Worked
Frequently Asked Questions
Is incline treadmill walking better than flat walking?
Yes, it burns more calories and engages more muscles without increasing impact on the joints.
What incline should I use for fat loss?
Start with 8 to 10 percent incline and walk briskly for 30 minutes to maximize fat burning.
Can incline walking replace leg day?
No, but it complements strength training by improving muscular endurance and conditioning.
Is incline treadmill good for beginners?
Yes. Start slow and low, and gradually increase the incline as your endurance improves.
Overview
The rowing machine is a cardio and strength-training exercise tool that simulates rowing. By engaging both upper and lower body muscle groups, it improves stamina, strength, and calorie expenditure simultaneously. It provides a full-body workout, engaging muscles in the legs, core, back, and arms while offering low-impact cardiovascular conditioning. It is widely used for fat loss, aerobic endurance, and sport-specific conditioning.
How to Use the Rowing Machine
Start Position (The Catch): Sit on the seat with feet strapped in. Bend your knees, lean slightly forward at the hips, and hold the handle with an overhand grip.
Drive Phase: Push explosively through the legs, extend hips, then pull the handle toward your upper abdomen while keeping elbows close to the body.
Finish Position: Legs fully extended, torso leaning slightly back, handle pulled just below the chest.
Recovery Phase: Extend arms forward first, then hinge at the hips, and finally bend knees to return to the catch.
Maintain a steady rhythm, coordinating legs, core, and arms smoothly.
Tips for Proper Form
Keep your back straight and avoid rounding during the drive.
Push with your legs first, then follow with the upper body pull.
Maintain a controlled pace; don’t rush the recovery.
Keep elbows tucked close to the ribcage at the finish.
Common Mistakes to Avoid
Leading with the arms instead of pushing with the legs.
Overextending the lower back at the finish.
Letting knees splay outward during the drive.
Rushing the recovery phase instead of keeping rhythm.
Benefits of the Rowing Machine
Full-Body Workout: Engages legs, core, back, and arms simultaneously, promoting balanced muscular development.
Low-Impact Conditioning: Gentle on joints while still delivering high-calorie burn and cardiovascular benefits.
Builds Endurance and Stamina: Improves both aerobic capacity and muscular endurance, making it suitable for athletes and general fitness.
Enhances Posture and Core Strength: Strengthens posterior chain muscles, supporting better posture and spinal health.
Efficient Calorie Burn: A time-efficient way to combine strength and cardio training in one workout.
How to Incorporate Into Your Routine
Begin your training with a 5 minute warm up (to gradually increase heart rate). It should be performed at a light intensity to warm up your body. Light perspiration is an indicator that your body has warmed up and is ready for an increase in intensity.
For Beginners: Start with 10–15 minutes at a moderate pace, focusing on learning proper technique.
For Endurance Training: Row for 20–40 minutes at a steady pace, maintaining consistent rhythm and breathing.
For Interval Training: Perform high-intensity intervals (e.g., 1 minute fast, 1–2 minutes slow) for 15–20 minutes.
For Strength and Power: Use higher resistance and shorter bursts, rowing hard for 250–500 meters, followed by rest.
For General Fitness: Include rowing sessions 2–3 times per week as part of a balanced cardio and strength program.
The duration of your exercise depends on your fitness level; generally it is recommended that you maintain your heart rate in the training zone for at least 15-20 minutes to realize an aerobic benefit. Beginners should always start slowly and bring their workout sessions up to 15 minutes or more. As your fitness level increases, you will be able to maintain your heart rate in the training zone for longer periods: usually between 20 and 30 minutes.
Rowing Machine Muscles Worked
- Deltoids
- Triceps
- Trapezius
- Serratus Anterior
- Erector Spinae
- Rectus Abdominus
- Hamstrings
- Tibialis Anterior
- Gastrocnemius
| Legs Emphasis | Body Swing Emphasis | Arm Pull Through |
|
|
|
- Biceps
- Brachialis
- Brachioradialis
- Forearm Extensors
- Latissimus Dorsi
- Trapezius
- Quadriceps
- Posterior Deltoid
- Gluteus Maximus
- Trapezius
- Rectus Abdominus
- Hamstrings
- Anterior Deltoid
- Triceps
- Wrist Extensors
- Gastrocnemius
Frequently Asked Questions (FAQs)
Is the rowing machine good for weight loss?
Yes, it is excellent for calorie burning while building strength and endurance.
How long should beginners row?
Start with 10–15 minutes, focusing on form before increasing duration or intensity.
Is rowing safe for people with knee or joint issues?
Yes, it’s low-impact, but proper form is essential to avoid strain.
How many times per week should I row?
Two to four sessions per week is effective for most fitness goals.
What type of resistance is best—air, water, or magnetic?
All are effective; air and water rowers mimic natural rowing feel, while magnetic rowers are quieter and smoother.
Can rowing replace weight training?
Rowing builds muscular endurance and strength but should complement, not replace, resistance training.
How to Manual Treadmill
Elliptical Machine
Overview
The stepmill is a cardio machine that mimics walking upstairs on a continuously rotating staircase. It provides a highly effective low-impact workout that strengthens the legs and glutes, boosts cardiovascular health, and supports weight management. Compared to treadmills or ellipticals, the stepmill increases vertical loading, making it a more challenging form of walking.
How to do perform Walking on Stepmill
Step carefully onto the machine, starting with the lowest speed setting.
Hold the handrails lightly for balance, keeping an upright posture.
Climb step by step, driving through the heels and engaging your glutes.
Focus on controlled movement, avoiding short or rushed steps.
Increase speed or duration gradually based on your fitness level and goals.
Cool down by decreasing speed for the final 2–3 minutes before stepping off safely.
Tips for Proper Form
Maintain an upright torso, avoid leaning too far forward.
Use the rails lightly, not to support your weight.
Step fully onto each stair, driving through your entire foot.
Engage your core to stabilize your body.
Keep a consistent rhythm, don’t rush or skip steps.
Common Mistakes
Leaning on the handrails, which reduces lower-body engagement.
Taking shallow steps, limiting muscle activation.
Looking down, which disrupts posture and balance.
Climbing too fast, sacrificing form and safety.
Skipping the warm-up or cooldown, increasing injury risk.
Benefits of Walking on the Stepmill
Builds Lower Body Strength: Targets glutes, quads, and hamstrings with each upward step for muscular endurance and tone.
High Calorie Burn: The vertical movement demands more energy, making it excellent for fat loss and conditioning.
Improves Cardiovascular Endurance: Challenges heart and lungs, enhancing aerobic and anaerobic fitness.
Low-Impact on Joints: Provides an intense workout without the pounding impact of running.
Enhances Functional Fitness: Mimics daily activities like stair climbing, improving real-world strength and coordination.
Scalable Intensity: Easily adjusted by speed or workout duration for beginners to advanced athletes.
Strengthens Posterior Chain: Activates glutes and hamstrings more than flat-surface walking or cycling.
How to Incorporate Into Your Routine
- For Beginners: Walk for 5–10 minutes at a slow pace, focusing on coordination and form.
- For Fat Loss: Perform 20–30 minutes at moderate intensity 3–5 times per week.
- For Strength Endurance: Use intervals of 1 minute fast, 1 minute slow for 20 minutes.
- For Functional Training: Pair with bodyweight exercises like squats and lunges for movement prep.
- For Circuit Training: Add 5-minute stepmill sessions between strength rounds to keep heart rate elevated.
- For General Fitness: Walk for 15–20 minutes post-lifting as a conditioning finisher.
- For Athletic Conditioning: Incorporate weighted vest or HIIT-style intervals to simulate sport demands.
Muscles Worked
Frequently Asked Questions
Is the stepmill better than the treadmill for fat loss?
It can be. The vertical stepping motion typically burns more calories in less time due to increased muscular effort.
Can beginners use the stepmill?
Yes, but it’s more intense than walking on flat surfaces. Start slowly and focus on form.
Does the stepmill build muscle?
It tones and strengthens lower-body muscles, especially glutes and thighs, through constant resistance.
Should I hold onto the handrails?
Only lightly for balance. Avoid leaning on them as it reduces workout effectiveness.
How often should I use the stepmill?
2–4 sessions per week is effective for cardiovascular and muscular conditioning without overuse.
How to do: Elbow To Knee Twists