Overview
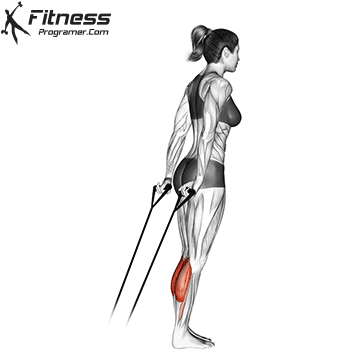
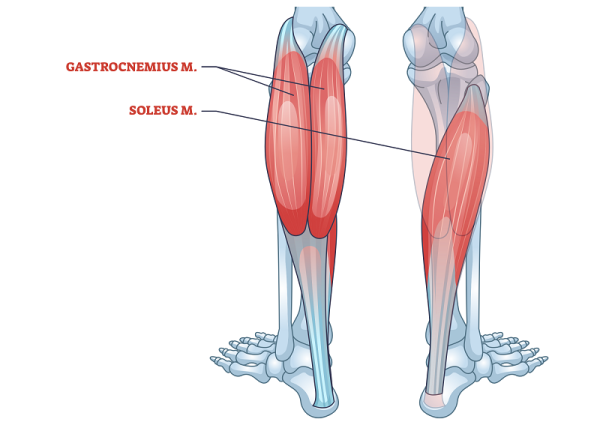
The calf raise with resistance band is a bodyweight plus resistance exercise that isolates and strengthens the gastrocnemius and soleus muscles of the calves. It emphasizes ankle plantarflexion, improves balance, and increases lower leg muscular endurance. It is commonly used in rehabilitation, injury prevention, and general strength or conditioning routines. The addition of a band provides progressive resistance while keeping the movement joint-friendly and accessible.
How to Perform:
Setup: Secure a resistance band to a low anchor point behind your feet.
Grip the Band: Attach handles to the band ends and grasp one handle in each hand, arms straight and palms facing backward.
Starting Position: Stand upright with feet hip-width apart. Keep your spine tall, shoulders slightly retracted, and arms relaxed behind you holding the tensioned band.
Raise: Press through the balls of your feet and lift your heels off the ground slowly, engaging your calves as you rise.
Pause and Contract: At the top of the movement, squeeze the calves and hold for 1–2 seconds to emphasize the peak contraction.
Lower Slowly: Descend under control, allowing your heels to return just below parallel for a full stretch.
Repeat: Perform the desired number of reps while maintaining consistent band tension.
Tips for Proper Form
Stand tall and aligned: Keep your head, shoulders, and hips stacked vertically for better form and calf isolation.
Maximize range of motion: Lift as high as possible onto your toes, then lower until your heels are slightly below parallel if mobility allows.
Hold the peak contraction: Pausing at the top increases time under tension and muscle fiber recruitment.
Avoid bending the arms: Keep elbows extended to maintain consistent band tension from the anchor point.
Stabilize with your core: Engage your abdominal muscles to avoid forward lean or swaying.
Common Mistakes
Using a band that’s too loose, which reduces effective resistance at the top of the movement.
Bouncing the movement, eliminating control and increasing joint strain.
Shortening the range of motion, particularly by not allowing a full heel drop at the bottom.
Shrugging the shoulders or tensing the upper traps due to improper handle positioning.
Letting the arms bend, which decreases the stretch and tension in the band.
Benefits of the Standing Calf Raise With Resistance Band
Applies consistent ascending resistance: The band increases load as you rise, enhancing the contraction at the top of each rep.
Targets both major calf muscles: Engages both the gastrocnemius and soleus for balanced lower leg development.
Promotes better posture: The behind-the-back band position reinforces scapular retraction and upright alignment during the movement.
Improves ankle strength and mobility: Strengthens plantarflexion, which is essential for jumping, running, and directional movement.
Equipment-efficient: Requires only a resistance band with handles and a low anchor point, making it accessible for home or travel training.
Low impact on joints: Gentle on knees and hips while still effectively targeting the calves.
Enhances neuromuscular control: Slowing down the movement improves proprioception, which is beneficial for injury prevention.
How to Incorporate Into Your Routine
For Beginners: Use a light-to-moderate band and complete 2–3 sets of 12–15 reps to learn control and tension.
For Hypertrophy: Perform 3–4 sets of 15–20 reps, focusing on slow tempo and peak contraction to maximize muscle fatigue.
For Strength: Use a thicker band and increase resistance gradually. Perform 4–5 sets of 8–12 reps with a 2–3 second pause at the top.
For Circuit Training: Add to lower-body or plyometric circuits using 12–20 reps for muscular endurance and time-under-tension.
For General Fitness: Include in leg or mobility-focused sessions twice per week to maintain strong, responsive calves.
For Athletic Performance: Pair with sprint mechanics drills, sled pushes, or reactive jumping for sport-specific transfer.
Muscles Worked
Frequently Asked Questions
How is this variation different from a standard banded calf raise?
This version places the band behind your back, offering direct upward resistance and reinforcing scapular retraction, which also benefits posture and shoulder alignment.
Can this exercise be performed with a single band?
Yes. A single loop band with attached handles or ends can be anchored low and held behind the back. Just ensure even resistance on both sides.
Is this safe for beginners with poor balance?
Yes, but beginners can stand next to a wall or use a stable object for balance while learning the movement.
What if the band is too tight or too loose?
Adjust band length or select a different resistance level. Too much tension will limit your range; too little will fail to challenge the muscles.
Should I keep my arms fully extended behind me?
Yes. Keeping your arms straight maintains consistent resistance and ensures the calves, not the upper body, are doing the work.