Foam Roller Inner Thigh Adductor Stretch
Foam Roller Hamstrings
Foam Roller Front Shoulder and Chest
Foam Roller Plantar Fasciitis
Overview
The Foam Roller Calves movement involves sitting on the floor, placing a foam roller under your lower leg, and using your bodyweight to apply pressure while rolling back and forth. The movement can be performed with both legs at once for general release or one leg stacked over the other to increase pressure and isolate specific tension points.
This technique is not a strength exercise but an effective mobility and recovery tool to enhance muscle health, promote blood flow, and reduce post-workout soreness. It is commonly used by athletes, runners, lifters, and sedentary individuals experiencing tightness in the calves or lower limbs.
How to Foam Roll Your Calves
Setup: Sit on the floor with your legs extended and place a foam roller horizontally under your calves.
Support Your Upper Body: Place your hands on the floor behind you and lift your hips slightly so your weight shifts onto the foam roller.
Begin Rolling: Roll slowly from the bottom of the calf (just above the ankle) to the top (below the knee) using small forward and backward movements.
Apply Pressure: To increase pressure, cross one leg over the other so more weight is placed on the lower calf.
Target Trigger Points: If you find a tender or tight spot, pause and hold for 10–20 seconds until the tension reduces.
Repeat: Continue rolling for 20–40 seconds per leg, switching sides as needed.
Tips for Proper Form
Move slowly to properly identify and release tight areas.
Breathe deeply to promote muscle relaxation during the rolling.
Keep your body elevated with your arms to apply consistent pressure.
Do not roll over the knee joint—focus only on the soft tissue of the calf.
Use unilateral rolling (one leg at a time) for deeper release and better control.
Common Mistakes
Rolling too fast: Limits the effectiveness and can skip over trigger points.
Holding your breath: Tension in your body reduces the benefits of release.
Applying too much pressure immediately: Start light and build gradually to avoid discomfort or bruising.
Rolling directly on bones or joints: Avoid the Achilles tendon and knee to prevent irritation.
Skipping sore spots: The goal is to spend time on tight areas to help release tension.
Benefits of the Foam Roller Calves Exercise
Releases muscle tightness: Helps break down adhesions and reduce muscle knots in the calves.
Improves ankle mobility: Loosens surrounding tissues that restrict ankle dorsiflexion and plantar flexion.
Enhances blood flow and recovery: Stimulates circulation for quicker post-workout recovery and soreness reduction.
Prevents lower leg injuries: Reduces the risk of calf strains, Achilles tendonitis, and plantar fasciitis.
Boosts performance in running and jumping: Calf mobility enhances stride length, foot control, and vertical power.
Low-cost, portable recovery tool: Can be performed anywhere with a basic foam roller.
Reduces DOMS (delayed onset muscle soreness): Speeds up recovery time after intense lower body training.
How to Incorporate Into Your Routine
- For Warm-Ups: Perform for 30–45 seconds per leg before a workout to stimulate circulation and prepare the muscle tissue.
- For Cool-Downs: Use post-workout for 1–2 minutes per leg to reduce muscle stiffness and speed up recovery.
- For Daily Mobility: Include as part of a daily routine if you experience frequent calf tightness due to running, walking, or prolonged sitting.
- For Rehabilitation: Recommended under professional guidance to support recovery from calf strains or Achilles tightness.
- For Travel or Long Sitting: Great for releasing tension after long flights, car rides, or desk-bound workdays.
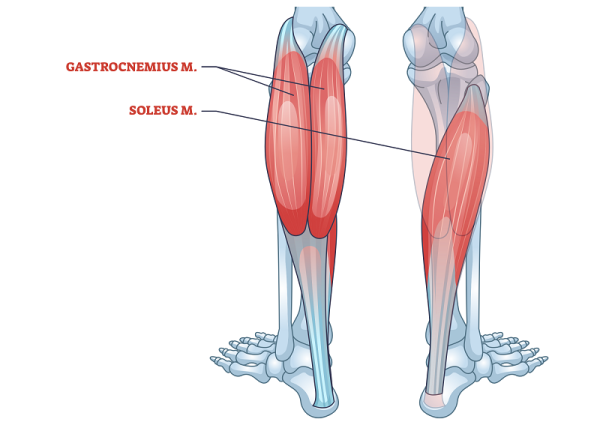
Muscles Worked
Frequently Asked Questions
How often should I foam roll my calves?
2–3 times per week is sufficient for general maintenance. Daily use is safe if done gently.
Should it hurt when I foam roll?
Mild discomfort is normal, but it should not be painful. Avoid pressing too hard into sore spots.
Can foam rolling replace stretching?
No. Foam rolling is complementary to stretching and should be used together for optimal mobility.
What type of foam roller is best for calves?
Medium-density rollers are ideal for beginners. Advanced users may prefer textured rollers for deeper pressure.
Is it normal for calves to feel sore after rolling?
Some tenderness is expected, especially if you’re new to foam rolling. It should subside within a day or two.

Rotator Cuff Stretch
Assisted Reverse Stretch
Overview
The Foot External Rotation With Resistance Band involves performing outward rotation of the foot against the resistance of an elastic band, while sitting on a bench or chair. This isolates small stabilizing muscles around the ankle that are often neglected in traditional training. It is commonly incorporated into physical therapy programs, warm-ups, and prehab routines for athletes, runners, and individuals with foot or ankle weakness.
How to Perform Foot External Rotation With Resistance Band
Setup: Sit on a bench or chair with your knees bent at 90 degrees and feet flat on the floor.
Band Placement: Loop a resistance band around both feet, creating light to moderate tension between them.
Anchor the Opposite Foot: Keep one foot stationary to anchor the band, pressing it into the floor for stability.
Rotate the Working Foot: Slowly rotate the working foot outward, moving against the band’s resistance. Only the foot and ankle should move—avoid knee or hip movement.
Pause at End Range: Hold the externally rotated position for 1–2 seconds for activation.
Return Under Control: Slowly bring the foot back to the starting position without letting the band snap.
Repeat: Perform the desired number of reps, then switch to the other side.
Tips for Proper Form
Keep your leg and knee still; isolate the movement to the ankle and foot only.
Start with light resistance, focusing on controlled movement and muscle engagement.
Maintain upright posture to support spine alignment during the seated position.
Don’t rush the movement—the slower, the more effective for muscle activation.
Breathe steadily to help maintain core stability and relaxation.
Common Mistakes
Moving the knee or thigh instead of isolating the ankle.
Using excessive band resistance which compromises form and control.
Performing fast or jerky reps, reducing effectiveness and risking strain.
Neglecting the return phase — the eccentric portion is key to strengthening.
Allowing toes to dominate the movement instead of rotating the entire foot/ankle.
Benefits of the Foot External Rotation With Resistance Band
Strengthens ankle stabilizers: Activates the external rotators responsible for ankle alignment and joint integrity.
Improves foot control and coordination: Enhances proprioception and muscle awareness in the lower leg.
Reduces risk of ankle sprains: A strong ankle reduces the likelihood of rolling or misstepping during movement.
Supports foot arch health: Engages the tibialis posterior to stabilize and elevate the medial arch.
Corrects muscle imbalances: Helps address dominance from larger calf muscles and underactivation of deeper foot muscles.
Enhances performance in sports: A stable foot and ankle improve sprinting, jumping, and multidirectional movement.
Portable and beginner-friendly: Requires only a resistance band and a chair, making it ideal for home workouts or on-the-go rehab.
How to Incorporate Into Your Routine
- For Rehabilitation: Begin with 2–3 sets of 10–15 reps per foot using a light resistance band, 3–5 times per week as directed by a therapist.
- For Injury Prevention: Use in warm-ups or cooldowns, especially after running or lower body training, 2–3 times weekly.
- For Athletic Prehab: Integrate with balance and mobility drills to prepare the foot and ankle for sports performance.
- For Corrective Training: Use alongside foot doming, toe yoga, and arch-strengthening exercises to correct flat feet or pronation.
Frequently Asked Questions
How often should I do this exercise for rehab?
Start with 3–5 sessions per week, using light resistance and focusing on slow, controlled movement.
Can I use a cable machine instead of a band?
Yes, but a band allows for easier setup, progressive resistance, and controlled tension angles.
Should I feel this in my ankle or calf?
You should feel a deep engagement along the side and back of the ankle, not in the large calf muscle.
What level of resistance band is best to start with?
A light resistance band is ideal for learning control. Progress slowly to medium resistance if needed.
Is this exercise only for rehab?
No. It’s also valuable for prehab, posture correction, and performance enhancement.
Lying Upper Body Rotation
How to do:
1- Lie on your left side with your hips, knees, and feet stacked one above the other, and your hips and knees bent at right angles. Extend your arms straight in front of you, pressing your palms together.
2- Keeping your knees and feet together and your hips stacked, breathe in, brace your abdomen, and reach upward and back with your right hand, while keeping your left arm straight and resting on the floor.
3- Breathing out, rotate your upper body to face the ceiling, keeping your hips stacked and your right arm extended.
4- Continue the movement until you are as far back as possible, with your chest facing upward and your hips still stacked. Hold the movement briefly, keeping your shoulders stable and level. Breathe in.
5- Breathing out, reach back toward the ceiling with your right arm, while rotating your torso back toward the start position slowly and under control.
6- Continue the movement toward the start position and touch the palms of your hands together. Repeat the movement as required, then switch sides.
How to do 90/90 Hip Stretch