Overview
The Unilateral Lat Stretch on the Wall is a static stretching exercise where one arm is placed against a wall while the torso hinges backward and downward to create a deep stretch through one side of the upper back. Commonly used in warm-ups, cooldowns, and mobility routines, this stretch helps counteract tightness caused by overhead training, prolonged sitting, and poor posture. When performed correctly, it promotes better movement mechanics and upper-body comfort.
How to Perform the Unilateral Lat Stretch on the Wall
Starting Position:
Stand facing a wall at arm’s length.
Place one palm flat against the wall at about shoulder height or slightly above.
Step the same-side foot slightly back for stability.
Initiate the Stretch:
Bend slightly at the hips and knees.
Keep your arm straight and gently press the palm into the wall.
Deepen the Movement:
Push your hips backward while allowing your chest to drop toward the floor.
Rotate the torso slightly away from the wall to increase the lat stretch.
Hold and Breathe:
Maintain the stretch for the desired time.
Breathe slowly and deeply, focusing on relaxing the upper back and shoulders.
Switch Sides:
Return to the starting position.
Repeat the movement on the opposite side.
Tips for Proper Form
Keep your spine long rather than excessively rounding the back.
Maintain gentle pressure through the palm without locking the elbow.
Adjust arm height to target different areas of the lat muscle.
Move slowly into the stretch and avoid forcing range of motion.
Focus on steady breathing to enhance muscle relaxation.
Common Mistakes to Avoid
Bending the elbow and losing tension in the lat.
Rotating excessively through the lower back instead of the upper torso.
Holding the breath during the stretch.
Forcing the stretch beyond a comfortable range.
Shrugging the shoulder toward the ear instead of keeping it relaxed.
Benefits of the Unilateral Lat Stretch on the Wall
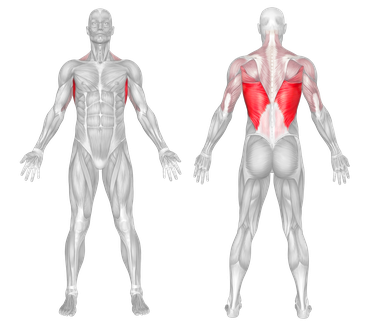
Improves Lat Flexibility: Helps lengthen the latissimus dorsi, supporting better overhead movement and pulling mechanics.
Enhances Shoulder Mobility: Encourages improved shoulder flexion and scapular movement.
Reduces Upper-Back and Side Tension: Relieves tightness caused by desk work, training volume, or limited thoracic mobility.
Supports Better Posture: Improved lat mobility can reduce excessive spinal extension and rounded shoulders.
Addresses Side-to-Side Imbalances: Unilateral execution allows focused work on tighter or restricted sides.
Aids Recovery and Relaxation: Slow breathing during the stretch promotes nervous system downregulation.
Routine Integration
For Beginners: Hold for 20–30 seconds per side, focusing on posture and breathing.
For Mobility Training: Include in upper-body mobility flows or shoulder routines.
For Functional Training: Pair with thoracic rotation drills for improved upper-body mechanics.
For General Fitness: Practice daily for 1–2 sets per side to maintain shoulder health.
For Recovery Days: Hold for 45–60 seconds per side during cooldowns or rest days.
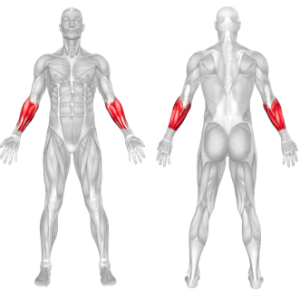
Muscles Worked
Frequently Asked Questions
Should my arm stay completely straight during the stretch?
Yes, keeping the arm straight helps maintain tension through the lat muscle.
Where should I feel the stretch?
You should feel it along the side of the upper back, from the shoulder down toward the waist.
Can I perform this stretch if I have shoulder tightness?
Yes, but keep the movement gentle and adjust arm height to stay comfortable.
How long should I hold the stretch?
Most people benefit from holding 20 to 60 seconds depending on flexibility.
Is this stretch suitable before workouts?
Yes, short holds can be used in warm-ups, while longer holds are better post-workout.
Can this stretch help with overhead mobility?
Yes, improved lat flexibility often leads to better overhead range of motion.
Overview
The Forward Bend is a foundational flexibility exercise commonly used in mobility routines, warm-ups, cooldowns, and yoga-based programs. It focuses on lengthening the posterior chain, particularly the hamstrings and lower back, while promoting relaxation and controlled breathing. It can be performed dynamically or statically and is widely used to improve lower-body flexibility, spinal mobility, and neuromuscular relaxation. When performed correctly, it supports joint health, posture, and overall movement quality.
How to Perform the Forward Bend
Starting Position:
Stand upright with feet hip-width apart.
Keep your weight evenly distributed and core gently engaged.
Initiate the Movement:
Inhale and prepare by lengthening the spine.
Exhale and hinge at the hips, allowing the torso to move forward.
Lower Into the Stretch:
Let your arms hang naturally toward the floor.
Keep the knees slightly bent if hamstring flexibility is limited.
Hold and Breathe:
Relax the neck and shoulders.
Maintain the position while breathing slowly and deeply.
Return to Standing:
Engage your core and glutes.
Slowly roll or hinge back up to the starting position.
Tips for Proper Form
Prioritize a hip hinge rather than rounding excessively through the spine.
Keep your neck relaxed and avoid forcing the stretch.
Bend the knees slightly to reduce strain on the hamstrings.
Focus on controlled breathing to encourage muscle relaxation.
Stop at a depth where you feel a stretch, not pain.
Common Mistakes to Avoid
Locking the knees and overstretching the hamstrings.
Forcing the hands to reach the floor at the expense of form.
Holding the breath during the stretch.
Bouncing at the bottom instead of holding a controlled position.
Benefits of the Forward Bend
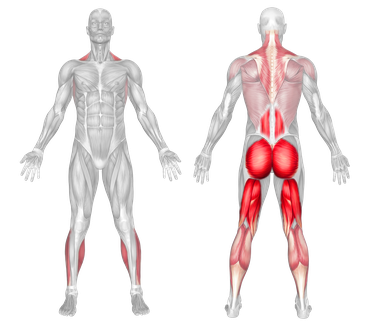
Improves Hamstring Flexibility: Regular practice helps lengthen the hamstrings, supporting better squatting, hinging, and running mechanics.
Enhances Spinal Mobility: Encourages gentle spinal flexion and decompression, promoting healthier movement patterns.
Reduces Muscle Tension: Helps release tightness in the lower back, hips, and posterior chain after training or prolonged sitting.
Supports Postural Awareness: Improves awareness of hip hinge mechanics, which carry over to deadlifts and squats.
Promotes Relaxation and Recovery: Slow breathing in the stretch can reduce nervous system stress and aid recovery.
Accessible for All Fitness Levels: Easily modified through knee bend or range of motion adjustments.
How to Incorporate the Forward Bend Into Your Routine
The Forward Bend can be adapted for flexibility, recovery, and movement preparation across many training styles.
For Beginners: Hold for 20 to 30 seconds with bent knees, focusing on breathing and relaxation.
For Functional Training: Include as part of a mobility flow emphasizing hip hinge mechanics.
For Circuit Training: Use short holds between rounds to reset breathing and posture.
For General Fitness: Practice daily for 1 to 2 sets of 30 to 45 seconds to support movement quality.
For Mobility and Recovery: Hold longer durations of 45 to 60 seconds during cooldowns or rest days.
Forward Bend Muscles Worked
Frequently Asked Questions
Should my legs be straight during the Forward Bend?
Slight knee bend is recommended, especially if hamstring flexibility is limited.
Is it normal to feel tension in the lower back?
Mild stretching sensation is normal, but sharp pain indicates excessive rounding or depth.
Can the Forward Bend help with lower back stiffness?
Yes, when performed gently, it can reduce tension and promote spinal relaxation.
How long should I hold the Forward Bend?
Most people benefit from 20 to 60 seconds depending on flexibility and comfort.
Should I perform this stretch before or after workouts?
It works best after training or as part of a cooldown. Dynamic versions can be used in warm-ups.
Is the Forward Bend safe for everyone?
Most individuals can perform it safely, but those with disc issues should limit spinal flexion and consult a professional.
Overview
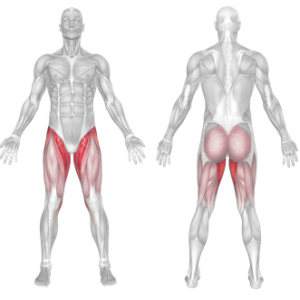
Leg swings (front to back) are dynamic stretching drills that involve swinging one leg forward and backward in a controlled manner while standing on the opposite leg. Often used before athletic activity or strength training, this movement targets the hip flexors, hamstrings, and glutes, and supports better hip extension and mobility.
How to perform Leg Swings Front to Back
Stand tall next to a wall or sturdy object for balance support.
Shift your weight to one leg and lift the opposite leg slightly off the ground.
Swing the lifted leg forward, keeping the knee straight or slightly bent.
Allow the leg to swing backward, creating a smooth front-to-back arc.
Perform 10–15 swings per leg, increasing the range of motion gradually with each rep.
Switch sides and repeat with the opposite leg.
Tips for Proper Form
Keep your torso upright and core engaged throughout the movement.
Start with a small range and increase it as your body warms up.
Avoid jerky or uncontrolled swings; keep the motion fluid.
Maintain balance on the standing leg, using support only if necessary.
Breathe steadily to stay relaxed and focused on the motion.
Common Mistakes
Overarching the lower back, which can strain the spine.
Swinging too forcefully, which may lead to poor control or injury.
Turning the hips outward, reducing the effectiveness of the stretch.
Leaning too far forward or back, throwing off body alignment.
Using momentum, rather than muscle control, to move the leg.
Benefits of the Leg Swings Front to Back
Increases Hip Mobility: Loosens tight hip flexors and extensors to allow better movement mechanics.
Improves Dynamic Flexibility: Prepares the hamstrings and glutes for more intense activity with active motion.
Activates Key Lower Body Muscles: Engages the glutes, hamstrings, and hip flexors without high effort.
Enhances Athletic Performance: Supports running, jumping, and lifting by improving leg drive and stride length.
Reduces Injury Risk: Warms up the joints and muscles to reduce strain during training or sport.
Fast and Efficient: Requires no equipment and takes less than a minute per side.
Suitable for All Fitness Levels: Easily adjustable for beginners or advanced athletes depending on swing height.
How to Incorporate Into Your Routine
- For Warm-Ups: Perform 1–2 sets of 10–15 swings per leg before running, squats, or any leg-focused workout.
- For Functional Training: Include in mobility flows or movement prep before agility or plyometric drills.
- For Circuit Training: Use between high-effort sets as an active recovery to maintain hip mobility.
- For General Fitness: Add to a dynamic warm-up routine for better movement readiness.
- For Rehab or Injury Prevention: Begin with smaller swings under control to restore range of motion safely.
- For Sports Performance: Use as part of sprint or agility warm-ups to open the hips and improve stride mechanics.
Muscles Worked
Frequently Asked Questions
Should I do leg swings before or after workouts?
They’re most effective before workouts as part of a dynamic warm-up to prepare your hips and legs.
How high should I swing my leg?
High enough to feel a stretch without losing control—range can increase as you warm up.
Can I do them daily?
Yes. They are low-impact and can be done daily to improve or maintain mobility.
Is support required?
Not always, but beginners should use a wall or rail to maintain balance and proper form.
Do leg swings help with tight hips?
Yes. They help loosen up hip flexors and extensors and improve movement quality.
Overview
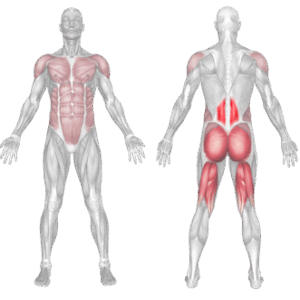
The PVC hip hinge is a form and mobility exercise that helps individuals understand the correct way to hinge at the hips while keeping the spine neutral. It involves holding a PVC pipe along the spine to give tactile feedback and ensure the head, upper back, and tailbone remain in alignment throughout the movement. This drill is essential for mastering movements like deadlifts, RDLs, and kettlebell swings, and helps prevent injury by improving awareness of posture and control.
How to Perform PVC Hip Hinge
Stand with feet hip-width apart, knees slightly bent.
Hold a PVC pipe vertically along your spine, using one hand behind your neck and the other behind your lower back.
Ensure three contact points: the back of the head, between the shoulder blades, and the tailbone.
Begin the hinge by pushing your hips back, keeping your spine straight and the PVC in contact with all three points.
Lower your torso until you feel a stretch in your hamstrings, then return to the starting position by driving your hips forward.
Tips for Proper Form
Maintain all three contact points on the PVC throughout the movement.
Bend only at the hips, not at the waist or spine.
Keep your chest up and shoulders back as you hinge.
Shift your weight into your heels, not your toes.
Move slowly and with control to reinforce proper technique.
Common Mistakes
Losing contact with the PVC at the lower back or head.
Bending the spine, rather than hinging at the hips.
Allowing the knees to bend excessively, turning the hinge into a squat.
Pushing the hips downward instead of backward.
Rushing the movement, which reduces the effectiveness of the drill.
Benefits of the PVC Hip Hinge
Teaches Proper Lifting Mechanics: Helps build the foundation for exercises like deadlifts, good mornings, and kettlebell swings.
Improves Postural Awareness: Reinforces spinal alignment and body control using tactile feedback.
Enhances Hip Mobility: Encourages movement through the hips while maintaining a neutral spine.
Reduces Injury Risk: Trains safe movement patterns that protect the lower back during loaded exercises.
Activates the Posterior Chain: Engages the glutes and hamstrings, preparing them for strength training.
Perfect for All Levels: Suitable for beginners, rehab clients, or advanced athletes refining technique.
Effective in Warm-Ups and Drills: Ideal before training sessions to reinforce movement patterns and prep the hips.
How to Incorporate Into Your Routine
- For Beginners: Perform 2–3 sets of 8–10 slow, controlled reps before strength training.
- For Technique Practice: Use between sets of deadlifts or RDLs to reinforce hinge form.
- For Strength Training Prep: Add to your warm-up to activate the posterior chain and improve alignment.
- For General Fitness: Include 2–3 times per week to improve hip movement awareness.
- For Rehab or Posture Work: Use light resistance or bodyweight-only for corrective exercise routines.
PVC Hip Hinge: Muscles Worked
Frequently Asked Questions
Why use a PVC pipe for the hinge?
It provides feedback for correct spine alignment and helps identify breakdowns in form.
Is this exercise good for beginners?
Yes. It’s one of the best drills for teaching proper movement mechanics from the start.
Can I use a broomstick instead?
Absolutely. Any straight, light dowel can serve the same purpose.
How do I know if I’m doing it right?
Maintain contact at your head, back, and tailbone with the pipe. If one lifts off, adjust your hinge.
Should I feel it in my back?
No. You should feel a stretch in the hamstrings and engagement in the glutes, not strain in the spine.
Overview
Wrist rotations are a circular movement of the wrist joint, usually performed without resistance. It’s a simple, low-impact mobility exercise used to maintain or improve the range of motion in the wrist joint. It is commonly included in warm-ups for weight training, calisthenics routines, or rehabilitation protocols to prevent overuse injuries and support healthy movement patterns.
How to Perform Wrist Rotations
Stand or sit upright, keeping your shoulders relaxed.
Extend both arms forward, elbows slightly bent or locked depending on your preference.
Make loose fists or open palms, then rotate your wrists in slow, controlled circles.
Perform 10–15 rotations clockwise, then reverse the direction for 10–15 counterclockwise reps.
Breathe naturally and avoid moving your elbows or shoulders during the motion.
Tips for Proper Form
Move only the wrists, not the forearms or shoulders.
Keep the motion smooth, avoiding jerky or rushed circles.
Focus on full circular range, not just flicking back and forth.
Relax your fingers to avoid unnecessary tension.
Include in warm-ups before strength or hand-based exercises.
Common Mistakes
Moving the elbows or arms, instead of isolating the wrists.
Rotating too fast, which reduces the effectiveness of joint priming.
Forgetting both directions, limiting mobility and muscle balance.
Tensing the forearms, creating fatigue or discomfort.
Neglecting to include in warm-ups, especially before wrist-loading exercises.
Benefits of the Wrist Rotations
Increases Joint Mobility: Promotes better range of motion in the wrist, preparing it for movement and load.
Reduces Risk of Injury: Prepares connective tissues and muscles for training or repetitive activity.
Improves Blood Flow: Enhances circulation in the hands and wrists, especially during long periods of inactivity.
Aids in Rehabilitation: Supports joint recovery and flexibility following sprains or strain-related injuries.
Improves Movement Efficiency: Helps in exercises requiring wrist extension or flexion like push-ups or front squats.
Supports Daily Activity: Beneficial for artists, writers, lifters, and anyone who uses their hands repetitively.
Prepares for Strength Training: Ideal for warming up before exercises like cleans, handstands, or overhead pressing.
How to Incorporate Into Your Routine
- For Warm-Ups: Perform 2 sets of 10–15 reps in each direction before upper body or full-body training.
- For Mobility Training: Include wrist circles in a joint-specific mobility session 2–3 times per week.
- For Rehabilitation: Use gentle, low-volume reps as prescribed by a physiotherapist.
- For Functional Training: Pair with grip work or hand-balancing drills for wrist prep.
- For Desk Workers: Perform 2–3 times daily to combat wrist stiffness and improve circulation.
- For General Fitness: Incorporate during dynamic warm-ups or cooldowns to promote long-term joint health.
Muscles Worked
Frequently Asked Questions
Are wrist rotations good before lifting?
Yes. They improve mobility and prepare the joint for weight-bearing movements.
How often should I do wrist rotations?
Daily is ideal, especially if you train frequently or work at a computer.
Can wrist rotations prevent carpal tunnel?
They may help reduce tension and improve circulation, but they don’t replace medical treatment.
Should I use weights or bands?
No. This is a bodyweight mobility drill. Keep the movement unloaded and controlled.
Is it normal to feel clicking?
Mild clicking can be normal if it’s painless. Stop if you feel discomfort or instability.
Overview
Standing leg circles are a simple yet effective lower body exercise that helps improve leg strength, hip mobility, flexibility, and balance. It involves standing on one leg while making circular motions with the other leg.
The leg circles involve dynamic stretching, which means that you’re not only elongating the muscles but also working on their functional capacity. This exercise is often used in various fitness routines such as yoga and pilates, as well as in pre-workout warm-up routines.
How to perform Standing Leg Circles
Stand tall with your feet shoulder-width apart and your hands on your hips or extended out for balance.
Shift your weight to one leg and lift the opposite foot slightly off the floor.
Draw small circles in the air with the lifted leg, moving it forward, outward, then backward in a slow, controlled motion.
Perform 8 to 10 circles in one direction, then reverse the direction.
Switch legs and repeat.
Tips for Proper Form
Keep your upper body upright and avoid leaning.
Engage your core to stay balanced and stable.
Use slow, controlled movement rather than momentum.
Start with small circles and gradually increase range.
Use a wall or chair for support if needed, especially for beginners.
Common Mistakes
Swinging the leg instead of controlling the motion.
Leaning excessively to one side, reducing balance benefits.
Rushing the movement, which reduces muscle engagement.
Forgetting to reverse direction, leading to imbalanced development.
Not keeping the standing leg engaged, missing out on stability training.
Benefits of the Standing Leg Circles
Improves hip mobility: The circular motion increases range of motion around the hip joint and reduces stiffness.
Strengthens stabilizer muscles: The standing leg works to keep you balanced, strengthening glutes, calves, and ankle stabilizers.
- Inner Thigh Activation: The inner thigh muscles (adductors) are involved in controlling the leg’s movement during the circles. Strengthening these muscles can improve your leg stability and control.
Enhances neuromuscular coordination: This movement builds body awareness and balance, key for athletic and daily movement.
Great for warm-ups and mobility: It preps the joints and muscles for more intense exercise or helps maintain mobility on recovery days.
Low-impact and joint-friendly: Ideal for those with limited mobility or recovering from injury, offering strength without strain.
Supports better posture: Engaging the core and glutes during the movement reinforces upright posture and spinal alignment.
Improves functional movement: Helps with daily actions like stepping, rotating, and shifting weight efficiently.
How to Incorporate Into Your Routine
- For Beginners: Perform 2 to 3 sets of 6 to 8 circles in each direction per leg.
- For Strength: Add ankle weights for 2 to 3 sets of 8 to 10 reps per direction with slower tempo.
- For Functional Training: Include in movement prep or as part of multi-directional drills.
- For Circuit Training: Use as a low-impact active recovery exercise between strength sets.
- For General Fitness: Add to your daily mobility or morning movement routine to maintain joint health.
- For Balance and Rehab: Use near a wall or with support to retrain single-leg control and stability.
Muscles Worked
The specific muscles worked during leg circles can vary depending on the direction of the circles (clockwise or counterclockwise) and the leg being moved. Here are the key muscle groups that are typically involved:
Frequently Asked Questions
Is this a good warm-up exercise?
Yes, it helps activate the hips and core while improving blood flow and joint readiness.
Can I do this every day?
Absolutely. It’s low-impact and suitable for daily mobility work.
What if I have poor balance?
Use a chair or wall for support. Balance improves over time with consistent practice.
Does it help with tight hips?
Yes, especially when combined with other dynamic and static hip mobility exercises.
Warrior 1 Pose / Virabhadrasana I
Warrior 1 Pose, also known as Virabhadrasana I, is a standing yoga pose that strengthens the legs, stretches the hips and thighs, and improves overall balance and stability.
How to do:
- Start by standing on your mat with your feet hip-width apart and your arms at your sides.
- Rotate your torso to the right, bringing your right foot to face forward while keeping your left foot at a 45-degree angle.
- Bend your right knee so that it’s directly above your ankle. Make sure your knee is not going past your ankle and that your shin is perpendicular to the floor.
- Engage your core muscles, drawing your belly button towards your spine and keeping your spine lengthened.
- Reach your arms up towards the ceiling, palms facing each other or touching.
- Keep your shoulders relaxed and away from your ears.
- Gaze up towards your hands or towards the horizon.
- Hold the pose for several deep breaths, then repeat on the other side.
Warrior 1 Pose: Benefits
Warrior 1 Pose, also known as Virabhadrasana I, is a powerful yoga pose that offers numerous physical, mental, and emotional benefits. Here are some of the benefits of practicing Warrior 1 Pose regularly:
Physical Benefits:
- Builds strength: Warrior 1 Pose is a great way to build strength in your legs, hips, and core muscles. Holding the pose for several breaths can help to tone and strengthen these muscles.
- Improves flexibility: Practicing Warrior 1 Pose regularly can help to improve flexibility in the hips, shoulders, and spine. It can also help to stretch the quadriceps and hamstrings.
- Improves balance: Warrior 1 Pose requires a certain degree of balance, which can help to improve overall balance and coordination.
- Stimulates the digestive system: The twisting motion in Warrior 1 Pose can help to stimulate the digestive system, aiding in digestion and elimination.
Mental and Emotional Benefits:
- Builds confidence: The strong, grounded stance of Warrior 1 Pose can help to cultivate a sense of confidence and inner strength.
- Reduces stress and anxiety: Practicing Warrior 1 Pose can help to calm the mind and reduce stress and anxiety. Focusing on the breath and the present moment can help to alleviate mental tension.
- Increases focus and concentration: Holding the pose requires focus and concentration, which can help to improve overall mental clarity and focus.
- Increases energy: The deep breathing and strong stance of Warrior 1 Pose can help to increase energy levels and leave you feeling revitalized.
Incorporating Warrior 1 Pose into your regular yoga practice can offer numerous physical, mental, and emotional benefits. Whether you’re a beginner or an experienced yogi, give Warrior 1 Pose a try and experience its powerful effects for yourself.
How to: Warrior 2 Pose
How to: Warrior 3 Pose

How to: Humble Warrior Pose